About the Tabs
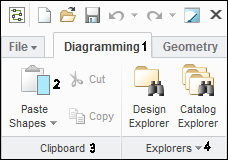
The ribbon contains commands organized in sets of tabs. Related buttons are grouped on each tab. You can customize the ribbon by adding tabs and custom buttons. You can customize the tabs by removing, moving, and adding groups of commands. The following figure shows a tab.
1. Tab
2. Button
3. Group
4. Group overflow button
There are 9 design tool tabs and 2 catalog tabs. Use the commands in each tab to create, add, and edit design elements.
• Diagramming—Use these commands to instance and modify design objects and labels.
• Geometry—Use these commands to create and edit geometry.
• —Use these commands to create and edit text.
• Properties—Use these commands to edit graphic properties.
• Data—Use these commands to report on or apply information to objects.
• Tools—Use these commands to aid you in the work environment.
• View—Use these commands to navigate to and view design objects, set grid properties.
• Design—Use these commands to set your work environment.
• Get Started—Use these commands to learn how to use the application.
• Catalog—Use this tab to create and edit catalog items. This tab is only available when you create or edit a catalog item.
• Decoration—Use this tab to create and edit user defined cable decorations. This tab is only available when you create or edit a custom cable decoration.
• Windchill—Use this tab to set the connection status with Windchill, open the Windchill Workgroup Manager for Creo Schematics, and check designs in or out. This tab is only available when the Windchill Workgroup Manager for Creo Schematics application is installed and running on the local client machine where Creo Schematics is installed.
Keep the following guidelines in mind when using the design tool buttons:
• When you click the arrow next to a name, a list of commands appears.
• The name of the tool button describes the commands included in the list.
• The first time you use a tool, the active command is the first command in the list.
• The icon may change to indicate which command is active.
• When you click the arrow and select a command, a checkmark may appear to its left.
• The active tool icon appears in the bottom right corner of the main window.
• You can customize the tabs to suit your design needs as you work.