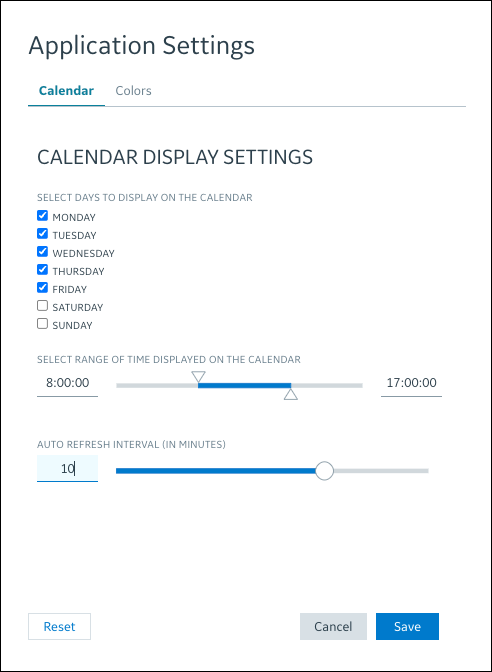
Configuring Visible Days and Times
Service Board ships with the Calendar configured to display 24-hour days and 7-day weeks by default. Your system administrator can configure the Calendar to hide specific days and time ranges as your organizational needs dictate, and you can override these settings to personalize the days and hours that appear on your Calendar.
When you hide days and hours from the Calendar, double forward slashes followed by an hour value ( ) appear in the header bar section next to the start and end times of each day to indicate hidden time intervals. Appointment blocks with start and end times that fall within invisible time ranges appear with serrated borders on their affected edges.
 ) appear in the header bar section next to the start and end times of each day to indicate hidden time intervals. Appointment blocks with start and end times that fall within invisible time ranges appear with serrated borders on their affected edges.
After you configure the days you want to show, your currently selected date is automatically reset to the nearest visible day that falls within your currently selected Preset Date Range, and you can use infinite scrolling to view the next group of visible days that fall into the same date range. If you also customize the visible times shown on your Calendar in the Calendar tab of the Application Settings dialog box, the number of Calendar time-interval columns per day are adjusted to show your complete customized time range for each day.
• Time range display personalization is not supported for date ranges longer than six weeks in the Scheduler Calendar, and longer than four weeks in the Crew Calendar and Project Gantt. • You cannot view or schedule Jobs and Events that fall within hidden time ranges, but you can edit existing Appointment start and end times to fall within hidden hours and days. |
To configure visible days and times:
1. In Service Board, on the Navigation Bar, click Application Settings ( ), and then on the Application Settings page, on the Calendar tab, under Select Days to Display on the Calendar, select or clear the check boxes for the days you want to show or hide.

2. Under Select Range of Time Displayed on the Calendar, use the slider and text entry boxes to set the time range you want to configure, and then click Save to instantly apply your settings.
To return to the default application settings for your organization, you can click Reset. Be sure to click Save if you want to restore these settings for your Calendar view. |
For more information: