Configuring Support for the Number of Times Scheduled Field
To provide insight into the number of times Appointments and their related Work Orders have been rescheduled, you can configure support for the Number of Times Scheduled field in the Job object. By default, this field does not appear anywhere in the Service Board or Max Designer, or Max Admin UIs. After real-time sync is configured, you must therefore add the field to Job Cards and the Edit Job dialog box and to Job list views and records to make it visible. You can also add a report to the Admin Dashboard so that you can monitor Jobs that have been rescheduled many times.
The Number of Times Scheduled field is updated as follows:
• The value is incremented by 1 each time Appointments are created, rescheduled, or reassigned in Service Board.
• Multiple updates can occur in the following cases:
◦ Appointments are rescheduled or reassigned in the Scheduler Calendar.
◦ Appointments are created, rescheduled, or reassigned in the Multi-Resource Assignment Calendar, Project Tab, Planning Mode, or Schedule Proposals mode.
◦ Multiple Appointments are automatically created for long-duration Jobs.
◦ Appointments are created or rescheduled by custom event handlers.
• Updates are skipped in the following cases:
◦ The SUPPRESS_JOB_SCHEDULED_NUM_UPDATE context parameter is present.
◦ Appointments whose travel times were automatically adjusted after drag-and-drop rescheduling.
◦ Appointments are created or rescheduled from Crew Resource Appointments or during data sync from Salesforce.
To configure support for the Number of Times Scheduled field:
1. Add the field to Job Cards and Job list views in Max Designer, and then add the field to the Edit Job dialog box Form record.
2. To add a report to the Admin Dashboard, in Max Designer, click Developer Tools ( ) > , and then in the left pane, search for and select the Job object.
) > , and then in the left pane, search for and select the Job object.3. In the left pane, click Records, and then in the list view, at the top center, on the View Selector menu, click Create New View.
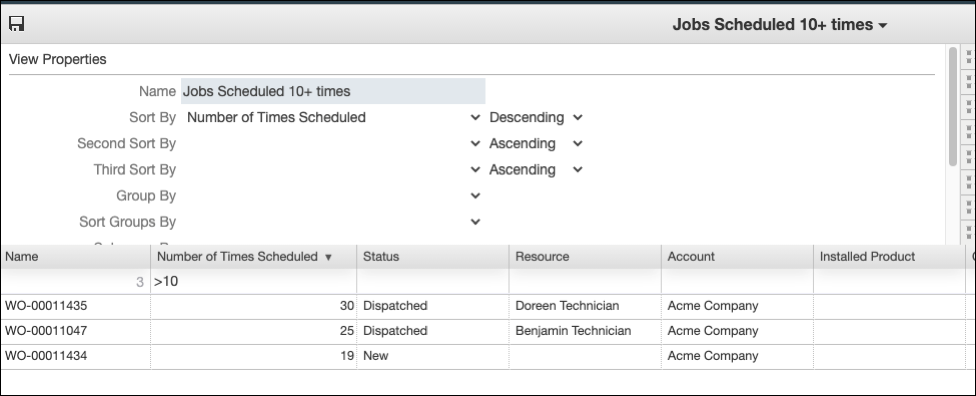
4. In the top pane, in the Name field, enter the name you want to use for the view, for example, Jobs Scheduled 10+ Times, and then in the Sort By field, click Number of Times Scheduled.
5. In the top right area of the upper pane, click the field and drag it into the form layout, and then in the filtering box, add a condition, for example, >10 and save and close the record.
6. In Object Designer, in the left pane, search for and click Dashboard, and then in the list view, open the Dashboard to which you want to add this report, for example, Admin Overview.
7. On the record page, in the top right corner, on the Options menu, click Dashboard Designer, and then create and add a new View Dashlet for the report.