Configuring Creo+
|
|
For the Creo+ August 2024 release and later, configurations are no longer accessed from the config.sup, config.pro, or customizations.ui files that are stored locally or at a shared location. All configurations are now stored and retrieved from the Creo+ Portal instead. To continue using existing configurations, Administrators must migrate all existing configurations to the Creo+ Portal as part of a profile.
To migrate existing config.pro, config.sup customizations.ui and mapkey.pro files, see the topic Migrating Creo Configurations.
|
Configuration Profiles
Configuration option settings, UI customizations, and mapkeys are collectively grouped as configuration “profiles” and stored and retrieved from the Creo+ Portal. Adding, deleting, or changing configurations is done using the Creo+ Options dialog box in a Creo+ session.
The following types of configuration profiles are available :
• Standard Creo+ configuration—The Standard Creo+ configuration is a default profile with default configuration settings (PTC OOTB settings). This configuration is retrieved first. Configurations for this profile cannot be modified and saved, but can be viewed in the Configuration Editor or exported to a file. Administrators can compare their configuration settings with Standard Creo+ settings. This is useful in cases where Administrators want to confirm if a problem is because of some customized setting, or if the problem also exists with the standard OOTB settings.
• Organization configuration—The Administrator sets this configuration as a global setting when the organization is created. The organization configuration is retrieved second and is used only if there are no available profile or user configurations.
• Profile configuration—Administrators create different profiles based on different user roles, for example design profile, manufacturing profile, simulation profile etc. The Administrator adds relevant configurations that are specific to the profile. These configurations are retrieved third, and take precedence over the organization configuration. These settings are available to all members of a profile and can only be modified by an Administrator.
• User configuration(personal profile)—This is the configuration for an individual user. User configurations are retrieved last and have the highest precedence, overriding all other settings except locked settings.
This means that if the same configuration option is set at the profile level and at the user level, the setting at the user level overrides the setting at the profile level for a user, provided that the setting is not locked at the profile level.

To learn more about the different configuration and UI customizations that you can define from the Creo+ Options dialog box, see the topics in the Help Center module “Configuring Creo+”.
The following sections describe how an Administrator sets up the following configurations.
Additionally, a user can also maintain a user (profile) with their individual settings that override all other settings.
Setting up Configurations for an Organization (Administrator Workflow)
An Administrator sets up configurations for the organization. The configurations are saved to the Creo+ Portal as part of the organization profile.
Prerequisites
• You must be an Organization Administrator.
As an Administrator perform the following steps to set up the default configuration for an organization:
1. Open the PTC Control Center.
2. Select the organization profile from the Creo+ Profiles list.
3. Click > to expand the Options area and then select the Use as administrator check box.
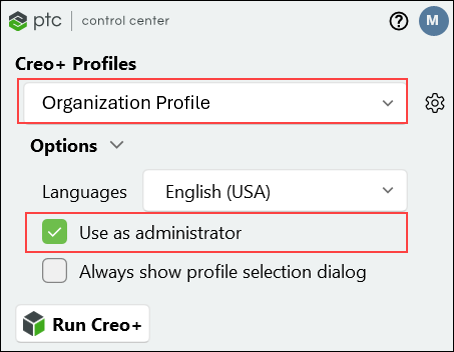
4. Click  Run Creo+ to start Creo+. A notification at the top of the screen indicates that all configuration changes will be updated and saved to the organization profile on the Creo+ Portal.
5. To import configuration options from an existing config.pro or config.sup file, click > > to open the Creo+ Options dialog box.
6. From the left pane select Configuration Editor and then click Import configuration file from the Options list on the lower right side of the dialog box. The File Open dialog box opens. Select an existing configuration options file with the .pro or .sup file extension. All valid options in the file are displayed in the Creo+ Options window.
All options in the config.sup file are displayed with a lock icon indicating they are locked at the organization level.
7. Add, modify or delete configuration options as required.
8. To lock an option, select it in the Configuration Editor, right-click and select Lock.
To unlock a previously locked configuration option, right-click and select Unlock.
9. Similarly, to import existing UI customizations, click > > to open the Manage UI Customization dialog box. Click Import and browse to select a customizations.ui file.
10. Click Save All to save all configuration option changes as well as UI customizations to the organization profile. These configurations are available to all members of an organization in their next Creo+ session.
11. To import existing mapkeys, click > > to open the Mapkeys dialog box.
12. Click > and then select an existing mapkey.pro file to import a set of mapkeys.
Alternatively, create new mapkeys for the organization.
13. Click Save to save the mapkeys to the organization profile.
Setting up Configurations for a Profile (Administrator Workflow)
Before adding users to profiles an Administrator must first set up configurations for a profile. Every user added to the profile has the same set of configurations. The configurations are saved to the Creo+ Portal.
Prerequisites
• You must be an Administrator.
• You must have the PTC Control Center and Creo+ installed on your computer and have a valid license to run assigned to you.
Start Creo+ as an Administrator to set up configurations for a profile and perform the following steps:
1. Open the PTC Control Center.
2. Select the profile from the Creo+ Profiles list.
3. Click > to expand the Options area and then select the Use as administrator check box.
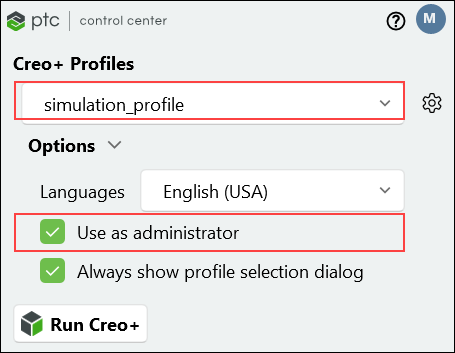
4. Click Run Creo+ to start Creo+. A notification at the top of the screen indicates that all configuration changes for the profile are updated and saved to the Creo+ Portal.
5. To import configuration options from an existing config.pro or config.sup file, click > > to open the Creo+ Options dialog box.
6. From the left pane select Configuration Editor and then click Import configuration file from the Options list on the lower right side of the dialog box. The File Open dialog box opens. Browse to select an existing configuration options file with the .pro or .sup file extension. All valid options in the file are displayed in the Creo+ Options window.
All options in the config.sup file are displayed with a lock icon indicating they are locked at the profile level.
7. Add, modify or delete configuration options as required.
8. To lock an option, select it in the Configuration Editor, right-click and select Lock.
To unlock a previously locked configuration option, right-click and select Unlock.
Configuration options that are locked at the profile level cannot be modified or overridden by a user. |
9. Similarly, to import existing UI customizations, click > > to open the Manage UI Customization dialog box. Click Import and browse to select a customizations.ui file.
10. Click Save All to save all configuration option changes as well as UI customizations to the profile. These configurations are available to all members of a profile in their next Creo+ session.
11. To import existing mapkeys, click > > to open the Mapkeys dialog box.
12. Click > and then select an existing mapkey.pro file to import a set of mapkeys.
Define new mapkeys as required.
13. Click Save to save the mapkeys to the profile.
Setting up Configurations for a User
In addition to the organization and profile level configurations that are available to all users, users can also add, modify or change configurations by saving configurations to their individual user profile (personal profile).
Note that only Administrators can view or delete a user’s configurations from the Creo+ Portal. Users can only view and modify their configurations from the Configuration Editor on the Creo+ Options dialog box. |