Migrating Creo+ Configurations
|
|
For the Creo+ August 2024 release and later, configurations can only be stored and retrieved from the Creo+ Portal. You can still export configurations for a session to a config.pro, customization.ui, or mapkey.pro file and store them locally on your computer, but all configurations (configuration options, UI customizations and mapkeys) can only be stored and retrieved from the Creo+ Portal as a part of a profile.
|
Migrating Configurations to the Creo+ Portal
Administrators must migrate all existing organization and profile configurations to the Creo+ Portal from a Creo+ session. Users can also migrate their saved configurations to the Creo+ Portal from a Creo+ session.
Migrating Configurations for an Organization (Administrator Workflow)
Perform the following steps to migrate existing legacy configurations from local or shared files to the organization profile on the Creo+ Portal:
1. Install Creo+ on a computer and log in to the PTC Control Center.
2. Open the PTC Control Center.
3. Select the organization profile from the Creo+ Profiles list.
4. Click > to expand the Options area and then select the Use as administrator check box.
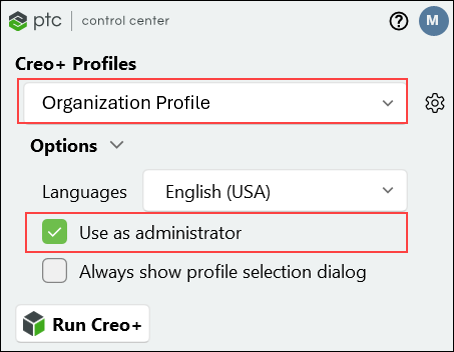
5. Click  Run Creo+ to start Creo+ as an Administrator. A notification at the top of the screen indicates that all configuration changes are updated and saved to the organization profile on the Creo+ Portal.
A banner similar to the one shown below displays at the top of the screen:

This banner is displayed only if there are no configurations at the organization level on the Creo+ Portal. |
6. From the banner, click the Import Configurations button.
7. The Import Configuration files dialog box opens.
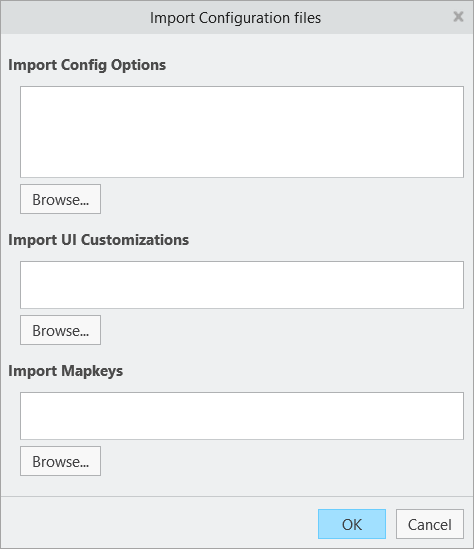
8. Select the following local files:
◦ Import Config Options—Select an existing config.pro file for all organization level settings. Select a config.sup file for all existing locked options for the organization.
◦ Import UI Customizations—Select an existing <customizations>.ui file for all organization level user interface customizations.
◦ Import Mapkeys—Select an existing mapkey.pro file to migrate an existing set of mapkeys for the organization.
You can import mapkeys only if they were created in Creo 11.0 or later. |
9. Click OK to save the configurations to the Creo+ Portal.
10. To confirm that the settings are saved to the organization profile on the Creo+ Portal do the following:
b. Click View on the Global Setup box.
c. On the Global Creo+ Settings page, select the Creo+ Configuration tab.
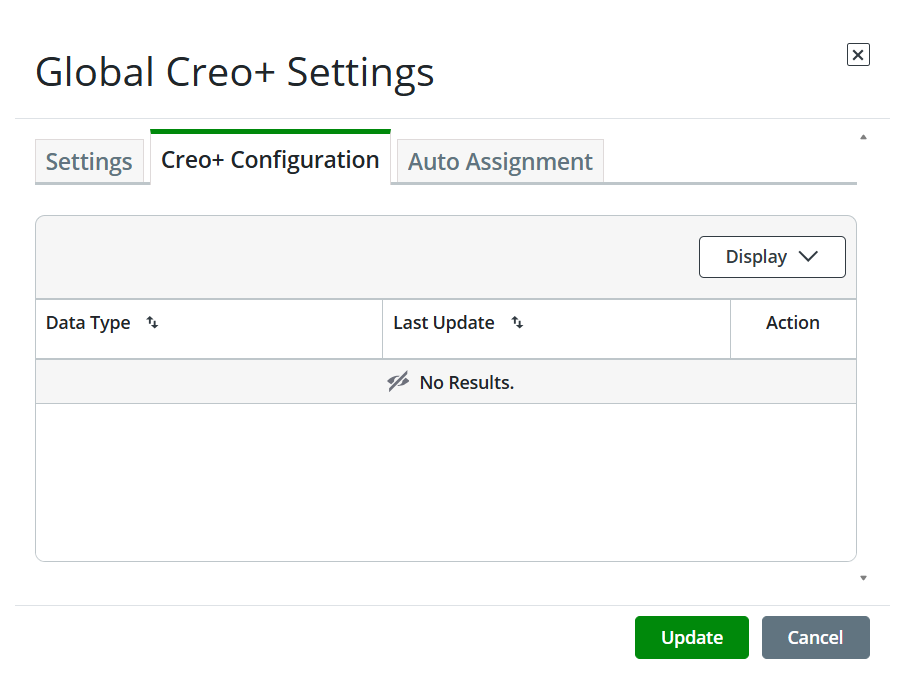
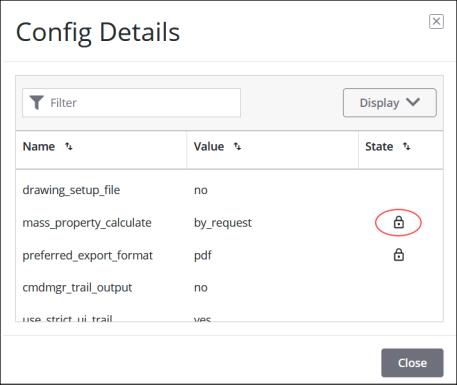
You can view when the UI customizations and mapkeys were created or updated and you can also delete the mapkeys or UI customizations for the organization. You can view all configuration options available for the organization profile. All options that are migrated from config.sup files are displayed with a lock icon, indicating that they are locked at the organization level.
Importing Configurations for a Profile (Administrator Workflow)
Perform the following steps to migrate existing legacy configurations from local or shared files to a profile on the Creo+ Portal:
1. Install Creo+ on a computer and log in to the PTC Control Center.
2. Open the PTC Control Center.
3. Select the profile from the Creo+ Profiles list.
4. Click > to expand the Options area and then select the Use as administrator check box.
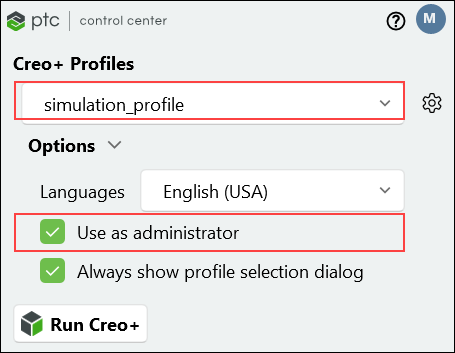
5. Click Run Creo+ to start Creo+ as an Administrator. A notification at the top of the screen indicates that all configuration changes are updated and saved to the current profile on the Creo+ Portal.
A banner similar to the one shown below displays at the top of the screen:

This banner is displayed only if there are no configurations for the profile on the Creo+ Portal. |
6. From the banner, click the Import Configurations button.
7. The Import Configuration files dialog box opens.
8. Select the following local files:
◦ Import Config Options—Select an existing config.pro file for all profile level settings. Select a config.sup file for all existing locked options for the profile.
◦ Import UI Customizations—Select an existing <customizations>.ui file for all profile level user interface customizations.
◦ Import Mapkeys—Select an existing mapkey.pro file to migrate an existing set of mapkeys for the profile.
This option will only work if the mapkeys were created in Creo 11.0 or later. |
9. Click OK to save the configurations to the Creo+ Portal.
10. To confirm that the settings are saved to the profile on the Creo+ Portal do the following:
b. Open the Profiles page and select the profile for which you want to view the configuration.
c. Open the Creo+ Configuration tab for the profile.
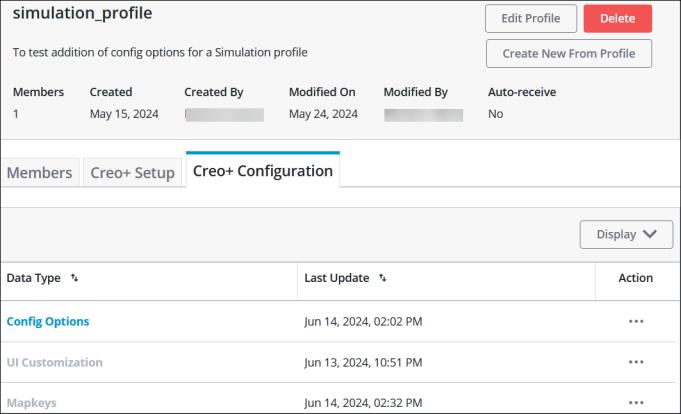
You can view when the UI customizations and mapkeys were created or updated, and you can also delete the mapkeys or UI customizations for the profile. You can view all configuration options available for the profile. All options that are migrated from config.sup files are displayed with a lock icon, indicating that they are locked at the profile level.

Migrating Configurations for a User
To migrate your user configurations (personal profile) to the Creo+ Portal perform the following steps:
1. Click Run Creo+ to start Creo+. A notification at the top of the screen indicates that all configuration changes are updated and saved to the individual profile on the Creo+ Portal.
A banner similar to the one shown below displays at the top of the screen:

The banner appears only if there are no configurations on the Creo+ Portal and there are configuration, customization, or mapkey files found at specific locations on your computer. You can use the Import command on the Creo+ Options dialog box if you don’t see the Import Configurations banner at the top of the screen. |
2. From the banner, click the Import Configurations button.
3. The Import Configuration files dialog box opens.

Creo+ will auto-detect and populate the dialog box with any customization.ui, or config.pro files that it finds in the user’s HOME directory, or with customization.ui or mapkey files that are in a customization folder on the user’s computer. Customization folders are typically located in—<Users>\AppData\Roaming\PTC\ProENGINEER\Wildfire\.wf\.Settings
4. If no local configuration files are found on your computer, browse and select the following local files:
◦ Import Config Options—Select a config.pro file for any individual settings that you have saved locally.
◦ Import UI Customizations—Select a <customizations>.ui file for the user-level user interface customizations.
◦ Import Mapkeys—Select a mapkey.pro file to migrate any existing individual sets of mapkeys that you have saved locally.
This option will only work if the mapkeys were created in Creo 11.0 or later. |
5. Click OK to save the configuration to the Creo+ Portal.