About Creo+ Configuration
An Administrator can customize the look and feel of Creo+ and the way in which it runs, by setting configurations at the organization or profile level.
Individual users can modify configuration options at the personal profile level.
Configuration Profiles
Configuration option settings, UI customizations, and mapkeys are collectively grouped as configuration “profiles” and stored and retrieved from the Creo+ Portal. Adding, deleting, or changing configurations is done using the Creo+ Options dialog box in a Creo+ session.
The following types of configuration profiles are available :
• Standard Creo+ configuration—The Standard Creo+ configuration is a default profile with default configuration settings (PTC OOTB settings). This configuration is retrieved first. Configurations for this profile cannot be modified and saved, but can be viewed in the Configuration Editor or exported to a file. Administrators can compare their configuration settings with Standard Creo+ settings. This is useful in cases where Administrators want to confirm if a problem is because of some customized setting, or if the problem also exists with the standard OOTB settings.
• Organization configuration—The Administrator sets this configuration as a global setting when the organization is created. The organization configuration is retrieved second and is used only if there are no available profile or user configurations.
• Profile configuration—Administrators create different profiles based on different user roles, for example design profile, manufacturing profile, simulation profile etc. The Administrator adds relevant configurations that are specific to the profile. These configurations are retrieved third, and take precedence over the organization configuration. These settings are available to all members of a profile and can only be modified by an Administrator.
• User configuration(personal profile)—This is the configuration for an individual user. User configurations are retrieved last and have the highest precedence, overriding all other settings except locked settings.
This means that if the same configuration option is set at the profile level and at the user level, the setting at the user level overrides the setting at the profile level for a user, provided that the setting is not locked at the profile level.

Locking Configuration Options
The Administrator can lock some configuration options for an organization or for a profile. Locked options cannot be overridden at lower levels. For example, an option that is locked at the organization level cannot be modified at the profile or user level. Similarly an option that is locked at the profile level cannot be modified at the user level.
To lock an option from the Configuration Editor, select the option, right-click and select Lock. When an Administrator locks an option at the organization or profile level a lock icon is displayed next to the option in the Configuration Editor indicating that an option cannot be edited by a user.

The option is locked on the Options dialog box, Quick Access toolbar, Graphics toolbar, and anywhere on the ribbon user interface.
For example, if an Administrator sets the values of the configuration options display_axes,display_coord_sys, display_planes, and display_datum to yes and locks these options for a profile, the user cannot change these options from the Options dialog box, or from the Quick Access Toolbar.
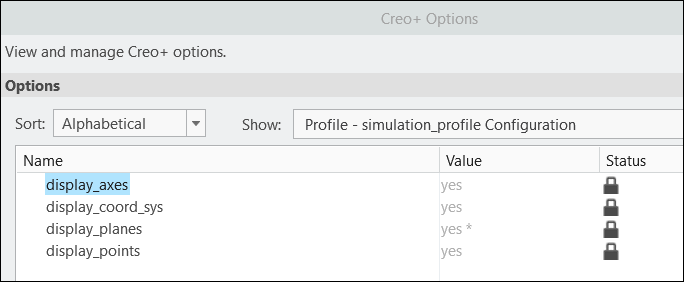
The image shows the Options dialog box with locked options for the simulation profile.
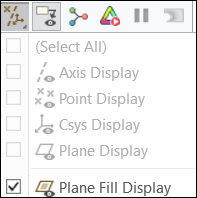
UI Options to turn off the display of axes, coordinate system, planes, or points are unavailable to the user because the corresponding configuration options are locked at the profile level.
Sharing Template Files for an Organization or Profile
To share template folders across an organization, the Administrator can set up a directory on OneDrive, or a folder on a shared network drive, to store all template files required for an organization.
Similarly, for a profile the Administrator can share a OneDrive folder with all members of the profile and specify the path to the OneDrive folder as $OneDrive\<Folder Name>. The administrator can create sub folders at this location to store profile specific custom formats and point the corresponding configuration options to them.
Folder | Corresponding Configuration Option |
|---|---|
templates | start_model_dir |
notes | pro_note_dir |
graphics_library | graphics_library_dir |
fonts | pro_font_dir |
symbols | pro_symbol_dir |
custom_hole_parameters | hole_parameter_file_path |
simulation_templates | simulation_process_template_dir, sim_pp_template_dir etc. |
Profile settings have precedence over global or organization settings. |
To enforce the use of these templates across a profile or organization Administrators can lock these options at the Organization or profile level.
Setting up a OneDrive folder
As a Creo+ Administrator perform the following steps to set up a shared OneDrive folder:
1. Create a folder with the name CreoPlus on OneDrive.
2. Share this folder with members of the organization or members of a profile as required.
Members of the organization or profile must perform the following steps:
1. Login to OneDrive from a browser.
2. Navigate to the folder named CreoPlus that the Administrator has shared with organization or profile members. Click Add shortcut to My files.
In this way all members of the organization or profile have a symbolic link to the CreoPlus shared folder which enables the file path $OneDrive/CreoPlus to work seamlessly.
For the OneDrive folder named CreoPlus the following are sample values for the configuration options that point to templates for an organization or profile:
start_model_dir $OneDrive\CreoPlus\templates
pro_note_dir $OneDrive\CreoPlus\notes
graphics_library_dir $OneDrive\CreoPlus\graphics_library
drawing_setup_file $OneDrive\CreoPlus\text\prodetail.dtl
pro_font_dir $OneDrive\CreoPlus\fonts
pro_symbol_dir $OneDrive\CreoPlus\symbols
hole_parameter_file_path $OneDrive\CreoPlus\custom_hole_parameters
simulation_process_template_dir $OneDrive\CreoPlus\simulation_templates
format_setup_file $OneDrive\CreoPlus\text\prodetail.dtl
template_designasm $OneDrive\CreoPlus\templates\inlbs_asm_design_abs.asm
template_new_ecadasm $OneDrive\CreoPlus\templates\inlbs_ecad_asm_abs.asm
template_drawing $OneDrive\CreoPlus\templates\c_drawing.drw
template_sheetmetalpart $OneDrive\CreoPlus\templates\inlbs_part_sheetmetal_abs.prt
template_solidpart $OneDrive\CreoPlus\templates\inlbs_part_solid_abs.prt
template_boardpart $OneDrive\CreoPlus\templates\inlbs_ecad_board_abs.prt
todays_date_note_format %Mmm-%dd-%yy
tolerance_standard ansi
weld_ui_standard ansi
pro_unit_length unit_inch
pro_unit_mass unit_pound
search_path_file $OneDrive\CreoPlus\ifx\parts\prolibrary\search.pro
These options can be added to a config.pro file and migrated to the Creo+ Portal.