Working with Profiles
The following sections detail the administrative tasks that you can perform from the Profiles page.
Viewing Information for a Profile
The Profiles page displays a table with the summary information for all the profiles in an organization. You can view the following detailed information for a profile:
• On the Profiles page, select a profile and right-click  and then click Show license information to view the licenses available for the profile.
• Click a profile, to view the detailed information for a profile. The following tabs are available:
◦ Members—Displays the list of members of the profile.
◦ Creo+ Setup—Displays the following information:
▪ Floating Licenses that are assigned to a profile.
▪ Default Language
◦ Creo+ Configuration—Displays the configuration options and UI customizations applicable to the profile.
Creating a New Profile
As an administrator, you can create a new profile to facilitate Creo+ configuration and allocation of floating licenses for a group of users based on their role in the organization.
1. From the Profiles page, click Create Profile. The Creo+ Profile Setup dialog box opens.
2. In the Name box, type a name for the profile.
3. Type a short description of the profile in the Description box.
4. Click  on the Add Members list to view all users for the organization.
5. Select the check box near the name of each user that you want to add to the profile.
6. Select the Auto Assign check box if you want all new users to be added as members to the profile.
7. Click Next to open the “Settings” page.
8. Click Next again if you want to retain the global configuration settings for Creo+, for the profile.
To customize the Creo+ settings for a profile, clear the Use Global Settings dialog box and specify the default language that Creo+ uses on each user’s machine.
9. Click Next to open the Floating licenses page.
10. Select one or more floating licenses to be assigned to the profile from the Available Licenses pane. Click  to assign the licenses.
If the Inherit check box is selected, you can clear it, and select Assign Licenses. To allocate a fixed number of licenses to the profile, type a number in the box.
Retain the default setting of Inherit to automatically assign licenses from the organization pool, as available.
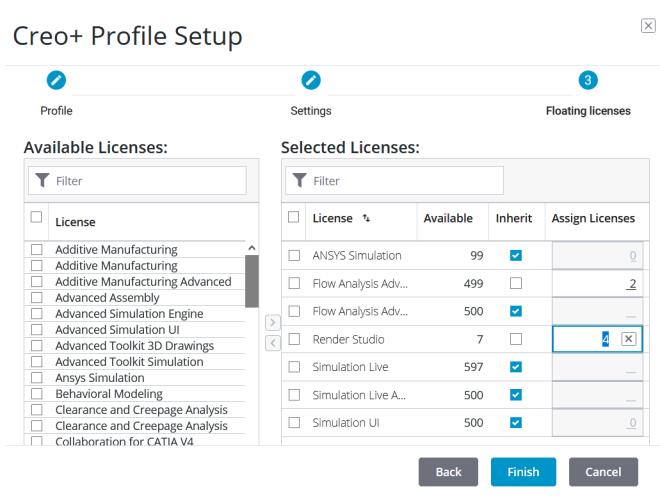
11. Click Finish to create the profile.
After creating a new profile you must add configurations and members to the profile. All licenses and configurations assigned to a profile are available to all members of the profile.
Adding and Removing Members from a Profile
As an Administrator, perform the following steps to add members to a profile:
1. From the Profiles page, click the profile to which to add members. The Members tab displays the current members of the profile.
2. Click Add Members to open the Add Members dialog box.
3. Click to view the complete list of users for the organization. Select one or more users to add to the profile. Type the name in the Filter box to easily find a user.
4. Click Add to add the users to the profile.
To remove members from a profile:
1. From the Profiles page, click the profile from which to remove members. The Members tab displays the current members of the profile.
2. Select the member you want to remove from the profile and click  to remove the member.
Creating a New Profile from an Existing Profile
1. From the Profiles page, click the profile from which you want to duplicate properties for a new profile.
2. Click Create New From Profile to open the New Profile From dialog box.
3. Specify a name for the new profile.
4. Type a short description of the profile.
5. All properties of the profile are copied to the new profile. Clear any of the following check boxes if you do not want to copy the properties to the new profile:
◦ Members
◦ Licenses
6. Click Create to create the new profile.
Editing a Profile
To edit a profile perform the following steps:
1. Select and click the name of a profile from the Profiles page. The details of the profile are displayed.
2. Click Edit Profile. The Create Profile page of the Edit Profile dialog box is displayed.
3. Follow the prompts to change different settings for a profile.
Changing the Licenses for a Profile
1. Select the profile from the Profiles page.
2. Click Edit Profile. The Create Profile page of the Edit Profile dialog box is displayed.
3. Click Next. The Edit Creo+ Settings page of the Edit Profile dialog box is displayed.
4. Click Next to open the Licenses page of the Edit Profile dialog box. Available and selected licenses for the profile are displayed.
5. Carry out any of the following actions to modify the license assignments for the profile:
◦ To add a license to the profile, select the license from the Available Licenses pane, and click to assign the license.
◦ If Assign Licenses is selected for a license, you can modify the number of licenses allocated to the profile by modifying the number specified.
If the Inherit check box is selected, you can clear it, and select Assign Licenses. To allocate a fixed number of licenses to the profile, type a number in the box.
Retain the default setting of Inherit to automatically assign licenses from the organization pool, as available.
◦ To remove a license assignment for a profile, select the license from the Selected Licenses pane, and click  .
.
6. Click Finish to save the changes for the profile.
Viewing the Configurations for a Profile
2. Open the Profiles page and select the profile for which you want to view the configuration.
3. Open the Creo+ Configuration tab for the profile.
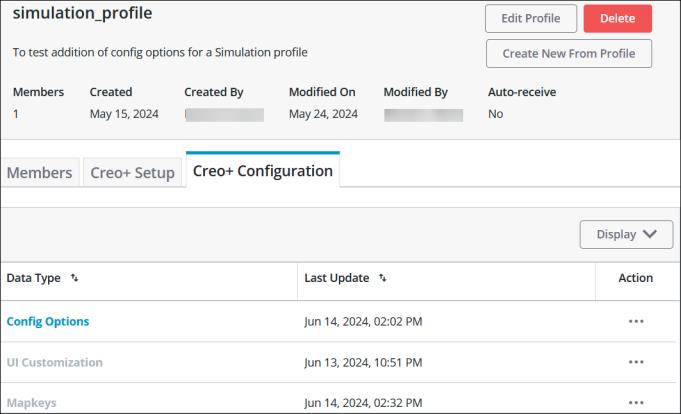
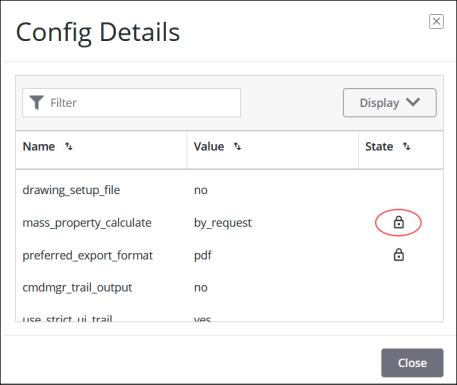
You can view when the UI customizations and mapkeys were created or updated, and you can also delete the mapkeys or UI customizations for the profile. You can view all configuration options available for the profile. All options that are migrated from config.sup files are displayed with a lock icon, indicating that they are locked at the profile level.