Business Administrative Tasks
The following administrative tasks are performed in the Windchill client:
• Site Administration and Organization Administration
• Managing Users
• Managing Products and Libraries
• Managing the Promotion Process
• Managing CAD Application
• Managing Publishing Jobs
Site Administration and Organization Administration
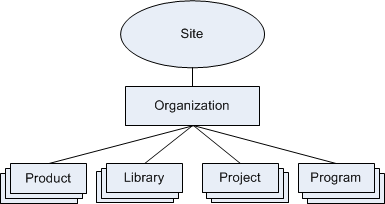
Windchill contexts provide the framework for collecting and finding related information. Windchill information is organized and managed within a context hierarchy.
For more information about the basics of contexts, see
Contexts Overview.
For detailed information about the hierarchy of contexts, see
Context Inheritance.
The organization you specified in the installation assistant is intended to represent your company and to contain and organize the data for your company employees.
Some business administrative tasks are performed at the site level, some are performed at the organization level, and some can be performed at both levels:
• Managing Users—Must be performed at the organization level.
• Managing Products and Libraries—Recommended to be performed at the organization level.
• Managing the Promotion Process—Performed at the organization levels. See applicable section below for details.
• Managing CAD Application—Performed at the site or organization level, depending on the specific task. See applicable section below for details.
• Configuring a Remote CAD Worker for Autodesk Inventor and SolidWorks—Must be performed at the site level.
Managing Users
During initial installation and configuration, the Windchill Setup Assistant includes a page to add users to Windchill. When adding users during this step of the configuration, the Windchill Setup Assistant provides five groups to which the new users are added. These groups also define profiles, roles, and shared teams. Users should be managed at the organization level so that they belong to an organization.
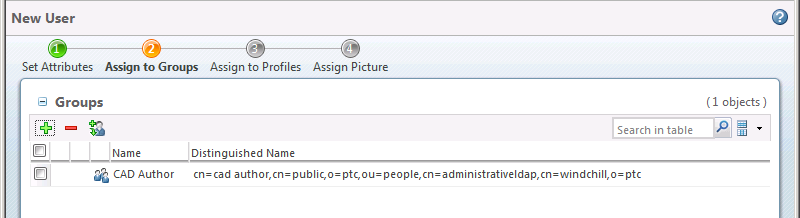
When adding new users to Windchill post-configuration, in order to ensure the proper behavior, add them to one or more of the five Windchill PDM Essentials groups during the Assign to Groups step of the New User window.
For detailed information about adding users to
Windchill and accessing the
New User window, see
Creating a New User.
Use the following procedure when assigning a new user to one or more of the out-of-the-box groups in the New User window:
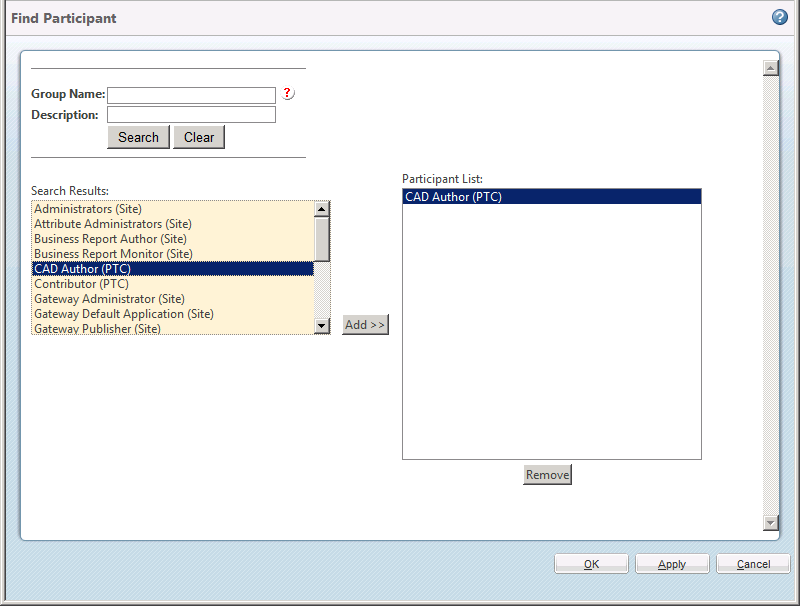
1. In the Assign to Groups step, click one of the following icons to add groups to the table:
◦ Add the group to table

icon
1. In the Find Participant window, enter values for one of the five out-of-the-box roles in the search criteria fields and click Search.
| The selection criteria fields are not case-sensitive and you can include the asterisk (*) wildcard character. You can also click Search without entering any values in the fields to display all available groups. |
For more information about the Windchill PDM Essentials out-of-the-box roles, groups, profiles, and shared teams, and how they are configured, see Participants.
Groups matching the specified criteria appear in the Search Results box.
2. Click each group that you want to assign, and then click Add to add the selected groups to the Participant List box. More than one group can be selected by using Ctrl and Shift keys.
| Although there are other standard Windchill groups available, in order to ensure the proper behavior, add users to one or more of the five Windchill PDM Essentials groups. For a description of these five roles, see Participants. |
3. Click OK to add groups to the Groups table.
2. Select Finish to add the group assignment to the database and close the New User window.
These groups automatically associate the new users with the appropriate profiles, and shared team roles for products and libraries.
| The Manager group is automatically added to the Product Creators group and the Library Creators group. Only members of these groups can create products and libraries, respectively. |
For more information about managing users, see
Using the Participant Administration Utility.
For information on how to change user passwords from the Participant Administration utility, see
Changing User PasswordsWhen instructing users to change their own password, refer them to the following link:
Changing Your Password.
For more information about roles and groups, see
About Roles and Groups.
For more information about profiles, see
Profiles.
Managing Products and Libraries
• Products—A product is typically thought of as the physical item manufactured and sold to customers. Windchill expands the concept of a product to include the environment in which users collaborate to develop that end item part. This environment is known as the product context.
• Libraries—A library provides a place for storing and providing access to commonly used objects that are shared across multiple products. Libraries correspond to your company's organization and processes. For example, standard hardware files, that are controlled by industry standards and that CAD Authors have read-only access to, can be shared and associated with multiple products. This environment is known as the library context.
It is recommended that products and libraries are managed at the organization level.
Windchill PDM Essentials includes an out-of-the-box product template and an out-of-the-box library template, each with a corresponding shared team. New products and libraries are created using these templates. Although you can create additional templates, it is recommended that these out-of-the-box templates are used for creating new products and libraries in order to ensure proper behavior. For more information about the Windchill PDM Essentials out-of-the-box library and product templates, see Library Template and Product Template.
An out-of-the-box library context called Parts Catalog is pre-configured for immediate production. This library uses the out-of-the-box library template and includes all of the applicable configurations.
An out-of-the-box product context is not pre-configured. When planning the administration and management of product contexts, keep in mind the following two options:
• Single Product Context—Create a single product context for all products and projects. Each product or project is created as a sub-folder within the main product context.
Benefits of the Single Product Container model include the following:
◦ Easier to manage and navigate
◦ Easier to collect and share related information that crosses products
• Product Context for Each Product/Project—Create a product context for each product or project.
Benefits of creating a product context for each product or project include the following:
◦ More flexible—If you do project engineering work, it is often easiest to manage each project using a separate product context where you can configure the folders and team roles uniquely for each project. You can also define attributes for each product or project (such as customer name, project number, start date, delivery date, and status) and create reports that are specific to the project.
◦ More scalable—If you have a very large number of products or projects, you may find it difficult to navigate and to search among the items in a single product context and you may find that opening the folders page for a single context is slow (such as when you have hundreds of top-level folders representing projects). Creating a product context for each product or project makes navigation and searching easier when there is a large number of products or projects.
◦ Easier to control access—If you need to separately control access to each product or project, it is usually easier to accomplish when you use separate project contexts (with separate teams) than with a single product context.
For more information about product and library administration, see
Working with Products and Libraries.
| The Manager group is automatically added to the Product Creators group and the Library Creators group. Only members of these groups can create products and libraries, respectively. |
When administering products and libraries, keep in mind the following:
• Teams—Products and libraries have teams, the members of which are assigned to roles that define their privileges within the context. A product or library team can consist of a local team, a shared team, or both. Windchill PDM Essentials includes an out-of-the-box product template and an out-of-the-box library template, each with a corresponding shared team. It is recommended that these templates are used for creating new products and libraries.
For more information about the Windchill PDM Essentials out-of-the-box groups, shared teams, and roles, and how they are configured, see Participants.
For more information about the Windchill PDM Essentials out-of-the-box library and product templates, see Library Template and Product Template.
• Modifying Access Control—As an administrator, you must ensure that only the appropriate participants have access to objects, such as documents and CAD documents. Decisions about access rights are expressed as access control rules. Access control is configured based on the Windchill PDM Essentials out-of-the-box groups and life cycle states.
◦ Security Management—The Edit Access Control action provides a mechanism to view and manipulate access control permissions on individual objects (such as documents, CAD documents, and folders).
◦ Policy Administration—The Policy Administration utility is used to manage administrative domains and the access control, indexing, and notification policies for those domains. An administrative domain is an area that defines a set of administrative policies. A policy is a collection of rules for types of objects within a domain.
Managing the Promotion Process
• Life Cycle States—An organization administrator from the Administrator group or a user in the Manager group/role can create a variety of life cycles or modify existing life cycles. These life cycles define the states and transitions associated with various business objects and the available transitions between those states.
For more information about the Windchill PDM Essentials out-of-the-box CAD Document life cycle, see CAD Data Management Life Cycle.
• Promotion Requests—You can use the promotion request processes to formally request a state change for a set of objects that reside in products or libraries.
Managing CAD Application
The
Integrating with Your CAD Application section of this guide describes administrative tasks to get started with the integration between
Windchill PDM Essentials and your CAD application. This integration requires a few regular administrative management tasks. Refer to the following Help Center topic for common management tasks moving forward:
For more information about administrative tasks specific to the integration between
Creo Parametric and
Windchill PDM Essentials, see
Administration and Configuration.
Managing Publishing Jobs
It may periodically be necessary to manage publishing jobs, including viewing the status of jobs, troubleshooting jobs, view individual jobs or queues, manage subscriptions, and so on. This is managed at the site level.
Configuring a Remote CAD Worker for Autodesk Inventor and SolidWorks
Windchill PDM Essentials is configured with the Creo Parametric CAD worker installed on the same machine as Windchill.
If you wish to publish formats for Autodesk Inventor or SolidWorks, you must purchase the CAD adapter for these applications and configure a CAD worker on a separate physical or virtual machine because Autodesk Inventor and SolidWorks do not support installation into a Windows Server operating system.
The below sections outline the steps to configure a remote CAD worker for the following products:
• Autodesk Inventor
• SolidWorks
Configuring a Remote CAD Worker for Autodesk Inventor
To configure a remote CAD worker for Autodesk Inventor:
Step | For Details, see |
1. Install supported Autodesk Inventor application release on a remote machine with a supported operating system. | To determine which releases of Autodesk Inventor and operating system platforms are supported (non-File-Sync), refer to the relevant Creo View Adapters Software Matrix (MOR-specific), located at the following URL: https://www.ptc.com/view?im_dbkey=148979. | Windchill PDM Essentials is a Windchill solution. The above links that reference the Windchill platform apply to Windchill PDM Essentials. |
To install the licensed Autodesk Inventor application release on the chosen machine, refer to the relevant information in your Autodesk Inventor documentation. |
2. Install and configure Creo View Adapter for Autodesk Inventor. | |
3. Configure the common file system for transferring data to and from the remote worker. | |
4. Configure the WVS Worker Agent for the remote worker. | Be sure to specify a Data Type of INVENTOR in the Add Worker panel of the Worker Configuration Wizard. |
5. Test the new remote worker. | Second, test the File Synchronization process by publishing a relevant INVENTOR CAD Part, CAD Assembly and CAD drawing from Windchill. |
Configuring a Remote CAD Worker for SolidWorks
To configure a remote CAD worker for SolidWorks:
Step | For Details, see |
1. Install supported SolidWorks application release on a remote machine with a supported operating system. | To determine which releases of SolidWorks and operating system platforms are supported (non-File-Sync), refer to the relevant Creo View Adapters Software Matrix (MOR-specific), located at the following URL: https://www.ptc.com/view?im_dbkey=148979. | Windchill PDM Essentials is a Windchill solution. The above links that reference the Windchill platform apply to Windchill PDM Essentials. |
To install the licensed SolidWorks application release on the chosen machine, refer to the relevant information in your SolidWorks documentation. |
2. Install and configure Creo View Adapter for SolidWorks. | |
3. Configure the common file system for transferring data to and from the remote worker. | |
4. Configure the WVS Worker Agent for the remote worker. | Be sure to specify a Data Type of SOLIDWORKS in the Add Worker panel of the Worker Configuration Wizard. |
5. Test the new remote worker. | Second, test the File Synchronization process by publishing a relevant SOLIDWORKS CAD Part, CAD Assembly and CAD drawing from Windchill. |