Viewing Multiple Resource and Crew Routes
On the Scheduler tab, you can easily view up to 10 Resource and Crew work routes by using the Show Route option. Routes appear in a slide panel on the right side of the Scheduler Calendar, and details about travel distances and time on the road are included.
|
|
You can use the Show Route option only in standard Scheduling mode, while using Job Search or Resource Search, and in Planning mode.
|
To view multiple Resource and Crew routes:
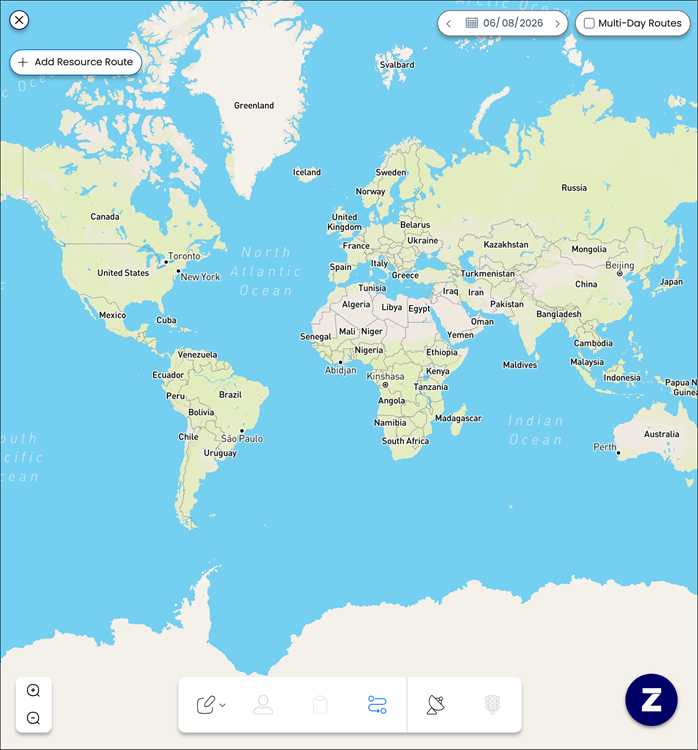
1. To open a slide panel and view routes, on the Scheduler tab, do one of the following:
◦ In the top right corner, click Expand Map Panel ( ).
).
).|
|
If no Resources are selected when you click Expand Map Panel, a blank map panel appears.
|
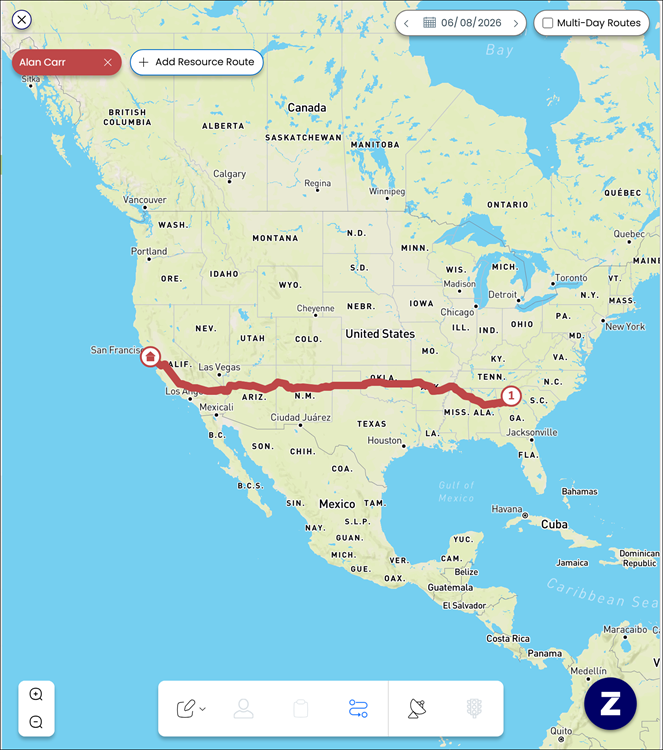
◦ On the Scheduler Resource List, click a Resource, and then in the context menu, click Show Route.
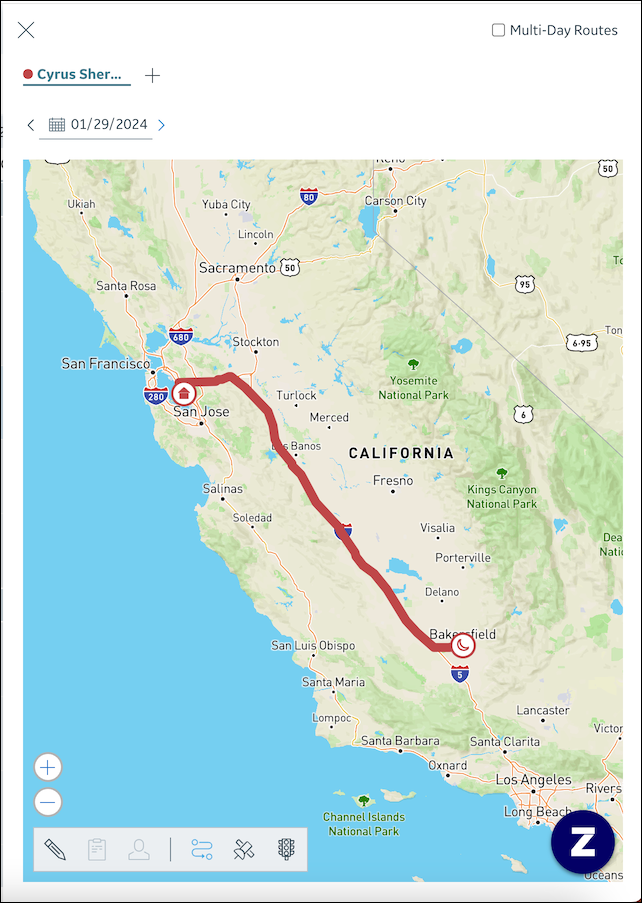
2. To view future work routes, in the top left corner of the Map Panel, click the date picker button and select the day for which you want to see planned routes.
|
|
By default, work routes for the currently selected date on the Scheduler tab appear in the Map Panel. When you click the arrow buttons to the right and left of the date picker or at the top of the date picker pane, or click a date on the date picker pane, the currently selected date does not change in the Scheduler. When you update the currently selected time zone on the Scheduler tab, the time zone for the Map Panel is also updated, but the selected date remains unchanged.
|
3. To add Resources to the Map Panel, do one of the following:
◦ On the Scheduler Resource List, click a Resource, and then on the context menu, click Show Route.
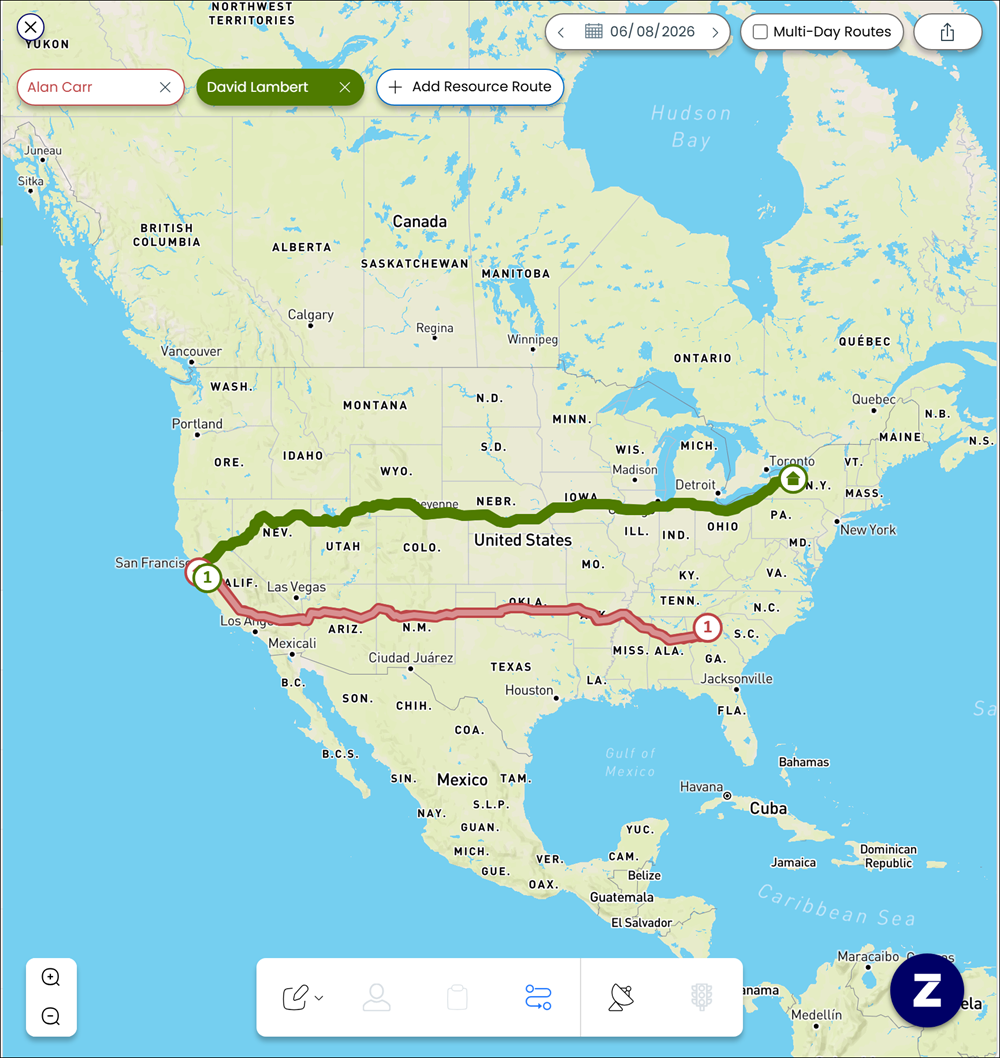
◦ On the Map Panel, to the right of the Resource names area, click Add ( ), and then in the list, click Resources.
), and then in the list, click Resources.|
|
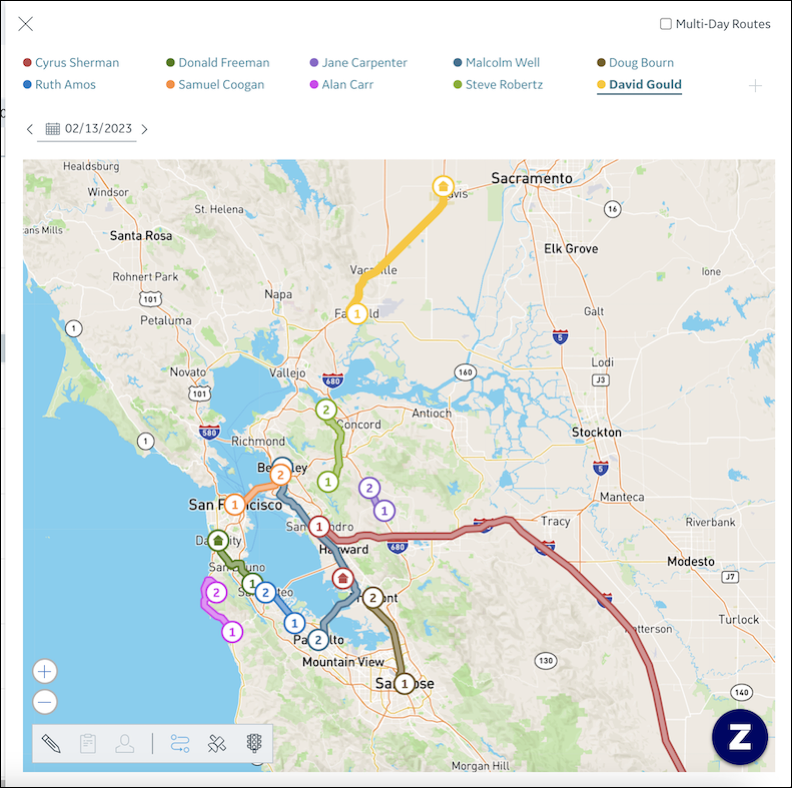
• You can view up to 10 routes in the Map Panel. After that limit is reached, or if routes for all Resources in the current Resource List are already added, the Add button is unavailable.
• When the Map Panel is open, each unselected route appears in a unique transparent color with stop point markers, and a dot of the same color appears to the left of the related Resource on the Scheduler Resource List.
• When you add Resources or Crews to the Map Panel and then make updates that change existing routing for related Appointments or Events on the Scheduler Calendar, routes automatically refresh in the open panel as soon as you complete your updates. In cases where the Map Panel is closed when you make such updates, existing routes automatically refresh the first time that you open the panel.
|
4. To view route information in the Map Panel, do any of the following:
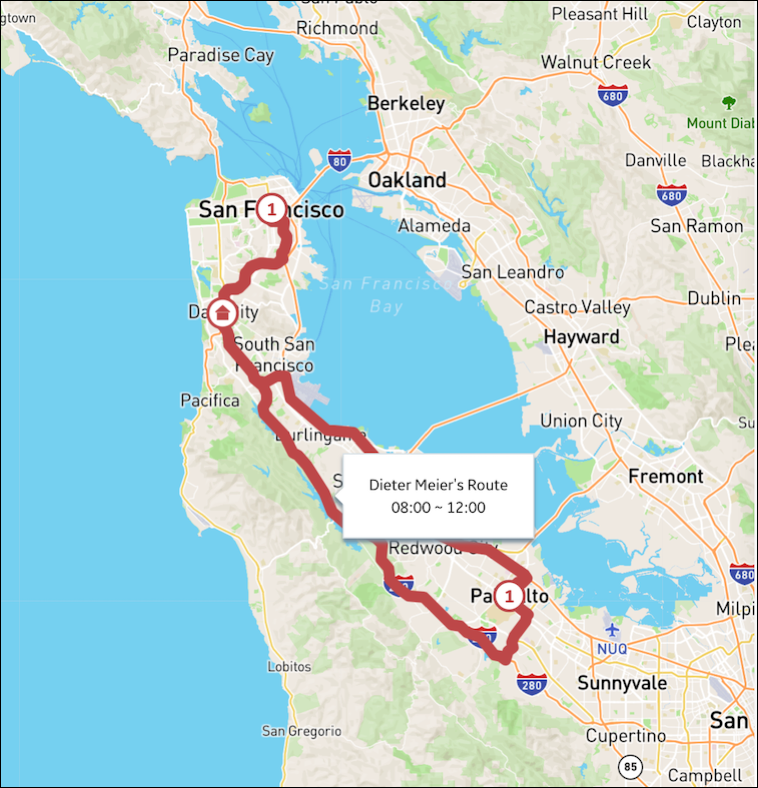
◦ Hover your mouse pointer over a route for .5 seconds to show its name in a tooltip. In cases where the currently selected Resource has multiple shifts on the selected date, the tooltip shows the shift to which the related route belongs. The tooltip automatically closes after 2 seconds.
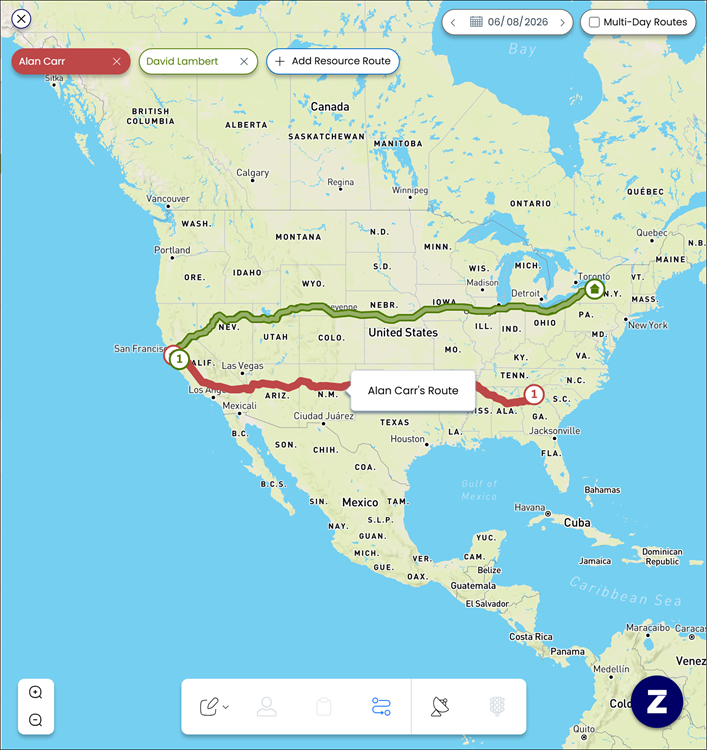
◦ Click a route to make its color opaque.
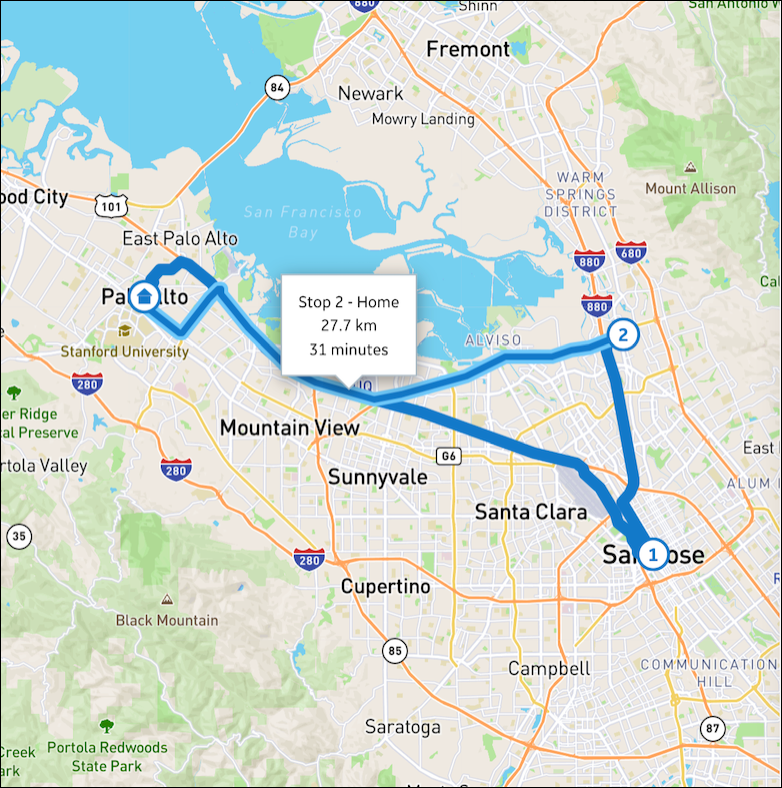
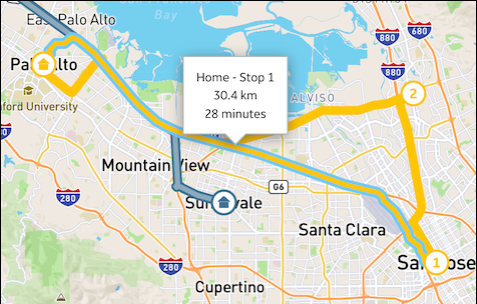
◦ Click a segment on a selected route to show it with a border and a tooltip with details of the start and end points, travel distances, and travel times.
◦ If Resource default location data is available, return routes appear on the Map Panel, and are based on the Travel Time Back From Location value of the final Appointment or Event in each shift. In cases where no Travel Time Back From Location data is available, return route travel time is recalculated when you click the route. If no Resource default location data is available, return routes do not appear in the Map Panel.
|
|
Return routes are also available in Planning Mode and in the Map tab, and are included in Trip Data information in the slide panel.
|
|
|
Existing travel times for Appointments and Events are recalculated in the following cases:
• Travel Time to Location field values are null.
• Appointment Start, Event Start, or Location field values are updated.
• The previous Appointment or Event is removed from the sequence, its Location field values are updated, or a new stop is added to the sequence before the current Appointment or Event.
• Recalculated travel times are based on traffic conditions during travel to work locations. For Appointments or Events that start in the future, the Appointment Start or Event Start field value is used as the arrival time. For Appointments or Events that started in the past, the current time is used as the arrival time.
• For all-day Events, if travel times are available, they appear on tooltips, and if no value is available, no recalculation occurs, and a hyphen (-) appears on the tooltip.
|
5. To resize the Map Panel, drag its border to the left or right, to a minimum width of 340 pixels or a maximum width of half the current window.
|
|
• If you resize the Map Panel to a width that is too small to show all selected Resources at the top of the Map Panel, the list of selected Resources and color-coding labels becomes scrollable.
• When you resize the Map Panel, the width you set remains in effect until you refresh your browser window or sign out of Service Board.
|
6. To select a different Resource or Crew, do any of the following:
◦ In the Scheduler Resource List, click another Resource, and then in the context menu, click Show Route.
◦ On the Map Panel, click a Resource or Crew, or route.
7. To remove a Resource or Crew from the Map Panel, at the top of the panel, click the close button to the right of its name.
|
|
When you click Close (
 ) at the top left corner of the Map Panel, the panel is minimized, and routes for previously added Resources and Crews appear automatically when you reopen it. However, previous routes are cleared in the following cases: ) at the top left corner of the Map Panel, the panel is minimized, and routes for previously added Resources and Crews appear automatically when you reopen it. However, previous routes are cleared in the following cases:• You select a different Scheduler Resource List.
• You switch to a different mode, for example, the Multi-Assignment Resource Calendar or Asset Calendar. and then return to the standard Scheduler Calendar view.
• You switch to a different tab, for example, Map, and then return to the Scheduler tab.
• You refresh your browser window.
|
Viewing Multiple Resource and Crew Routes in Classic Mode
The Classic user interface retires on November 8, 2026. All features are available in the Service Board Modern interface. We recommend switching to Service Board Modern at your earliest convenience to access the latest features. |
On the Scheduler tab, you can easily view up to 10 Resource and Crew work routes by using the Show Route option. Routes appear in a slide panel on the right side of the Scheduler Calendar, and details about travel distances and time on the road are included.
You can use the Show Route option only in standard Scheduling mode, while using Job Search or Resource Search, and in Planning mode. |
To view multiple Resource and Crew routes:
1. To open a slide panel and view routes, on the Scheduler tab, do one of the following:
◦ In the top right corner, click Expand Map Panel ().
).If no Resources are selected when you click Expand Map Panel, a blank map panel appears. |
◦ On the Scheduler Resource List, click a Resource, and then in the context menu, click Show Route.
2. To view future work routes, in the top left corner of the Map Panel, click the date picker button and select the day for which you want to see planned routes.
By default, work routes for the currently selected date on the Scheduler tab appear in the Map Panel. When you click the arrow buttons to the right and left of the date picker or at the top of the date picker pane, or click a date on the date picker pane, the currently selected date does not change in the Scheduler. When you update the currently selected time zone on the Scheduler tab, the time zone for the Map Panel is also updated, but the selected date remains unchanged. |
3. To add Resources to the Map Panel, do one of the following:
◦ On the Scheduler Resource List, click a Resource, and then on the context menu, click Show Route.
◦ On the Map Panel, to the right of the Resource names area, click Add (), and then in the list, click Resources.
), and then in the list, click Resources.• You can view up to 10 routes in the Map Panel. After that limit is reached, or if routes for all Resources in the current Resource List are already added, the Add button is unavailable. • When the Map Panel is open, each unselected route appears in a unique transparent color with stop point markers, and a dot of the same color appears to the left of the related Resource on the Scheduler Resource List. • When you add Resources or Crews to the Map Panel and then make updates that change existing routing for related Appointments or Events on the Scheduler Calendar, routes automatically refresh in the open panel as soon as you complete your updates. In cases where the Map Panel is closed when you make such updates, existing routes automatically refresh the first time that you open the panel. |
4. To view route information in the Map Panel, do any of the following:
◦ Hover your mouse pointer over a route for .5 seconds to show its name in a tooltip. In cases where the currently selected Resource has multiple shifts on the selected date, the tooltip shows the shift to which the related route belongs. The tooltip automatically closes after 2 seconds.
◦ Click a route to make its color opaque.
◦ Click a segment on a selected route to show it with a border and a tooltip with details of the start and end points, travel distances, and travel times.
◦ If Resource default location data is available, return routes appear on the Map Panel, and are based on the Travel Time Back From Location value of the final Appointment or Event in each shift. In cases where no Travel Time Back From Location data is available, return route travel time is recalculated when you click the route. If no Resource default location data is available, return routes do not appear in the Map Panel.
Return routes are also available in Planning Mode and in the Map tab, and are included in Trip Data information in the slide panel. |
Existing travel times for Appointments and Events are recalculated in the following cases: • Travel Time to Location field values are null. • Appointment Start, Event Start, or Location field values are updated. • The previous Appointment or Event is removed from the sequence, its Location field values are updated, or a new stop is added to the sequence before the current Appointment or Event. • Recalculated travel times are based on traffic conditions during travel to work locations. For Appointments or Events that start in the future, the Appointment Start or Event Start field value is used as the arrival time. For Appointments or Events that started in the past, the current time is used as the arrival time. • For all-day Events, if travel times are available, they appear on tooltips, and if no value is available, no recalculation occurs, and a hyphen (-) appears on the tooltip. |
5. To resize the Map Panel, drag its border to the left or right, to a minimum width of 340 pixels or a maximum width of half the current window.
• If you resize the Map Panel to a width that is too small to show all selected Resources at the top of the Map Panel, the list of selected Resources and color-coding labels becomes scrollable. • When you resize the Map Panel, the width you set remains in effect until you refresh your browser window or sign out of Service Board. |
6. To select a different Resource or Crew, do any of the following:
◦ In the Scheduler Resource List, click another Resource, and then in the context menu, click Show Route.
◦ On the Map Panel, click a Resource or Crew, or route.
7. To remove a Resource or Crew from the Map Panel, at the top of the panel, click the close button to the right of its name.
When you click Close ( ) at the top left corner of the Map Panel, the panel is minimized, and routes for previously added Resources and Crews appear automatically when you reopen it. However, previous routes are cleared in the following cases:• You select a different Scheduler Resource List. • You switch to a different mode, for example, the Multi-Assignment Resource Calendar or Asset Calendar. and then return to the standard Scheduler Calendar view. • You switch to a different tab, for example, Map, and then return to the Scheduler tab. • You refresh your browser window. |
Related Topics
• Calendar