Configuring Emojis for Job Cards and Appointments
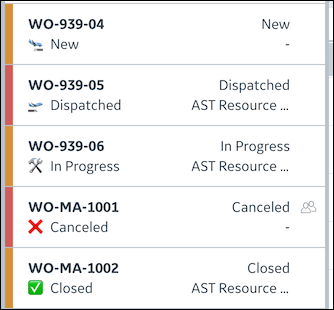
To make it easy for dispatchers to quickly identify Jobs and Appointments that have specific Status and Priority values, you can configure emojis to appear on Job Cards and Appointment blocks on the Calendar.
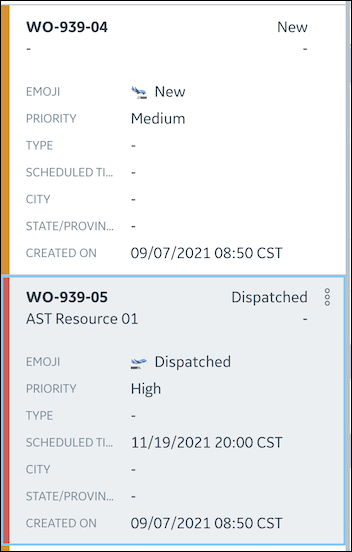
You can configure emojis for both expanded and collapsed Job Cards.
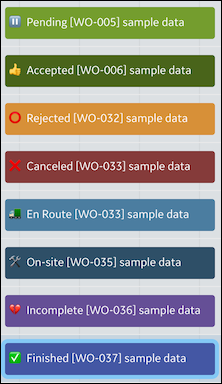
For Appointment blocks, you can configure emojis for many different Status values.
To configure emojis for Job Cards and Appointments:
1. To configure emojis for Job Cards, in Max Designer, create a new calculated field for the Job object, and then in the newly created Field record, on the Code tab, in the Custom Code field, implement the following Groovy code and save the record.
Following is an example of how to generate field values that show emojis based on Status field values, as shown in the previous figure.
def emoji = ''
if (svmx_workflow) {
  switch (svmx_workflow) {
    case "New":
      emoji = "🛬 ${svmx_workflow}"
      break
    case "Dispatched":
      emoji = "🛫 ${svmx_workflow}"
      break
    case "In Progress":
      emoji = "🛠 ${svmx_workflow}"
      break
    case "On Hold":
      emoji = "⏸️ ${svmx_workflow}"
      break
    case "Canceled":
      emoji = "❌ ${svmx_workflow}"
      break
    case "Closed":
      emoji = "✅ ${svmx_workflow}"
      break
    default:
      break
  }
}
return emoji
|
|
Search Emojipedia.org to find the emojis you want to use, which you can easily copy and paste directly into your code syntax.
|
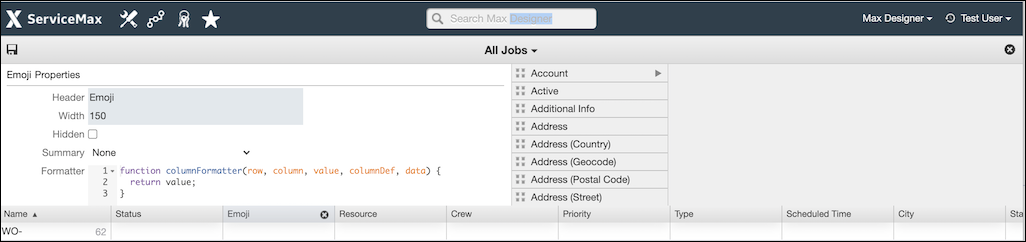
2. In Max Designer, navigate to the Job List view for which you want to configure Job Card emojis, and then in the top right corner, click Options ( ) > .
) > .
) > .3. In List View Designer, drag the newly created calculated field into the table, and then in the top left corner, click Save ( ).
).
).
4. To configure emojis for Appointments, in Max Designer, navigate to the Appointment object and open its linked Name field record, and then on the Code tab, in the Custom Code field, implement the following logic and save the record.
if(!svmx_related_to) {
  return ''
}

maxLength = 80
primaryName = svmx_related_to.entity?.primaryName
accountName = svmx_related_to.svmx_account?.core_name ?: ''

completeName = "[${primaryName}] ${accountName}"

// ************** Add emoji at the beginning of appointment name - start **************
emoji = ''
if (svmx_workflow) {
  switch (svmx_workflow) {
    case "Pending":
      emoji = "⏸️ ${svmx_workflow}"
      break
    case "Accepted":
      emoji = "👍 ${svmx_workflow}"
      break
    case "En Route":
      emoji = "🚛 ${svmx_workflow}"
      break
    case "On-site":
      emoji = "🛠 ${svmx_workflow}"
      break
    case "Rejected":
      emoji = "⭕️ ${svmx_workflow}"
      break
    case "Canceled":
      emoji = "❌ ${svmx_workflow}"
      break
    case "Incomplete":
      emoji = "💔 ${svmx_workflow}"
      break
    case "Finished":
      emoji = "✅ ${svmx_workflow}"
      break
    default:
      break
  }
}
if (emoji.length() > 0) {
  completeName = "${emoji} ${completeName}"
}
// ************** Add emoji at the beginning of appointment name - end **************

completeName = completeName.length() > maxLength ? "${ completeName[0..maxLength - 4] }..." : completeName
|
|
Emojis do not appear on existing Job Cards and Appointments after configuration is completed. Users must update existing records to trigger calculation functionality that renders emojis.
|