Creating Work Order Event
You can create a Work Order event by dragging a work order from the grid and dropping it on the Scheduler. By default, this allows you to create a single event for a single technician.
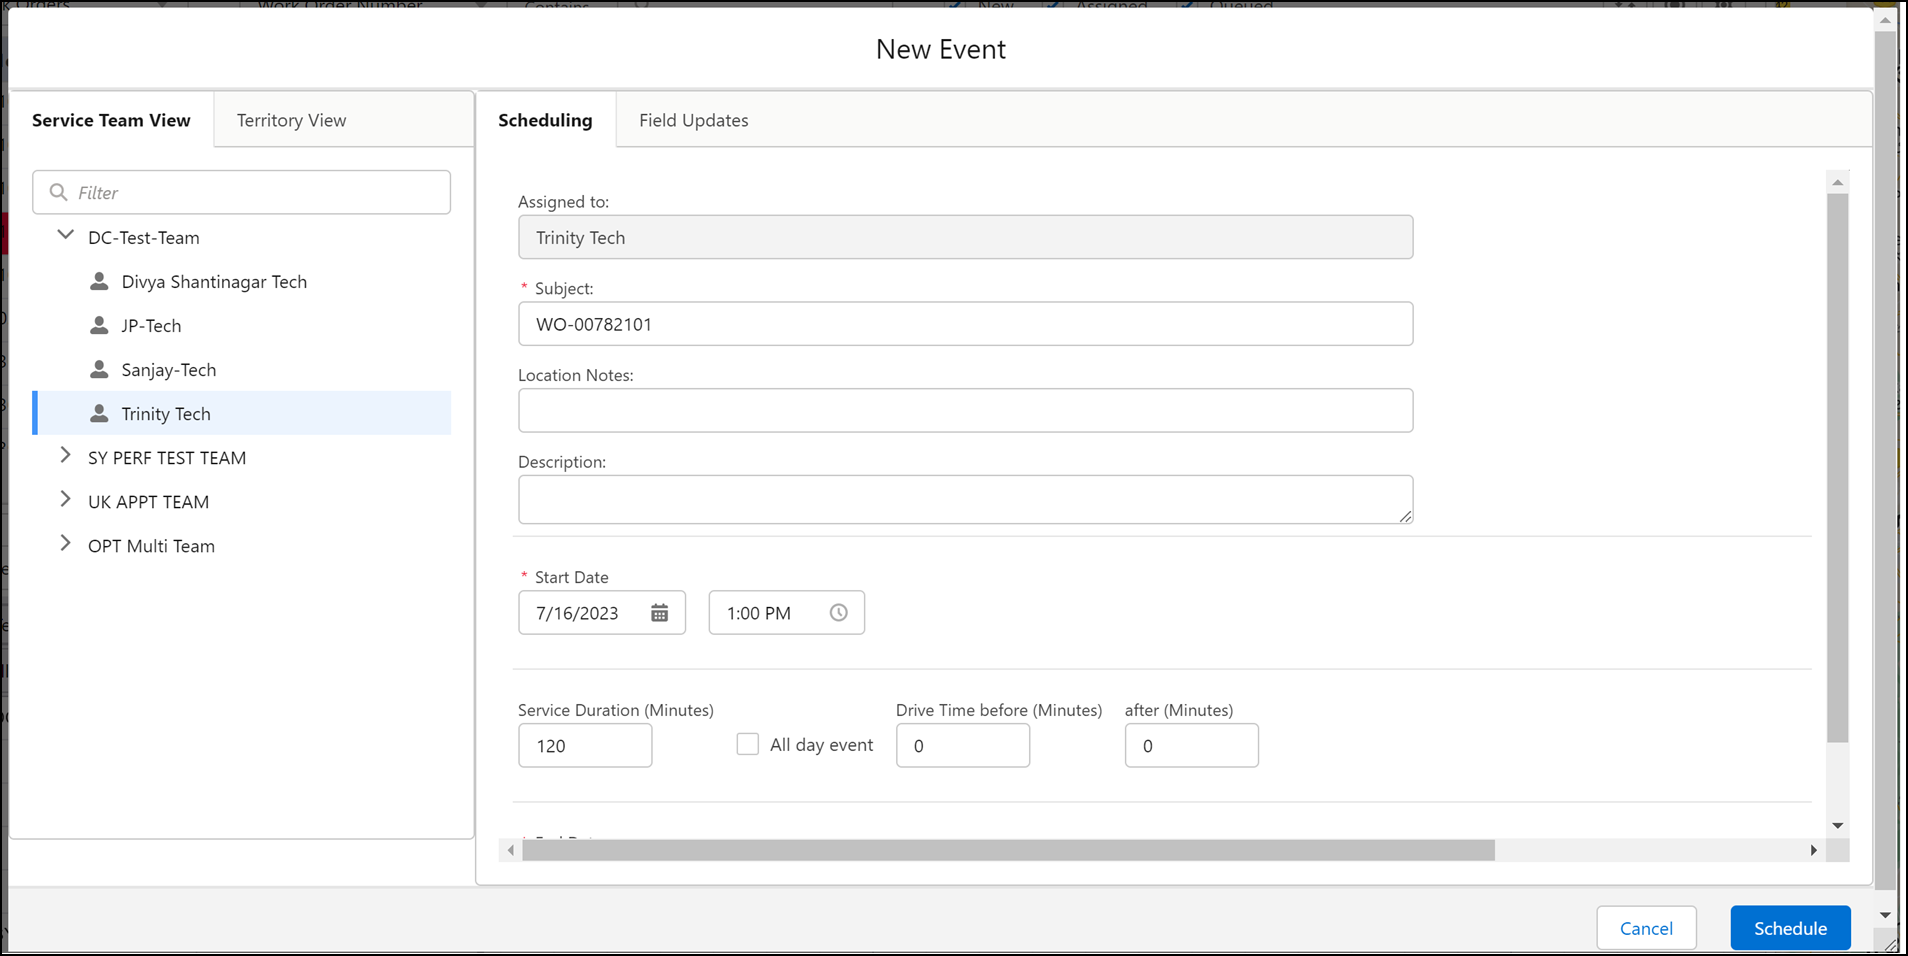
The figure below shows the New Work Order Event creation window, with Work Order fields configured in Dispatch Console Field Updates displayed in the Expanded Event Edit window. All the date times are displayed as per the logged-in user’s locale in Salesforce.
The New Work Order Event window displays the Service Team View and the Territory View listing all the Service Teams and Territories accessible to you and the active technicians associated with them.

The various fields displayed and the controls in the New Event creation window for Work Order are described below:
• Assigned to: Shows the Technician's name for whom the event is being created. This is auto-populated based on where the work order is dragged and dropped on the Scheduler against the Technician tree.
• Update primary technician: This checkbox is disabled for new events. The checkbox gets enabled, populating the current technician name, if the dragged & dropped work order has one or more existing events for a different technician. When checked, the originally assigned technician for the work order is changed to the currently selected technician.
• Delete events for other technicians: This checkbox is disabled for new events. This checkbox gets enabled only if the Update primary technician checkbox is selected. When checked, any event created for the (originally) assigned technicians will be deleted.
• Remember my preference: When checked, the selection for Remove current assignment and re-assign the work order will be persisted for all work order event creations across sessions.
• Subject: Shows the values to be displayed on the event in the Scheduler. This is auto-populated based on the configured Event Subject Rule. By default, it displays the Work Order Number.
• Location Notes: Enter the required details regarding the work order location. This is optional.
• Description: Enter the required details for the event. This is an optional field.
• Start Date: Shows the starting date and time for the event. This is auto-populated based on where it is dropped on the Scheduler, rounded off using the value of the group configuration setting SET011 (Module: Dispatch Management > Submodule: Dispatch Console Flex).
• Service Duration: This shows the various components that constitute the overall event duration. The overall unit of the duration is determined based on the group configuration setting SET054 (Module: Dispatch Management > Submodule: Dispatch Console Flex). The components are listed below:
◦ Service Duration: This shows the time required to service the work order. This is auto-populated. For more details on the calculation, refer to the table in the Defaults section.
◦ Drive Time before (Minutes): This shows the time required to drive to the work order's service location. This is auto-populated based on the value of the Work Order field Driving Times (in Minutes). However, you can add the drive time when you create the event.
If you add the drive times when creating the event, the ServiceMax Event end date/time is extended to incorporate the drive times, as the total duration of the event extends. The event end date/time is computed based on the total duration. The total event duration is the sum of drive times (if any), overhead times (if any), and the actual event duration. |
◦ Drive Time after (Minutes): This shows the time required to drive from the work order's service location. This is auto-populated based on the value of the Work Order field Driving Times (in Minutes). However, you can add the drive time when you create the event.
◦ Overhead Time: This shows the time required for any additional setup, reaching the installed product, and any other overheads incurred before or after the servicing of the work order. This component is displayed based on the value of group configuration setting SET003 (Module: Dispatch Management > Submodule: Event Management).
◦ Break Time: This shows the duration for which the assigned technician is eligible to take a break. This component is displayed based on the value of group configuration setting SET004 (Module: Dispatch Management > Submodule: Event Management). It cannot be edited from the screen.
◦ All-day event: When checked, the event is created to cover the entire day.
◦ End Date: Shows the ending date and time for the event. This is auto-calculated. For more details on the calculation, refer to the table in the Defaults section.
• Field Updates: The fields displayed in this section are configured using the Dispatch Console Field Updates screen.
You can re-size the Event modal window. |
The following sub-sections provide details of the event window features:
• Defaults