Custom Action for IB Hierarchy LWC
To create custom action for IB Hierarchy LWC:
1. Go to > > . The Custom Action page is displayed.
2. Select an object from the Manage Custom Actions for drop-down list.
3. In the User—defined Custom Actions, click New.
4. Select Action Type as UI Component. The Custom Action details page for the selected object is displayed.
5. Enter the details as described in the following table:
|
Field
|
Description
|
||
|---|---|---|---|
|
Object
|
Displays the name of the object for which you are creating a custom action.
|
||
|
Action Title
|
Enter the title to appear on the record page. For example, Issue Report/Feedback.
|
||
|
Action ID
|
Enter a unique ID for the custom action.
|
||
|
Description
|
Enter a description for the custom action.
|
||
|
Component Type
|
Select Managed Components from the list.
|
||
|
Name
|
Select ibHierarchy from the list.
|
||
|
Modal Height
|
Select a height from the list. This refers to height of the component when displayed at runtime.
|
6. Click Add to define the list of parameters for this custom action.
|
Parameter
|
Acceptable Values
|
Example
|
|---|---|---|
|
recordId
|
Select Field Name and then select Id.
|
|
|
objectApiName
|
The API name of the underlying object on which the IB hierarchy is launched.
|
SVMXC__Installed_Product__c
|
|
label
|
Any string value.
|
Heirarchy
|
|
order
|
Installed Products Only.
|
Installed Products Only
|
|
hierarchyField
|
Id, SVMXC__Parent__c, SVMXC__Top_Level__c (API Name of IB Field on the record)
|
Id
|
|
displayIcon
|
true, false
|
true
|
|
maxHeight
|
Set a maximum height for the Installed Product Hierarchy.
|
500
|
|
isInCommunity
|
true, false.
|
false
|
|
plotHierarchyField
|
When this option is set to True, hierarchy is plotted from the field configured in the Select field to plot hierarchy. This property is applicable only when Installed Product field is selected.
(true, false).
|
true
|
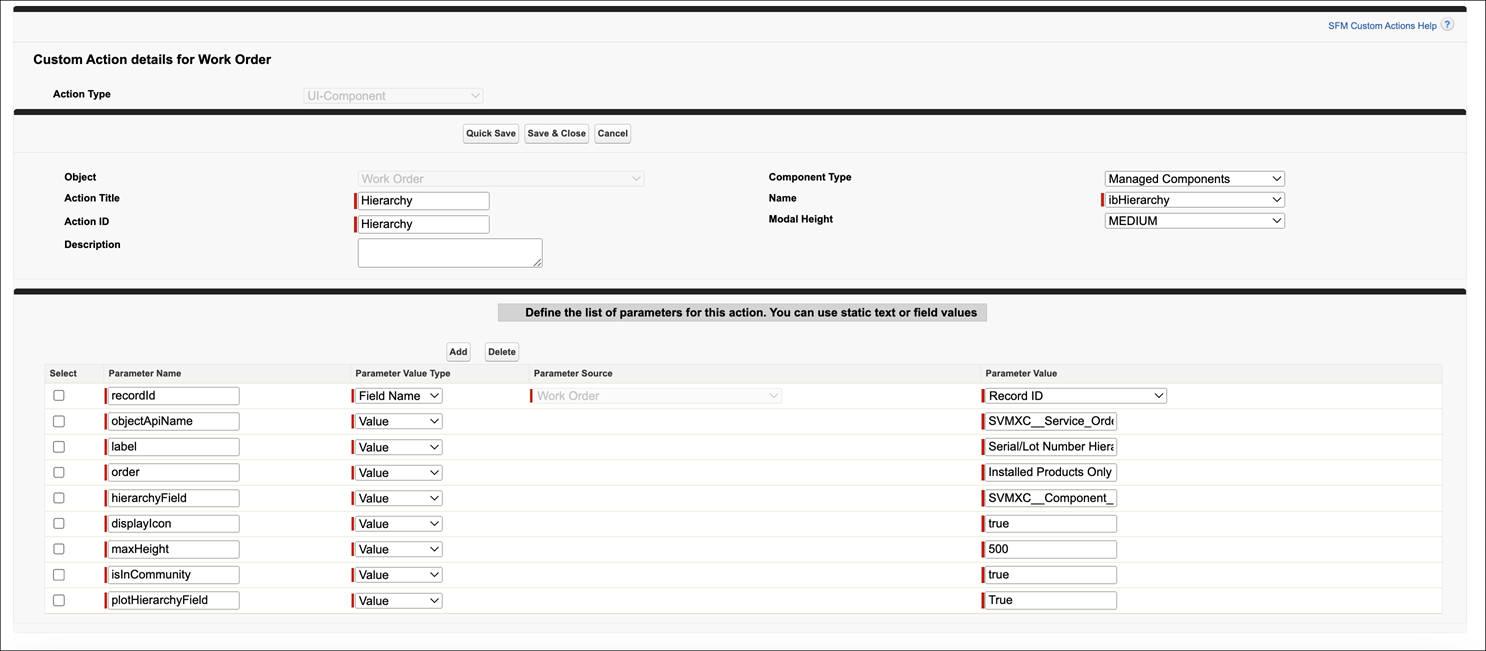
The following screenshot displays a sample IB Hierarchy custom action configuration on the Work Order object.
7. Click Save.