Creating a Custom Page Layout
1. Click the New (+) icon.
Action Icons Area
• Enter a descriptive, preferably unique name for the page layout and tab to the next field; page layout id is auto-populated from the name, after replacing the spaces with '_'.
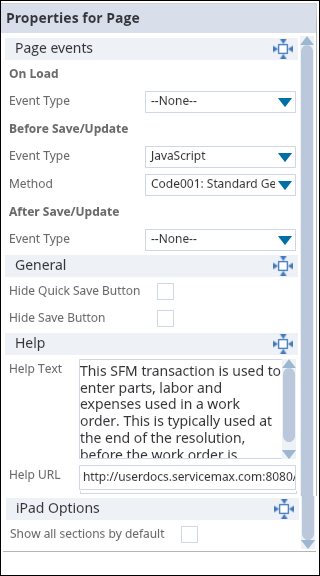
Configure the following page characteristics in the Properties Pane:
• Page-level events if required. For more details, see sections Apex Web Service and JavaScript Code Snippet
• Whether Save and/or Quick Save buttons should be hidden or not
• Page Help Text (displayed in browser on hovering over the SFM transaction title in SFM Delivery
• Page Help URL (launched on clicking the '?' icon in the top right corner of SFM Delivery)
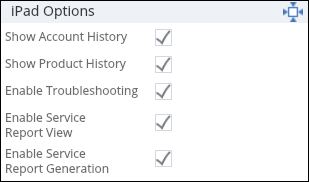
iPad Options
• For View Record type SFM transaction with Work Order as the Target Header object, set the following options as required.
◦ Show Account History to display the history of closed work orders associated with the Work Order’s Account
◦ Show Product History to display the history of closed work orders associated with the Work Order’s Product
◦ Enable Service Report View to display the Summary button, clicking which launches the Summary Report
|
|
This report is configured from the ServiceMax Setup home page option iPad Settings under Mobile & Offline.
|
◦ Enable Service Report Generation to display the Generate button in the Summary Report, enabling PDF Summary Report file generation and attachment to the record.
Enable Troubleshooting to display the Troubleshooting button, clicking which launches the Troubleshooting page. This page allows searching of and access to various Knowledge Base articles setup in Salesforce, and access to available Product Manual if any.
Buttons Area
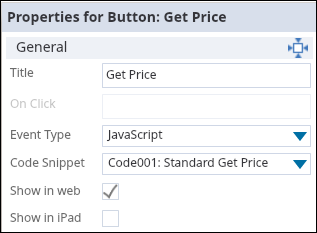
1. Add any required custom buttons by clicking the Add icon.
2. Click the button and use the Properties pane to configure the button characteristics such as title and whether to show the button in browser and/or iPad.
3. Define On Click event of required type. For more details, see sections Apex Web Service, JavaScript Code Snippet, and URL.
Header Section(s) Area
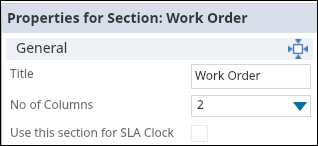
1. Configure one or more sections to logically group fields as needed. Click Add a section icon to add new sections.
|
|
There must be at least one section in header area. So, Delete section icon will appear only if there are two or more sections.
|
2. For each section, define the section title and whether it is a one or two column sections.
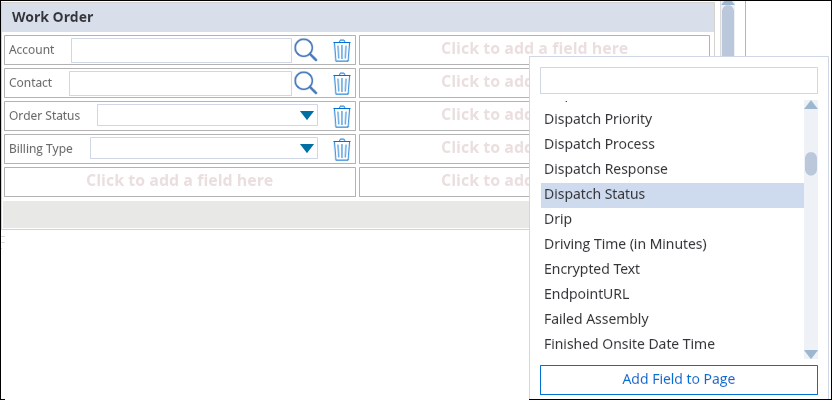
3. Click any blank field area in a section to view a popup list of target header object fields.
4. Use Quick Find to access required fields quickly, by entering part of the field name.
5. Double-click the field / select and click Add Field to Page.
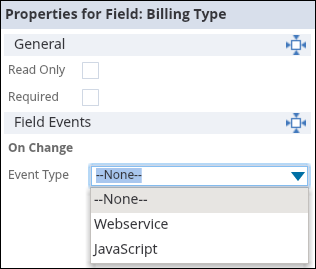
6. Click each field to bring up its Properties Pane and configure the field characteristics, depending on the field type.
7. Required / Read Only - mutually exclusive; Formula; Roll-up Summary fields are always Read Only.
|
|
SFM does not support adding formula field with HTML tags.
|
8. Field Events for editable fields. For more details, see sections Apex Web Service, JavaScript Code Snippet.
9. Lookup Configuration & Lookup Form-Fill for lookup fields.
10. Drag and drop the sections / fields to rearrange them, if needed.
11. You can mark a header section which does not include any fields as SLA Clocks section, by checking the check box 'Use this section for SLA Clock'. This is applicable for SFM transactions of type View Record, for Case and Work Order objects only

Child Section(s) Area
1. For each section, define the section title, if you want it to be different from the target alias (default value).
|
|
Even though all child sections are listed below one another in the designer, the sections will be painted as horizontal tabs by default for the end user in SFM Delivery. SFM Delivery provides the option to display the child sections one below the other, but this selection cannot be persisted.
|
For each section, define the following:
• If adding new lines should be allowed in SFM Delivery
• If deletion of lines should be allowed in SFM Delivery
• If it should be possible to save the SFM transaction in SFM Delivery with zero lines in the section - options available are Allow, Disallow, and Warn
1. Add and configure target child object fields, using the steps described above for header section.
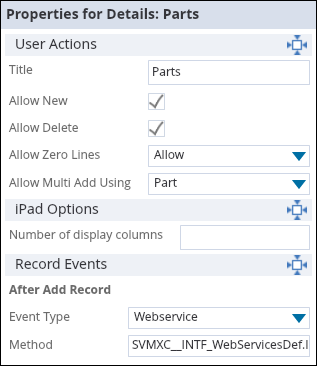
2. In the Properties Pane for the child section, configure if Multi-Add should be allowed - this option is available only if there are one or more lookup fields in the child section page layout.
3. In the Properties Pane for the child section, configure After Add Record event if needed.
4. Click the Save icon.
|
|
Multi Add feature uses the lookup configuration defined for the associated lookup field. This includes display and search fields, lookup context if the context field is a header field, basic filter, and advanced filters. Clicking Save saves the new page layout only. It does not associate the page layout with the SFM transaction. To associate, click Quick Save to save the SFM transaction.
|