SFM Transactions
The Transactions List view displays a list of SFM transactions that are defined on the ServiceMax platform. The transactions listed are sorted alphabetically (A-Z), based on the Transaction Name. The List View displays Sample Transactions (also known as Standard Transactions) and User-defined Transactions.
• Sample Transactions: The transactions prefixed with a lock icon represent a Sample Transaction. Sample transactions can be cloned but cannot be edited or deleted.
• User-defined Transactions: The transactions without the lock icon represent a User-defined Transaction. User-defined Transactions can be cloned, edited, or deleted.
The following screen displays the SFM Transaction List View:
To access the Transaction List View:
1. Go to ServiceMax Setup > Service Flow Manager > Transaction Designer. The Transaction List View is displayed.
2. View the information as described in the following table:
|
Field Name
|
Description
|
|---|---|
|
Transaction Name
|
This column displays the name of the SFM transactions. If the name exceeds the default width it ends with ellipses. In such cases, the user can hover over the name to see the complete name and description of the transaction. If the name and description value are similar, then just the transaction name is displayed. The user can also adjust the table column width to view the complete name.
|
|
Source Object
|
This column displays the name of the Source object. In some SFM types, the Source object is not available. In such cases, the Source Object column remains blank.
|
|
Target Object
|
This column displays the name of the Target object.
|
|
Type
|
This column displays the SFM process type. There are five types of SFM processes as mentioned below:
• To create new Target records from Source records and add new Child records.
• To convert existing Child records to new Child records and add new Child records.
• To update an existing record and add new Child records.
• To create a new record and add new Child records.
• To view an existing record with/without its Child records.
|
|
Where Used
|
This column allows you to determine the wizards and other areas where this transaction is used. When you click the Where Used icon, a pop-up box is displayed with the list of modules and configuration records where the SFM transaction is used. Click the links to navigate to the respective records.
• Wizard Step: Opens the wizard step Visual Force page. If the wizard step configuration page is not accessible, it opens the wizard configuration Visual Force page.
• Transaction: Opens the Transaction Properties page in a new tab.
• Scheduled SFM: Opens the scheduled SFM Visual Force page.
• Multi-Source Update: Opens the Transaction Properties page in a new tab.
• Linked SFM: Opens the Transaction Properties page in a new tab.
• Group Profile: Displays the group profile information to which the View or Create SFM transactions are associated. The association is configured on the Mobile> Mobile Permissions page.
• Work Plan Template: Opens the Info and Tasks tab of the Work Plan.
• Service Task: The tasks associated to the Work Order.
• ServiceMax AI: Opens the Service Flow Manager agent page in the AI console that references the transaction. This helps prevent unintended deletion of referenced transactions.
|
|
Last Edited
|
This column displays the date when the transaction was last edited based on the user's locale. You can view the name of the person who last edited the transaction and the time when it was done, by hovering on the value.
|
|
Status
|
This column represents the status of the transaction. If the transaction is completed, the status displays a tick mark. If the transaction is incomplete, the status remains blank.
 |
|
Sort
|
This functionality is denoted by the upward arrow next to the columns. All columns that can be sorted have a sort icon. Sorting is supported on columns like Name, Target Object, Source Object, Where Used Status, and Last Edited. Secondary sort is applied to the transaction name if the sorted column has multiple entries with the same value. The sorted column is indicated by up-down arrows. When columns are sorted in the natural order, blank values are listed at the bottom (Where Used, Status). Sorting is not supported on the Tags and Type columns. However, the user can use a filter to search for a specific transaction.
|
|
Action Menu
|
Every transaction entry in the list view will have an action menu. Two actions are supported by default: Clone and Delete. However, Delete is not available for standard and sample transactions.
The Clone option in the action menu makes a copy of the selected transaction.
The Delete option allows the user to delete the transaction. The Where Used modal pop-up window displays the group profile information and other areas where the transaction is used. The Confirm and Cancel options are provided so that the user can make the right decision about deleting the transaction.
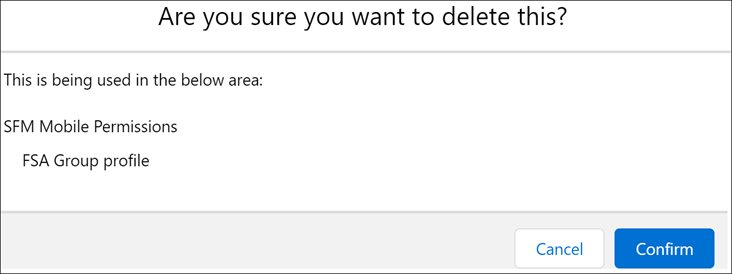 If a Transaction is used in other areas, then deleting the transaction removes the association and the underlying process is marked incomplete/broken.
Both the Delete and Clone actions are supported on User-defined Transactions.
|
|
Search Bar
|
The Search Bar allows the end-user to search for the transactions in the list and also displays five recently used transactions only within the same browser. A minimum of three characters is required to see the Search Results.
|
|
Filters
|
You can filter the transaction list by using pre-defined filters. Show All is the default filter that displays all the transactions in the List View. Filters allow you to view transactions recently (edited in the last seven days), Sample transactions, Other transactions, and the search based on each transaction type. The filtering can be refined by using Search and Filters together.
The available filter options are as follows:
• Show All (Default)
• Sample Transactions
• User-defined Transactions
• To create Target from Source
• To convert existing child records
• To update existing records
• To create Standalone record
• To create Mobile View
|
|
Tags
|
Tag is a new feature that will allow you to group transactions together. Example: By release, Business units, etc. This column lists the tags which are associated with the transaction. Each transaction can have a maximum of up to 10 tags. However, only one tag is visible, others are displayed when you hover over the listed tag. If there is more than one tag, then the list view stacks the tags.
 |
New SFM Transaction
You can use the New SFM Transaction button to create an SFM Transaction.
To create an SFM transaction:
1. Go to ServiceMax Setup > Service Flow Manager > Transaction Designer. The Transaction List View is displayed.
2. Click New SFM Transaction. A pop-up box is displayed with the list of transactions.

3. Choose the type of transaction. For example, select the "To create new Target records from Source records and add new Child records" type of transaction.
4. Click Continue. The Transactions Editor is displayed. For more information, see Transactions Editor.
5. Click Save. Your SFM Transaction is created successfully.