In Creo Elements/Direct Modeling's 3D Documentation module, you can attach various types of annotations to a 3D model. These can be free or attached to a docuplane, and can be transferred to a Creo Elements/Direct Annotation drawing of the model. A powerful advantage of a transferred annotation is that when it is edited or its reference point changed in Creo Elements/Direct Modeling, an update of the relevant views adjusts the annotations in the drawing as well. A specific update color indicates when the label or its reference line has been altered on the drawing. Once transferred, 3D dimensions can be treated as normal Creo Elements/Direct Annotation dimensions.
Before you can transfer docuplane annotations to a drawing, you must first transfer the docuplane itself to create a view.
After transferring annotations, you are notified about any that could not be transferred successfully. These unsuccessful annotations are put into a group in 3D Documentation (you can see it in the browser) called Untransferred_labels, containing subgroups related to each 2D view, so that you can analyze the problem. For example, transferring docuplane annos for the whole sheet may result in a parent group Untransferred_labels and a subgroup called Top1-1.
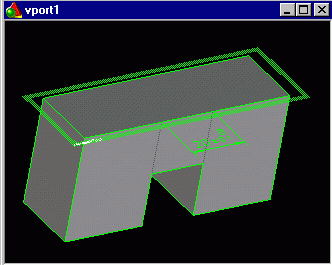
You can add dimensions to any geometry element in your part. The system also allows you to add such a dimension to any suitable docuplane. If you transfer the docuplane shown in the graphic below to a 2D drawing, and update the view (with invisible hidden lines), the resulting display will just depict a rectangle. This means that the dimension is not transferable.
Use the following procedure to deal with this situation:
1. Activate 3D Documentation application:
a. Click File > Modules. The Modules dialog box opens.
b. Click Applications.
c. Click 3D Documentation (under Free).
a. In 3D Documentation, click Insert and then, in the Group group, click Show. The Show Group dialog box opens.
b. Select Untransferred labels. This will show all 3D annotations that failed to transfer.
2. You can now do one of the following:
a. In Creo Elements/Direct Annotation change the hidden line mode to visible hidden lines:
a. Click Applications and then, in the Free group, click Annotation to switch to the Annotation application.
b. Use the Hidden option in the View Settings.
a. Click File > Settings > View 2D > View Settings. The Default Settings table opens.
b. In View, expand Appearance > Hidden Lines.
c. Double-click Hidden Lines Mode and select Visible.
b. Repeat the transfer procedure.
OR
3. Gather the 3D annotation to a docuplane, from where the dimension's reference elements are visible (in the above example a bottom docuplane instead of the top docuplane shown).
4. Do the transfer procedure for the bottom docuplane.
The settings of 3D annotations are preserved after transfer; that is, the 3D Documentation parameters are transferred with annotations, and the Creo Elements/Direct Annotation settings are ignored. (Note that this behavior is the reverse of
Create docuplanes from 2D views, which take the default settings for Creo Elements/Direct Annotation dimensions, text, and symbols after transfer.) In addition, if you subsequently change any of the settings for transferred docuplane annotations, a view update in Creo Elements/Direct Annotation will reset them to their original 3D Documentation parameters.
To transfer annotations from docuplanes,
1. Click Annotation and then, in the Transfer 3D Doc group, click the arrow next to Docuplane.
2. Click Transfer from 3D. The Transfer DP Annos dialog box opens.
3. Select the Type of transfer you want to do:
◦ One View: Transfers the annotations from a single view that was created by transferring a docuplane. This is the default selection (though a customization function can change this default); you can simply click the view to transfer to as soon as the Transfer DP Annos dialog box opens.
◦ Sheet: Transfers the annotations from all the docuplane-transferred views on a sheet. The active sheet is selected as default, but you can change this.
◦ Drawing: Transfers the annotations from all the docuplane-transferred views in the drawing.
◦ View Set: Transfers the annotations from all the docuplane-transferred views in a view set. A View Sets table opens listing names, owners and sizes of the annotation.
4. Click to start transferring annotations.
Creo Elements/Direct Annotation transfers the annotations to the relevant views. A warning is issued if any annotations could not be transferred, and a group is created, called Untransferred_labels, containing subgroups named after the relevant views, in which are placed the annotations that did not transfer.
Reposition existing annotations
You can reposition an annotation that has already been transferred, and modify its reference elements.
• To reposition a transferred annotation, click the annotation and drag it to the desired position.
• To modify its reference elements, click a handle on the annotation and move it to the desired reference point.
 View Settings. The Default Settings table opens.
 to start transferring annotations.