Export a document from DOORS Next Generation
Windchill Requirements Connector supports the export of data from DOORS Next Generation for migration purposes to e.g. Windchill RV&S. The supported versions of DOORS Next Generation are listed in the Hardware and Operating Systems section.
2. Create a roundtrip configuration and refer to the next step for the connection settings for DOORS Next Generation.
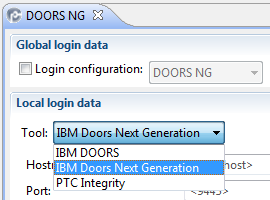
3. Switch to the Connection tab in your roundtrip configuration and select IBM DOORS Next Generation from the drop down list
Figure 268. Select tool to connect to
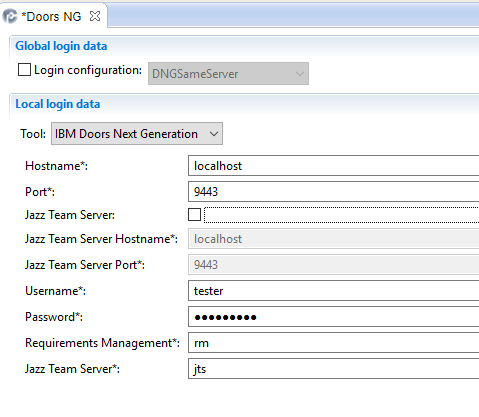
4. Enter the specific credentials for your DOORS Next Generation Server:
a. The Hostname of your DOORS Next Generation server if it is not installed on a distributed system. On a distributed system it is the hostname of the server where theRequirements Management application is running
b. The Port the server of a non distributed system is running on. Otherwise it is the port of the server where the Requirements Management application is running
c. Select the checkboox next to Jazz Team Server if Doors Next is installed as a distributed system where the Jazz Team Server is installed on a different host as the Requirements Management application
d. If the Jazz Team Server checkbox is checked, the Hostname of the Jazz Team Server.
e. If the Jazz Team Server checkbox is checked, the Port of the Jazz Team Server.
f. Your login Username and Password to connect to the server
The password will only be remembered during one session and has to be re-entered once the roundtrip configuration is closed. The password also can be left blank — Requirements Connector will prompt you for entering your password automatically when a connection to the server is establish (e.g. when adding a document to the configuration). |
g. Set the Application context root values for Requirements Management and Jazz Team Server.
Figure 269. Synchronize object types from original file
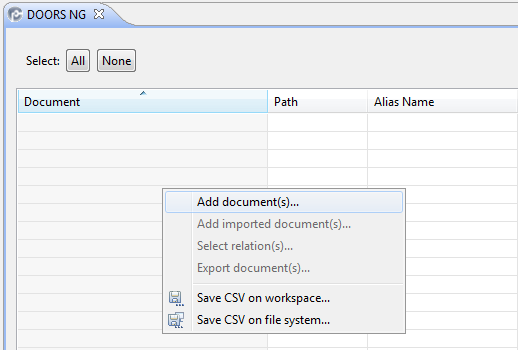
5. In the Export tab of the roundtrip configuration within the Document table right click to open the context menu and select Add document(s). Requirements Connector will connect to the DOORS Next Generation server and display a list to select documents from.
Figure 270. Add document to be exported to the roundtrip configuration
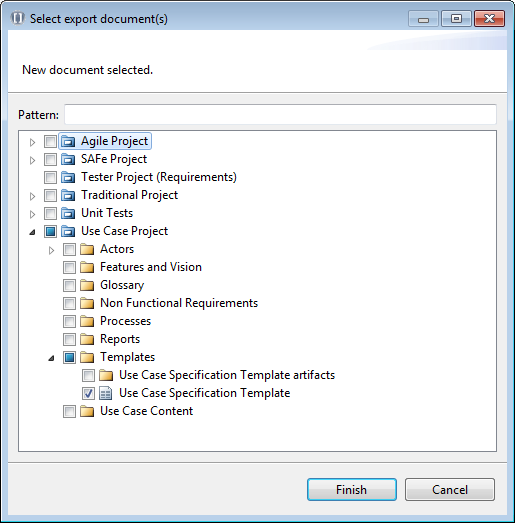
6. Select those documents you would like to export and click Finish .
Figure 271. Select documents to be exported
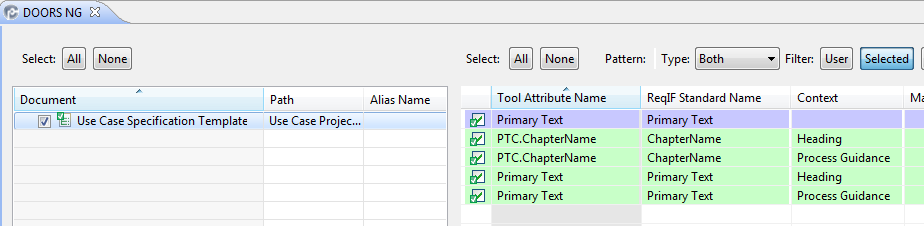
7. The documents will be added to the export tab of the roundtrip configuration and standard attributes will be pre-selected for export.
Since DOORS Next Generation is an item/artifact based RE/RM tool compared to a document based RE/RM tool like PTC Windchill RV&S or DOORS Classic, some attributes may occur several times within the attribute table (see figure below). This is due to the fact that within DOORS Next every artifact has its own set of attributes (e.g. a heading artifact or use case artifact). Requirements Connector displays the different artifact types (also referred to as multiple object types) in the Context column — for this example Heading and Process Guidance. |
Figure 272. Attributes to be selected for export
8. If needed, select any additional attributes (please refer to e.g. Modifying Windchill RV&S export options).
In order to import a DOORS Next Generation file into a document based RE/RM system like Windchill RV&S, please refer to Import a document with multiple object types . If you have further questions please contact PTC eSupport: https://support.ptc.com |
Parent topic