Adding and Managing Actions in a Workflow
Adding an action
To add an action to your workflow, do the following:
1. On the right side of the Workflow Editor, from the ACTIONS panel, under Services, expand a service or utility to display a list of available actions.
2. Drag one or more actions between  and
and  to the Workflow Editor.
and to the Workflow Editor.3. Connect to the first action to be executed, and then connect all subsequent actions until the last action is connected to .
to the first action to be executed, and then connect all subsequent actions until the last action is connected to .Ensure that there is at least one valid path from to to save the workflow. |
4. Place the pointer on an action, and click  or double-click the action icon. The action configuration window opens. This window consists of the following panels:
or double-click the action icon. The action configuration window opens. This window consists of the following panels:▪ The left panel provides the input parameters that the action uses to provide an output.
▪ In the right panel, the Input section provides the output of the previous actions, and the Parameter section provides a list of parameters that are available.
5. For Connector Type, select the appropriate connector type to define how to connect the ThingWorx Flow server to the third-party application.
By default, the input form for any action shows the default connector type. However, if you previously selected a connector type for any action in a workflow, the input form shows the last selected connector type for any action under that service or utility for that particular workflow.
6. Under Connector Name, add a connector for the type that you selected. If you previously added a connector, select the connector name from the list.
7. Click MAP CONNECTOR to execute the action using a connector that is different from the one that you are using to populate the input fields. You can add a connector of any type, but ensure that the mapped connector is from the same third-party service as the connector name.
After you click MAP CONNECTOR, in the Runtime Connector field, do one of the following:
▪ From the Parameter section in the right panel, click  next to a key-value. The value field must provide the name of a valid connector. For more information, see Adding parameters.
next to a key-value. The value field must provide the name of a valid connector. For more information, see Adding parameters.▪ Type a value that denotes a valid connector name.
▪ Map an appropriate output of a previous action to provide the name of a valid connector.
If your mapped value is not a valid connector name, the action is not executed, and you receive an error.
For Connector Type set to None, the MAP CONNECTOR option is not available. |
8. Depending on the field type, use one or a combination of the following methods to provide values in the input fields in the left panel:
▪ Type a value.
▪ Select a value from the list. Lists are populated from the external system to which the action is connected. In these cases, a valid connector must be configured to populate the list.
Click  to see a list of values. You can also enter text in the field to filter the list, and then click
  as shown in the following figure:
to see a list of values. You can also enter text in the field to filter the list, and then click as shown in the following figure:
▪ Map the output of any previous action to the input field. Do either of the following to map data:
▪ Place the pointer in the input field and click next to the output of a previous action under Input or a parameter value under Parameter.
next to the output of a previous action under Input or a parameter value under Parameter.▪ Drag and drop an output of the previous action to the input field.
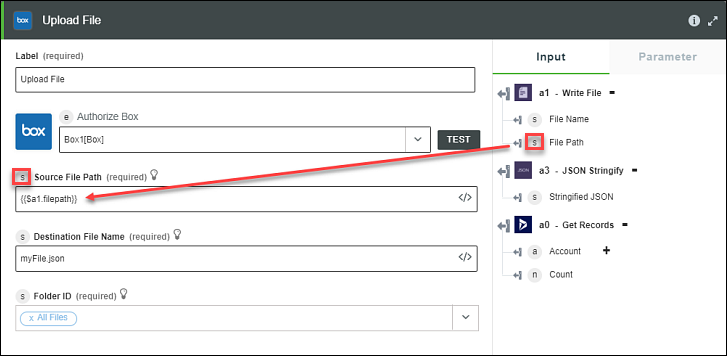
Ensure that you map same data types. For example, S indicates a string field in the following figure:
If a specific output attribute is not available in the output schema and you want to map that attribute to the input field, refer to Mapping output of a previous action manually.
 to add an
 9. After configuring the action, click Done.
10. Continue to configure all the actions in the workflow, and then test them. For more information on testing workflows, refer to Testing workflow execution.
Connecting two actions
After you connect two actions, you can manage the connection between two actions. Click the line connecting the two actions, and perform one of the following tasks:
◦ Add a condition—Click to set a condition between two actions. The workflow proceeds to the next action only if the specified condition is met. For more information, see Setting conditions between two actions.
to set a condition between two actions. The workflow proceeds to the next action only if the specified condition is met. For more information, see Setting conditions between two actions.◦ Delete the connection—Click  to delete the connection between the two actions.
to delete the connection between the two actions.◦ Detach the connection—Click  to detach the connection between the two actions.
to detach the connection between the two actions.◦ Add a note—Click  to add a note between the actions on the Workflow Editor. In the text box, type the note, and click
  to save the note. If you want to delete the note, click the note to open it, and click .
to add a note between the actions on the Workflow Editor. In the text box, type the note, and click to save the note. If you want to delete the note, click the note to open it, and click .Managing actions
Place the pointer on the action, and perform one of the following tasks:
◦ Edit an action—Click or double-click the action icon. The action configuration window opens. Modify the values in the input form as per your requirement, and click Done.
or double-click the action icon. The action configuration window opens. Modify the values in the input form as per your requirement, and click Done.◦ Copy an action—Click  to copy the action. A copy of the action is added to the Workflow Editor.
to copy the action. A copy of the action is added to the Workflow Editor.◦ Delete an action—Click and then click  .
.
and then click .