Testing Workflow Execution
Workflow 1
To set and fetch information from the Data Store utility and then display that information in the Logger utility, the workflow consists of the following scenarios:
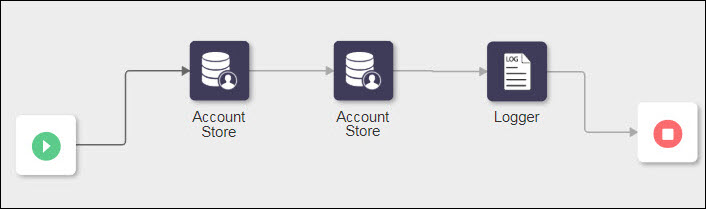
Step 1: Use two Account Store actions to set and fetch information
The following steps provide details of the values that you need to specify in the action form for this specific example. For detailed steps on configuring this action, see Account Store.
1. Open the first Account Store action, and do the following:
a. In the Select Action list, select SET.
b. Under the Set Data in Account Store section, do the following:
▪ In the Key field, enter the key name that you want to set.
▪ In the Value field, enter the value that you want to assign to the key.
2. Open the second Account Store action, and do the following:
a. In the Select Action list, select GET.
b. Under the Get Data from Account Store section, in the Key field, provide the same key name that you set in the first Account Store action.
Step 2: Use the Logger action to display information
The following steps provide details of the values that you need to specify in the action form for this specific example. For detailed steps on configuring this action, see Logger.
1. In the Log field, map the value of Data from the second Account Store action.
Step 3: Execute the workflow
1. Click Save to save the workflow, and then click Execute.
The workflow execution completes successfully.
2. To verify workflow execution, do the following:
a. Click  to open the debug panel.
to open the debug panel.b. In the Action tab, click the Logger action to view the Input and Output.
You can see that appropriate key/value pair is retrieved from the database which you set earlier using the first Account Store action.
If the appropriate key/value pair is not found, the Logger action output returns an empty value.
Workflow 2
To request information from an HTTP server by using the HTTP utility and then deliver the response to the Logger utility, the workflow consists of the following scenarios:
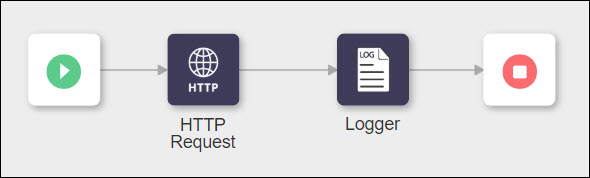
Step 1: Use the HTTP Request action to request information from an HTTP server
The following steps provide details of the values that you need to specify in the action form for this specific example. For detailed steps on configuring this action, see HTTP Request.
1. In the Select HTTP Method list, select GET.
2. In the URL field, provide your local ThingWorx URL.
Step 2: Use the Logger action to display information
The following steps provide details of the values that you need to specify in the action form for this specific example. For detailed steps on configuring this action, see Logger.
1. In the Log field, map the value of Status Code from the HTTP Request action. This provides the appropriate status code response from the HTTP Request action after it connects to ThingWorx.
Step 3: Execute the workflow
1. Click Save to save the workflow, and then click Execute.
The workflow execution completes successfully.
2. To verify workflow execution, do the following:
a. Click to open the debug panel.
to open the debug panel.b. In the Action tab, click the Logger action to view the appropriate response code that is retrieved depending on connectivity with ThingWorx.