Creating and Managing Connectors
Connectors are grants by an account owner to authorize the ThingWorx Flow server access to capabilities of a third-party service or utility. They allow actions and triggers to access data from external systems.
Each connector is owned by the user who creates it. By default, only the creator can view, use, edit, or delete connectors. The Administrator user and any member of the Administrator group cannot view, use, edit, or delete any private connector created by another user. However, if a user shares a connector, then any ThingWorx Flow user can use the connector. However, other ThingWorx Flow users cannot view, edit, or delete the connector.
There is no limit to the number of connectors that you can create for a service.
Connector names must be unique across all services, regardless the connector type.
Connector Types
Connector types define the way ThingWorx Flow connects to third-party services or utilities. While developers can define any connector type, the following list provides the commonly supported connector types by ThingWorx Flow:
◦ None—Anonymous access.
◦ Basic—Account credentials, in the form of user ID and password.
◦ Token—Access token of a particular account.
◦ Application key—Application key of a particular account.
◦ One-Way SSL and Two-Way SSL—Shared SSL certificates between the third-party service and the ThingWorx server is used for authentication.
◦ OAuth—Open Authorization (OAuth) authentication and authorization standard is used for authentication. ThingWorx Flow supports the following OAuth connector types:
▪ OAuth (Named User)
▪ OAuth (Session User)
The following table provides the key differences in an OAuth connector for Named Users and Session Users:
|
OAuth (Named User)
|
OAuth (Session User)
|
|---|---|
|
Create an OAuth (Named User) connector to execute any actions that are associated with this connector with the provided set of account credentials only.
To enable other users to execute workflows with the same credentials that the workflow is created, do the following:
1. Create an Create an OAuth (Named User) connector.
2. Share this connector.
|
Create an OAuth (Session User) connector to allow other users to execute any actions that are associated with this connector with their account credentials. To enable this, do the following:
1. Create an OAuth (Session User) connector.
2. Share this connector.
Any ThingWorx Flow user that logs in to the system must provide their own set of credentials and grant access to each third-party service or utility that uses the OAuth (Session User) connector.
|
|
Sharing this connector allows other ThingWorx Flow users to execute any workflow that is associated with this connector.
If you do not share this connector, other users cannot use it to execute workflows with this connector.
|
Sharing this connector allows other ThingWorx Flow users to execute workflows using their account credentials.
If you do not share this connector, it works like an OAuth (Named User) connector.
|
|
You can use the OAuth (Named User) connector in any action in a trigger-initiated or user-initiated workflow.
|
You can use the OAuth (Session User) connector in any workflow that is initiated by a user. However, you cannot use the OAuth (Session User) connector in any action in a trigger-initiated workflow.
|
|
You can create and edit polling triggers and webhook triggers using the OAuth (Named User) connector.
|
You can create and edit webhook triggers using the OAuth (Session User) connector. However, you cannot create polling triggers using the OAuth (Session User) connector.
|
Creating Connectors
Use one of the following options to create a connector:
From the ThingWorx Flow dashboard
To create a connector from the ThingWorx Flow dashboard, do the following:
1. On the ThingWorx Flow dashboard, click , and click  .
.
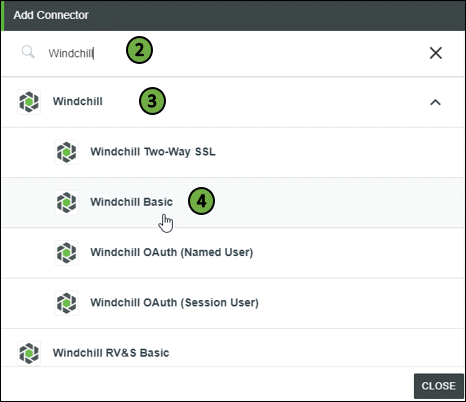
.2. In the Add Connector window, search for the connector that you want to add, or click  to filter connectors by their supported types.
to filter connectors by their supported types.3. Select the connector that you want to add to display the supported connector types.
4. Select the connector type that you want to add.
For example, to select the Windchill Basic connector type, in the Search field, search for Windchill, click  , and select Windchill Basic.
, and select Windchill Basic.The following image demonstrates steps 2, 3, and 4:
5. As per the connector type that you selected, enter your credentials or grant appropriate accesses to log in to the third-party system in the next pop-up, and click ADD.
Once the connector is added, you can use it in any action or trigger.
From the Workflow Editor
To create a connector from the Workflow Editor, do the following:
1. Drag any action under the connector to the canvas, place the pointer on the action, and then click  or double-click the action.
or double-click the action.2. For Connector Type, select the connector type that you want to create.
3. Under Connector Name, in the drop-down list, select one of the following relevant options:
▪ Add New
▪ Add new login – Named User
▪ Add new login – Session User
For example, to select the Windchill Basic connector type, for Connector Type, select Windchill Basic, and in the Windchill Basic list, select Add New.
4. As per the connector type that you selected, enter your credentials or grant appropriate accesses to log in to the third-party system in the next pop-up, and click ADD.
Once the connector is added, you can use it in any action or trigger.
Managing Connectors
You can manage connectors in one of the following ways:
• Test, edit, share, delete, or switch any connector in the ThingWorx Flow system from the ThingWorx Flow dashboard.
For more information about managing connector types, see Managing connectors on the ThingWorx Flow dashboard.
• View and remove connectors used in a specific workflow from the Workflow settings page.
For more information, see Managing connectors in the Workflow settings window.