Creating Request for Data Update
Accurate and up-to-date asset information is essential in the field service industry. Incomplete, inaccurate, or missing data can lead to significant challenges. You can create a Data Update request.
You can create a request with one of the following options:
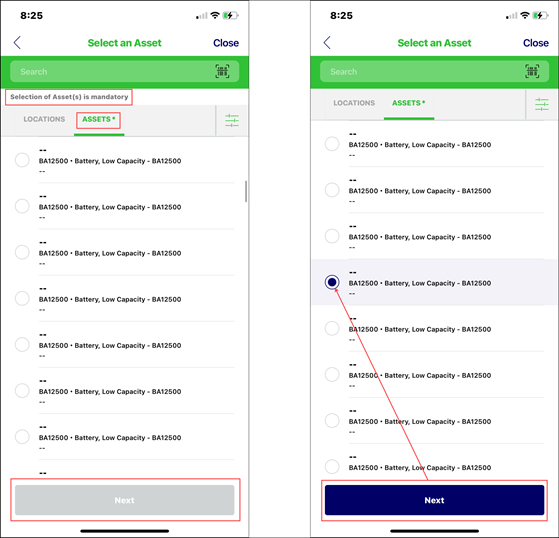
If the setting Asset is Mandatory is enabled by the administrator, you are directed to Asset tab. You must select an asset to proceed with the request.
|
|
If you select an asset and navigate to Location tab and select a location, the asset is deselected and Next button is deactivated. You must select an asset to proceed with the request.
|

Location-based Request
To create a Data Update Location-based Request:
1. Tap Submit a Request in the Overview screen. The Request Type screen is displayed.
2. Tap Data Update.
3. Tap Next. Select an Asset screen is displayed. A list of locations is displayed in the location tab.
4. Tap the filter option to select one of the following options.
◦ All (Default selection)
◦ Recently Viewed
◦ Selected
◦ Tagged
◦ Near Me
5. Click Apply to apply the selected filter.
6. Tap a location to select.
You can tap on the search bar to search for the location in the location tab. The filter options are also displayed. |
7. Tap Next. The Data Update screen is displayed.
You can edit the fields that are added in the details section and the information section. For more information, see Location Details. |
8. Tap an editable field to update the data.
9. Tap Next.
10. Enter the details for Notes. The description provides additional information about the service and the request is not mandatory.
11. Tap Upload to add the images. When you upload an image, an annotation icon is displayed on the image. Use the annotation tool to perform the following actions.
◦ Crop the captured photo.
◦ Draw lines/curves.
◦ Add text.
You can select the color for drawing or adding text. The annotated photo can be uploaded. When the image is annotated and added to the customer request, a copy of the image containing the annotation is added to the customer request. The original image without annotation is saved on the device. |
12. Answer the additional questions if configured. Review the details.
13. Tap Submit Request.
Asset-based Request
To create a Data Update Asset-based Request:
1. Tap Submit a Customer Request in the Overview screen. The Request Type screen is displayed.
2. Tap Data Update.
3. Tap Next. Select an Asset screen is displayed.
4. Tap the Assets tab. A list of assets is displayed.
5. Tap the filter option to select one of the following options.
◦ All (Default selection)
◦ Recently Viewed
◦ Selected
◦ Tagged
◦ Near Me
6. Click Apply to apply the selected filter.
7. Tap an asset to select.
You can tap the search bar to search for the asset in the asset tab. The filter options are also displayed. |
8. Tap Next. The Data Update screen is displayed.
You can edit the fields that are added in the details section and the information section. For more information, see Location Details. |
9. Tap an editable field to update the data.
10. Tap Next.
11. Enter the details for Notes. The description provides additional information about the service, and the request is not mandatory.
12. Tap Upload to add the images. When you upload an image, an annotation icon is displayed on the image. Use the annotation tool to perform the following actions.
◦ Crop the captured photo.
◦ Draw lines/curves.
◦ Add text.
You can select the color for drawing or adding text. The annotated photo can be uploaded. When the image is annotated and added to the customer request, a copy containing the annotation is added to the customer request. The original image without annotation is saved on the device. |
13. Tap Next.
14. Answer the additional questions if configured. Review the details.
15. Tap Submit Request.
Related Topics