Custom Action for Webservice
If you select Web Service, the following SFM Custom Action screen is displayed.
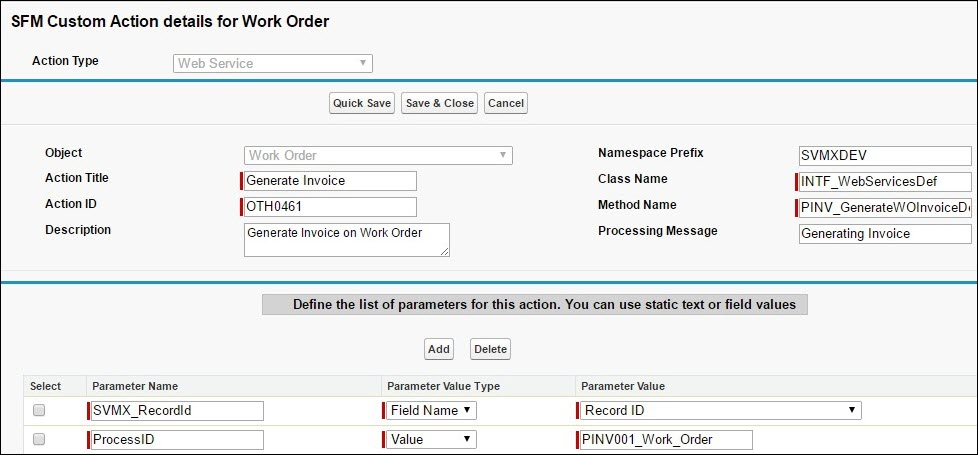
Use the following steps to create a custom action for Web Service.
1. Enter a user-friendly Action Title for the custom action. This will be used as the default title when this action is placed in a wizard.
2. Enter a unique Action ID and Description for the SFM custom action. The description entered here will be used as the default when this action is used in a wizard.
3. Enter the Namespace Prefix in the appropriate text box.
4. Enter the Class Name in the appropriate text box.
5. Enter the method name in the Method Name text box.
6. In the Processing Message text box, enter a custom message that will display to end users during processing.
7. In the parameters section at the bottom, create one or more Web Service parameters. The parameter name cannot contain spaces. The parameter value can either be a constant or data from any field in the record. To configure a static parameter value, select Value in the Parameter Value Type picklist and enter any static text in the Parameter Value field. To configure a dynamic parameter value, select Field Name in the Parameter Value Type picklist and select a field name in the Parameter Value picklist.
8. At anytime during the SFM custom action creation process, you can click the Quick Save button to save the SFM custom action even if it is incomplete, and continue to edit/create the action.
9. To save the SFM custom action and return to the ServiceMax Setup Home page, click the Save & Close button at the top.
10. To cancel any changes made to the action and return to ServiceMax Setup Home, click the Cancel button at the top. Any changes saved while building the SFM custom action will not be rolled back.