Multi-Level Mapping
The SFM Mapping Editor supports multi-level mapping. In multi-level field mapping, the target object field is mapped to the source object's field or a field from a related object list of the source object. This configuration reduces the need to create and maintain custom fields on the source record to hold the information that needs to be passed to the target record.
Use Case
A case has been raised for an Installed Product. The admin wants to auto-map Work Order's fields with values from Installed Product's record when a Work Order is created from the Case. For example, WO.Site is mapped to Case.Component SN.Location.
Example: Consider Case as the source object and Work Order as the target object. You can configure the mapping as follows: WO.Site mapped to Case.Component SN.Location.ORWO.Site mapped to Case.Site.
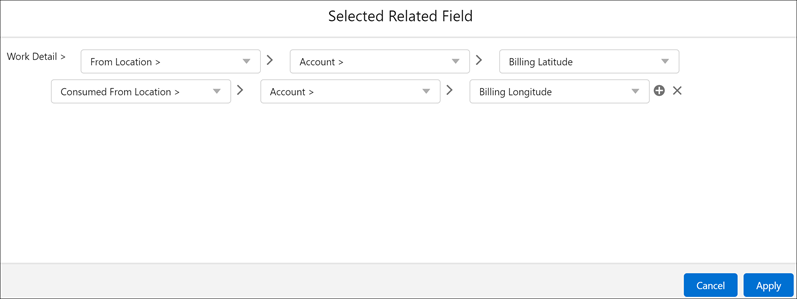
The following screen displays the multi-level mapping.

Key Points to Note for Multi-level Mapping
• All data types except the Record Type Id field are supported for multi-level mapping. When using polymorphic fields for multi-level mapping, the source and the target can be polymorphic fields but not the related field.
• A greater-than-symbol (>) is displayed for lookup fields, to go to the second and/or third levels of the lookup fields for multi-level mapping.
• If no compatible fields are found in the second or third-level source fields, then the No compatible fields error message is displayed in the modal window.
• It is recommended to always configure the correct multi-level mapping. You must use the same data types for the source and the target field mapping, for example, reference field maps with reference fields of the same object or related object. When you add incorrect mapping such as incorrect picklist, invalid email, invalid URL, invalid phone number, out-of-range number, and so on, an appropriate error message is displayed.
The steps to configure multi-level mapping are as follows.
To configure multi-level SFM Mapping:
1. Go to ServiceMax Setup>Service Flow Manager >Mapping. The SFM Mapping List View is displayed.
2. Create a new mapping. The Mapping Editor page is displayed with the Target fields displayed on the left.
3. Select the operator as Field.
4. Click the source field to display the SFM Mapping modal window.
5. Select the field or related field from which you want to map. You can navigate up to three levels from the source and select a field.
6. Click the + icon to add Preference 1 and Preference 2 in the modal window. A maximum of three levels of the source fields can be configured. For example, WorkOrder.Site is mapped with Case.Component.Location by default. If the default mapping does not display any value, then Preference 1 Case.Site is mapped.
• Two more mapping configurations can be added as preferences in addition to the default mapping. They are evaluated sequentially in the order: Default, Preference 1, and Preference 2. • Preference 1 is executed only when the default mapping does not display any value. • Preference 2 is applied only when Preference 1 mapping does not display any value. • Click the x icon to delete the preferences. |
7. Click Applyto apply the mapping and exit the SFM Mapping modal window and back to the Mapping Editor page.
8. Click Save.