Creating a Data Validation Rule
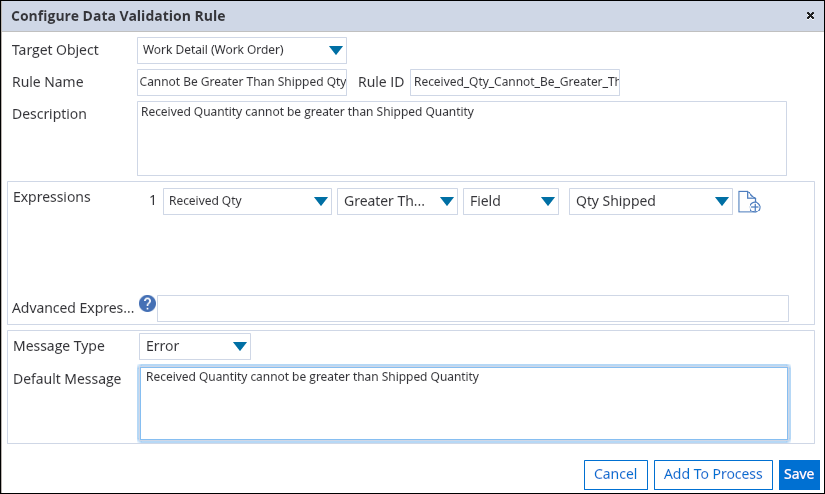
1. Click the New(+) icon.
2. Select a target object from the Target Object picklist.
3. Enter a descriptive, preferably unique name for the rule and tab to the next field; rule id is auto-populated from the name, after replacing the spaces with '_'.
4. Configure the expressions using the available picklists. These are similar to those available in the Qualifying Criteria tab, except for the additional picklist to select Value, Function, or Field.
5. Select Value in this picklist to enter any hard-coded value in the value text box (for example, Expected Qty Greater Than 0) or to choose a picklist value (for example, Order Status Equals Open).
6. Select Function to choose from the list of SFM Literals applicable for a particular field type (for example, Scheduled Date Greater Than Today).
7. Select Field to choose from the list of other fields of compatible type in the same object (from example, Start Date Time Greater Than End Date Time).
8. Configure Advanced Expression such as 1 OR 2 if required; if it is blank, AND is taken as the default operator.
9. Change theMessage Type from the default value Error to Confirmation if required.
10. Configure Default Message.
This is the message displayed in SFM Delivery on Save, when a record matches logical condition configured above, unless the message has been customized for the SFM transaction in the Data Validation Rule tab, or translated using the ServiceMax Translation Workbench.

11. Click the Save button to save the rule and continue to edit.
12. Click the Add To Process button to add the rule to the SFM transaction.
13. If the rule is for the target child object, the Select Target Children dialog box displays when the SFM transaction has two or more tabs for the same child object.

14. Check the target children (for example, Parts and Labor) check boxes that you want to add the rule to and then click OK.
◦ The rule is listed in the 'Data Validation Rules available for the target objects of the SFM transaction' section.
◦ The rule is listed with the associated target objects in the 'Data Validation Rules added to the target objects of the SFM transaction' section.
15. If required, click in the Rule Message column cells in the Data Validation Rules added to the target objects of the SFM transaction's section to customize the rule message for the specific SFM transaction's target objects.
A data validation rule can be created from SFM Data Validation Rules configuration screen using the same steps as above. This can be done after selecting the required object using the Select picklist.- In this configuration screen, it is not possible to associate a rule with any SFM transaction. However, by selecting a rule, you can view the list of associated SFM transactions.