Creating a Custom Value Map
1. Click the + icon.
2. Enter a descriptive, preferably unique name for the value map and tab to the next field; value map id is auto-populated from the name, after replacing the spaces with '_'.
You will see all the target object fields listed on the left side and blank text fields listed on the right side.
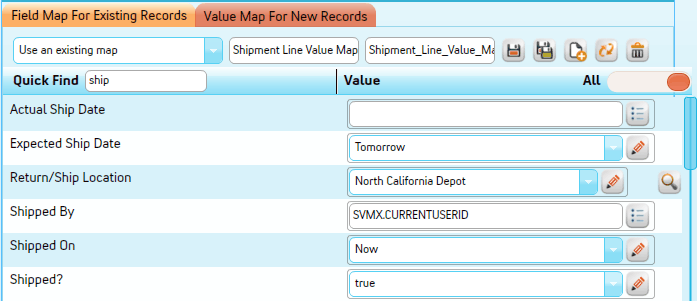
3. Use Quick Find to access quickly any required field, by typing any part of a field name; it triggers an inline filter which does a contains search.
4. Enter values for target fields as required. For copying value from existing field in the same record, enter SVMX.CURRENTRECORD>API Name of the source field>.
|
|
For this to work, both the source and the target fields must be included in the page layout.
|
5. To map a User lookup field to the logged in user's name (this will be any user who launches the SFM transaction in SFM Delivery, determined dynamically at runtime), enter 'SVMX.CURRENTUSERID'.
6. To map a Location lookup field to the inventory location of the technician associated with the logged in Salesforce user (this will be any user who launches the SFM transaction in SFM Delivery, determined dynamically at runtime), enter 'SVMX.USERTRUNK'.
|
|
The above SFM literals work only in the value map for existing records. They do not work in the value map for new records.
|
7. To map any child object field to the value of a header field, enter SVMX.CURRENTRECORDHEADER<Header Field API Name>For this to work, both the source and the target fields must be included in the page layout.
|
|
This literal does not work in value maps for Source To Target All and Standalone Create type of SFM transactions, where the header record is also newly created.
|
8. If you need to map any of the target fields to constants (SFM Literals or picklist values or Record Type values), instead of entering the value, click the list icon and select the required value from the picklist.
9. For lookup fields, you can click the list icon and then the lookup icon, to map a target field to a specific record.
10. Click the Save icon.
|
|
Clicking Save saves the new value map only. It does not associate the value map with the SFM transaction. To associate, click Quick Save to save the SFM transaction.
|
A value map can be created from SFM Mappings configuration screen using the same steps as above. This can be done after selecting the required target object using the related Select picklist.