Creating a Schedule
You can create a single schedule or a repeating schedule from the Pipeline Scheduling tab. A single schedule runs once at the scheduled date and time. A repeating schedule can be run daily or weekly, at the scheduled date and time.
If this is the initial schedule for an area, on the Create Schedule for <Area Name> window, both schedule types are enabled. If you already have an existing schedule, either single or repeating, then the corresponding schedule type is disabled.
When creating the initial schedule for an area, schedule it for overnight or a time when the system is less busy.
Once a schedule is successfully triggered, then that Data Set Start Date is used for all other subsequent schedules.
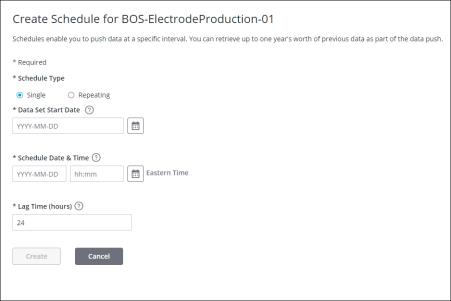
Single Schedule
To create a single schedule, complete the following steps:
1. Click Create Schedule in the Pipeline Schedules table. The Create Schedule for <Area Name> page opens.

2. Fill in the details for Data Set Start Date, Schedule Date & Time, and Lag Time (hours) as required.
◦ Data Set Start Date— The start date from which data is pushed to the ThingWorx Analytics Server for calculating insights. You can select a start date between a year ago and today. Once a schedule is successfully triggered, then that Data Set Start Date is used for all other subsequent schedules.
◦ Schedule Date & Time— The date and time when the scheduled push is triggered.
◦ Lag Time (hours)— The lag time is the delay that allows data used for analysis to be finalized before being pushed to the ThingWorx Analytics Server. Data is not included in the pipeline push until the lag time has elapsed. For example, if the lag time is set to 24 hours, then data is not included in the push until 24 hours after the data was entered. You can enter a number between 0 and 168.
3. Click Create to create a single schedule.
Click Cancel to discard your changes and return to the Pipeline Scheduling tab.
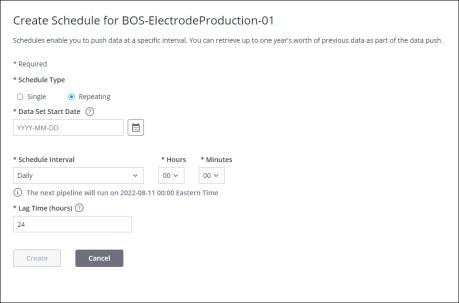
Repeating Schedule
To create a repeating schedule, complete the following steps:
1. Click Create Schedule in the Pipeline Schedules table. The Create Schedule for <Area Name> page opens.

2. Fill in the details for Data Set Start Date, Schedule Interval, and Lag Time (hours) as required.
◦ Data Set Start Date— The start date from which data is pushed to the ThingWorx Analytics Server for calculating insights. You can select a start date between a year ago and today. Once a schedule is successfully triggered, then that Data Set Start Date is used for all other subsequent schedules.
◦ Schedule Interval— Choose whether the schedule repeats Daily or Weekly. Specify the time that the schedule is triggered in the Hours and Minutes fields.
◦ Lag Time (hours)— The lag time is the delay that allows data used for analysis to be finalized before being pushed to the ThingWorx Analytics Server. Data is not included in the pipeline push until the lag time has elapsed. For example, if the lag time is set to 24 hours, then data is not included in the push until 24 hours after the data was entered. You can enter a number between 0 and 168.
3. Click Create to create a repeating schedule.
Click Cancel to discard your changes and return to the Pipeline Scheduling tab.