About Profiles
A Creo+ profile enables grouping of users based on role in the organization, allocation of floating licenses based on role, and configuration of Creo+ for that role.
For example, if a group of engineers work on Simulation Design, as an Administrator you can create a Simulation profile, configure Creo+ for simulation, add simulation engineers as members of the profile, and assign floating licenses for simulation applications to the profile.
The following figure shows the layout of the Profiles page on the Creo+ Portal.
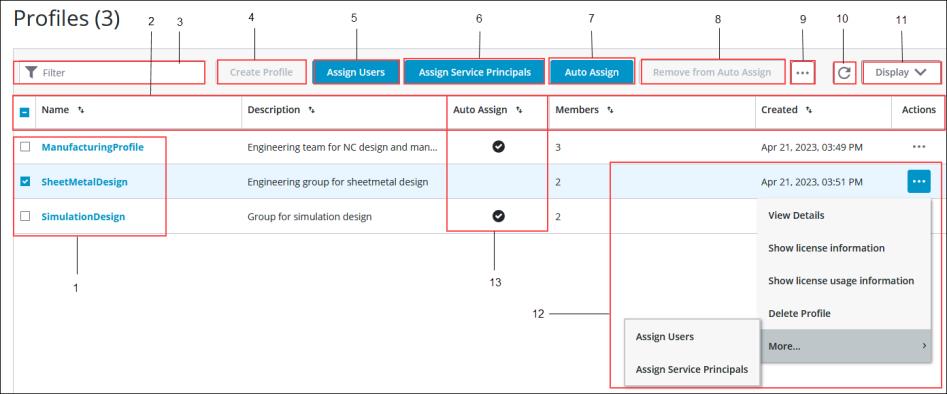
1. Lists all available profiles.
2. Properties of the profiles.
3.  Filter—Searches for a profile
4. Create Profile button—Opens the Profile Setup wizard.
5. Assign Users—Assigns users to the selected profile.
6. Assign Service Principals—Assigns service principals to a selected profile.
7. Auto Assign—Automatically adds all new members to the selected profile.
8. Remove from Auto Assign—Stops automatically adding new users to the selected profile.
9. Click to see additional commands.
10.  —Refreshes the display of profiles.
11. Selects the fields to be displayed.
12. Actions available for profiles:
◦ View Details—Displays the details of a profile such as members, licenses and configurations.
◦ Show license information—Displays the license details for the profile.
◦ Show license usage information—Displays the license usage of the profile at that time.
◦ Display List—Controls the profile properties to be displayed.
◦ Delete Profile—Deletes the selected profile.
◦ Assign Users—Assigns users to the selected profile.
◦ Assign Service Principals—Assigns service principals to a selected profile.
13. Auto Assign—Indicates which profiles are automatically assigned to every new user.