Setup Required Before Installing the AI Parts Rationalization Plugin for On-prem Environment
|
|
This topic is intended for administrators setting up the Windchill on-prem system.
|
Administrators must complete the following prerequisites before installing the plugin:
Configure Windchill Server
Before installing the AI Plugin on your Windchill environment, ensure that your system meets the configuration requirements outlined in this topic. Meeting these requirements is essential for compatibility, performance, and stability of the plugin within the Windchill ecosystem.
For more information on configuring the Windchill server, see Installing Windchill and the Installation Process Flow.
Because the plugin will be hosted on the same machine as the Method Server, additional memory will be required to ensure smooth operation.
• Supported Windchill version: Windchill 12.1.2.22, 13.0.2.10 and 13.1.3.0
• Optional Module (PartsLink)—The plugin supports installation on Windchill environments. This flexibility ensures the plugin can be integrated into a wide range of Windchill setups:
◦ With PartsLink—Enables advanced classification and reuse of parts using a structured taxonomy.
|
|
As mentioned in the Windchill PartsLink and Execute Steps for Windchill Index Search topics, a SOLR server is required to enable classification filter functionality.
|
◦ Without PartsLink—Standard Windchill functionality without classification enhancements.
• BLOB Storage Options—The plugin supports Windchill environments using cloud-based BLOB (Binary Large Object) storage. This ensures seamless handling of large files and documents stored in these cloud services:
◦ Microsoft Azure
◦ Amazon Web Services (AWS)
|
|
The plugin requires a dedicated storage account, either on AWS or Azure. Note that while Windchill currently supports storing vault contents in BLOB Storage, this is a separate requirement. Even if a customer already uses BLOB storage for vault data, a dedicated storage account is still needed specifically for this plugin.
|
• Apache Server Configuration— Plugin utilizes the following authentication methods through Apache, as supported by Windchill 12.1.2.22 and above, 13.0.2.10 and above, and 13.1.3.0 and above releases:
◦ Basic Auth—Simple username/password access
◦ SSO SAML
◦ CAC-PKI (Client Certificate)—Strong authentication using SSL certificates
◦ OIDC‑SSO
|
|
OIDC‑SSO authentication is not supported when the AI Parts Rationalization plugin is used with Windchill version 12.1.2.22.
|
|
|
If you are using MPMLink, to enable indexing with long URL configure the AJP and Tomcat server settings as follows:
1. In a Windchill shell, navigate to the <HTTPServer> folder and execute the command:
ant -f config.xml configureAJPWorkers -DajpMaxPacketSize=16384
2. In a Windchill shell, navigate to the <Windchill>/Tomcat folder and execute the command:
ant -f config.xml configureConnectors -DajpMaxPacketSize=16384
3. Edit the HTTPServer/conf/httpd.conf file to include the following lines:
LimitRequestLine 16384
LimitRequestFieldSize 16384
4. Restart the Apache and Windchill servers to apply the changes.
|
Update Windchill with Preserve Apache Settings Enabled
When upgrading Windchill to 12.1.2.22, 13.0.2.10, or 13.1.3.0, if you choose the Preserve Apache Settings option, the Apache server will not be updated during the upgrade process. This means the existing Apache configuration will remain unchanged, and any new configuration changes introduced in the update will not be applied automatically.
To manually apply the necessary Apache configuration changes, follow these steps only if you selected Preserve Apache Settings = true during the update. If you did not select this option, the updated Apache configuration will be applied automatically.
These steps are common applicable for all authentication types (SAML SSO and Basic Authentication):
1. Load the Required Modules—Update the modules-load.conf.template file located at <Windchill_Home>\HTTPServer\conf\templates\ to include the missing modules:
<IfModule !rewrite_module>
LoadModule rewrite_module modules/mod_rewrite.so
</IfModule>
<IfModule !proxy_module>
LoadModule proxy_module modules/mod_proxy.so
</IfModule>
<IfModule !proxy_http_module>
LoadModule proxy_http_module modules/mod_proxy_http.so
</IfModule>
<IfModule !proxy_hcheck_module>
LoadModule proxy_hcheck_module modules/mod_proxy_hcheck.so
</IfModule>
<IfModule !proxy_balancer_module>
LoadModule proxy_balancer_module modules/mod_proxy_balancer.so
</IfModule>
<IfModule !slotmem_shm_module>
LoadModule slotmem_shm_module modules/mod_slotmem_shm.so
</IfModule>
<IfModule !watchdog_module>
LoadModule watchdog_module modules/mod_watchdog.so
</IfModule>
<IfModule !lbmethod_byrequests_module>
LoadModule lbmethod_byrequests_module modules/mod_lbmethod_byrequests.so
</IfModule>
2. Reconfigure Apache. Before proceeding, ensure you take a backup of the Apache folder. Then, run the following command to reconfigure Apache:
ant -f config.xml reconfigure
• SAML SSO
a. Load the required modules as described in common Step 1.
b. Ensure that the directive ShibUseHeaders On is present within the LocationMatch elements in /apache/conf/conf.d/30-app-Windchill-1Auth.conf for REMOTE_USER. Add it if it is missing.
• Basic Authentication
1. Load the required modules as described in common Step 1.
2. Update webAppAuthResToConf.xsl file located at <Windchill_Home>\HTTPServer\conf\templates\xsl to include the following code after the Require valid-user line:
<xsl:if test="$resource='WCPlugins'">
RewriteRule .* - [E=PROXY_USER:%{LA-U:REMOTE_USER}]
RequestHeader set REMOTE_USER %{PROXY_USER}e
</xsl:if>
RewriteRule .* - [E=PROXY_USER:%{LA-U:REMOTE_USER}]
RequestHeader set REMOTE_USER %{PROXY_USER}e
</xsl:if>
3. Modify app-Windchill-AuthRes.xml—Update the app-Windchill-AuthRes.xml file located at \<Windchill_Home>\HTTPServer\conf to include following line immediately after the opening <resources> tag, before any existing <resource> entries:
<resource>WCPlugins</resource>
4. Reconfigure Apache. Before proceeding, ensure you take a backup of the Apache folder. Then, run the following command to reconfigure Apache:
ant -f webAppConfig.xml regenAllWebApps
ant -f config.xml reconfigure
ant -f config.xml reconfigure
When upgrading Windchill with Preserve Apache Settings = true, Apache must be updated manually. SAML SSO requires validating that the ShibUseHeaders On directive is configured correctly. Basic Authentication requires additional configuration changes and web application regeneration. After completing the relevant steps for the SAML SSO and Basic Authentication, reconfigure Apache.
|
|
Verify that Windchill is configured for HTTPS. For more information, see Configuring HTTPS for PTC HTTP Server and Windchill.
|
|
|
If custom certificates are configured in Windchill for a custom application (for example, the Navigate app), manually copy the contents of the custom certificate file to HTTPServer/conf/sslvhostconf.d/allClientCerts.crt and remove the configuration file that references the custom certificate.
|
Set the Plugin Installation Directory
A dedicated property wt.plugins.installed.dir is provided out-of-the-box (OOTB) so the administrator can define the directory where the plugin files will be unzipped and installed. By default, this property is left blank, meaning that no installation path is predefined.
An administrator installing Windchill must manually create a secure directory outside of the Windchill home directory, with read, write, and execute permissions, and then configure this property accordingly.
To add and propagate the wt.plugins.installed.dir property in the wt.properties file using xconfmanager, use the following command. For example:
xconfmanager -s wt.plugins.installed.dir=<your_custom_path> -t codebase/wt.properties && xconfmanager -pF
|
|
When specifying the plugin installation directory path on Windows, refer to the Specifying URIs and URLs topic for guidance on valid path formats.
|
Ensure that access to the installation directory is granted only to the administrator users. No other users should be given this permission.
|
|
If the plugin installation directory is not created as described, the plugin installation will not proceed.
|
Once you create a directory and define it using the property, you can install the plugin without requiring a restart of the Windchill server.
Configure a Shared Directory for the Plugin Installation in Windchill Clustered Environments
In a Windchill clustered environment, the plugin installation requires a shared directory that is accessible from all nodes in the cluster. This shared location ensures consistent deployment and availability of plugins across the environment.
|
|
The plugin installation is supported only through the shared directory, and local directories are not supported in clustered configurations. If the shared directory is not properly configured or is inaccessible to any node, the plugin installation process will fail.
|
Administrators must follow these guidelines to correctly configure and secure the shared directory:
• Create a network-shared folder to serve as the common plugin installation directory, accessible from all Windchill nodes.
• Specify a valid network path:
◦ \\shared\plugins (for Windows systems using UNC path format)
◦ /mnt/shared/plugins (for Linux systems using mounted network paths)
• Ensure all nodes have read and write access to the shared folder, and grant execute permissions for the Windchill installer user. In a Windows cluster setup, the plugin servers always operate in headless mode.
• Use the xconfmanager utility to set the wt.plugins.installed.dir property on each node, and ensure it points consistently to the shared directory.
• Ensure the shared directory has enough free space to accommodate all plugins. For example, if you plan to install 10 plugins and each plugin has a different size, calculate the total space required by adding the sizes of all plugins. The shared directory must have enough free space to accommodate all plugins after installation.
|
|
In a clustered setup, if one of the nodes is down during plugin installation, the plugin is installed only on the node that is currently running. When the node that was down comes back online, the plugin is automatically installed on that node, and the Apache configuration changes are updated accordingly.
For example, consider a setup with a Node 1 and another Node 2. If Node 2 is down or goes offline during the plugin installation, the plugin will not be installed on Node 2 at that time. After the server and Apache services are restarted and Node 2 comes back online, all required installation files are automatically updated on Node 2. No manual steps are required.
|
Log Files in the Plugin Installation Directory
The plugin installation directory contains, a logs folder with the files generated by the plugin, for example /opt/ptc/plugins/logs. Administrators can refer to these detailed logs to troubleshoot issues or verify operations. These logs include timestamps, request details, and error messages.
A dedicated property wt.plugins.logs.dir is provided to specify the custom location for generating plugin logs.
• If the property is not set, plugin logs will be generated in the plugin installation directory, for example /opt/ptc/plugins/logs.
• If the property is set, plugin logs are generated in the directory specified by the property.
|
|
Windchill related logs are available in Apache and the MethodServer logs within the Windchill installation logging directories.
|
Set the Plugin Temporary Directory
A new property wt.plugins.temp.dir is introduced. This is an optional property that defines the directory for storing temporary plugin files. By default, the directory path is set to ${wt.temp}/<pluginId>. wt.temp is the existing wt property that defines the Windchill temporary location. It is important to ensure that write access to this directory is granted only to administrative users. No other users should be given this permission.
Use the following command to set this property:
xconfmanager -s wt.plugins.temp.dir=<your_custom_path> -t codebase/wt.properties && xconfmanager -pF
Create a Unique Index in the VIZSERVERJOBID Column in the PUBLISHCLOUDENTRY Table
To improve the performance of external job creation and AI Parts Rationalization operations, create a unique index in the VIZSERVERJOBID column in the PUBLISHCLOUDENTRY table.
|
|
Creating a unique index is required for Windchill releases 12.1.2.22 and later, 13.0.2.10 and later, and 13.1.3.0 and later.
Starting with Windchill 2027.0.0.0, creating a unique index is no longer required.
|
Follow these steps to create a unique index:
1. Before creating the index, ensure there are no duplicate values in the VIZSERVERJOBID column. This column is currently empty, as Windchill does not use it out of the box (OOTB).
2. Use the appropriate SQL command as provided by the database vendor, to create the unique index in the VIZSERVERJOBID column in the PUBLISHCLOUDENTRY table.
The following is an example for Oracle databases. Database administrators should adjust the syntax and options according to the specific requirements and best practices of their database system:
CREATE UNIQUE INDEX "VIZSERVERJOBID_UNIQUE_IDX" ON "PUBLISHCLOUDENTRY" ("VIZSERVERJOBID")
PCTFREE 10 INITRANS 2 MAXTRANS 255 COMPUTE STATISTICS
STORAGE(INITIAL 24576 NEXT 24576 MINEXTENTS 1 MAXEXTENTS 2147483645
PCTINCREASE 0 FREELISTS 1 FREELIST GROUPS 1
BUFFER_POOL DEFAULT FLASH_CACHE DEFAULT CELL_FLASH_CACHE DEFAULT)
TABLESPACE "INDX";
PCTFREE 10 INITRANS 2 MAXTRANS 255 COMPUTE STATISTICS
STORAGE(INITIAL 24576 NEXT 24576 MINEXTENTS 1 MAXEXTENTS 2147483645
PCTINCREASE 0 FREELISTS 1 FREELIST GROUPS 1
BUFFER_POOL DEFAULT FLASH_CACHE DEFAULT CELL_FLASH_CACHE DEFAULT)
TABLESPACE "INDX";
3. Rebuild the newly created index if required.
4. Check that the index is created successfully.
Depending on your organization’s system parameters, the database administrator must take appropriate actions.
|
|
The VIZSERVERJOBID is used as a key identifier in the parts search and external job flows.
|
|
|
Index‑specific parameters are optional when creating the unique index on the VIZSERVERJOBID column. We recommend using the production database server’s default settings. Only the basic index creation query, along with the appropriate tablespace name, is executed.
|
Configure Customer Storage
The following section outlines the configuration steps for each supported storage option—Microsoft Azure Blob Storage and Amazon S3 bucket.
For on‑premise Windchill server configurations, AI Part Rationalization supports only SECURITY_CREDENTIALS authentication when connecting to Microsoft Azure Blob Storage and Amazon S3 buckets.
All sensitive information provided during the storage configuration is securely stored using a keystore. This ensures that your credentials are encrypted and protected from unauthorized access, maintaining the confidentiality and integrity of your data.
Refer to the Configuring Customer Storage topic for more information.
• Azure Storage
◦ Account Name—Your Azure Storage account name.
◦ Account Key—The secret key used to authenticate access.
◦ Container Name—The name of an existing or newly created container.
|
|
You can find the storage account name and access keys on the Azure Storage page under Security + networking.
If you already have an Azure Storage account, we recommend that you create an additional account for better security and storage organization. You can find the existing account name under > .
Azure Storage should be publicly accessible for VCS use. Set the Enabled from all networks option on > > > > .
For more information, see Azure Blob Storage documentation—Create a storage account.
|
• Amazon S3
◦ Bucket Name—The name of your Amazon S3 bucket
◦ Access Key ID—Your AWS access key ID
◦ Secret Access Key—The secret key for authentication
◦ Region—The AWS region where your bucket is hosted
|
|
You can find the above details on the AWS Console:
• Amazon S3 Bucket Name—Go to the Amazon S3 service in the AWS Console. Your bucket names are listed under the Bucket name column on the main S3 dashboard. Currently, AI Parts Rationalization plugin does not support a folder structure under Amazon S3 Bucket.
• Access Key ID—Go to > > > tab to view or create your Access Key ID.
• Secret Access Key—You can find your Secret Access Key only when you create a new access key in > > > . It is shown once and cannot be viewed again later.
• Region—Go to the Amazon S3 service in the AWS Console. In the bucket list, the Region is shown in the AWS Region column next to each bucket name.
• Define a policy on the Amazon S3 bucket. A sample snapshot of a policy defined on Amazon S3 bucket AIPlugin-s3-bucket is a follows:
{
"Version": "2012-10-17", "Statement": [ { "Sid": "VisualEditor0", "Effect": "Allow", "Action": "s3:*", "Resource": [ "arn:aws:s3::: AIPlugin-s3-bucket", "arn:aws:s3::: AIPlugin-s3-bucket/*" ] } ] } The policy can be customized based on the customer security requirements. Make sure to provide Read, Write, List, Delete and Exists access to the Amazon S3 bucket.
For more information, see Getting Started with IAM.
|
You can only see and fill in the fields relevant to your selected storage type.
The details of the Storage Account are required while configuring the plugin. For more information, see the section Configure AI Parts Rationalization Plugin.
Configure the Indexing User
Out-of-the-box, the indexing user field is blank in the plugin configuration UI. To enable indexing, you must configure a valid indexing user.
If a site administrator is configured as the indexing user, all Site data will be considered for indexing. For the site administrator, there is no need to configure any new access control rule.
The site administrator is responsible for creating and configuring indexing user in the Windchill system. The indexing user should be a non-administrative user designated specifically to initiate indexing operations.
With appropriate context-level access controls, the indexing user can include or exclude specific product content from indexing.
|
|
• Provide both site-level and context-level access to the indexing user.
• If an indexing user is created and configuration is added, but no policy administration rules are defined for the user and no context access is granted, then no data will be indexed.
• Add the indexing user to the one of the base licenses through license exclusion group. For more information, see License Exclusion Groups.
|
To configure the indexing user, follow these steps:
1. Configure Site-level access controls.
a. Navigate to > in Windchill.
b. Select > .
The name of the indexing user (IndexUser) is defined by the user during configuration.
|
|
You must provide the indexing user ID (IndexUser) when configuring the plugin. For more information, see the Configure AI Parts Rationalization Plugin section.
|
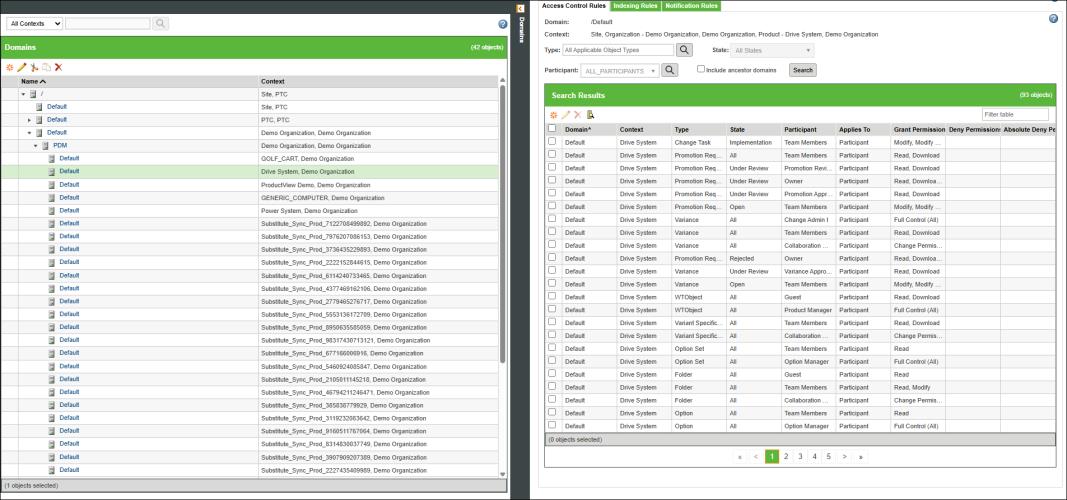
2. Configure Context-level access controls.
a. Navigate to > in Windchill.
b. Select All Context. From the table select > > . Set these access controls for the Product contexts whose parts need to be indexed.
c. Create new access control rules with the following configurations:
|
Type
|
User
|
Access Control
|
|---|---|---|
|
Part
|
IndexUser
|
Read
|
|
Derived Image
|
IndexUser
|
Read, Download
|
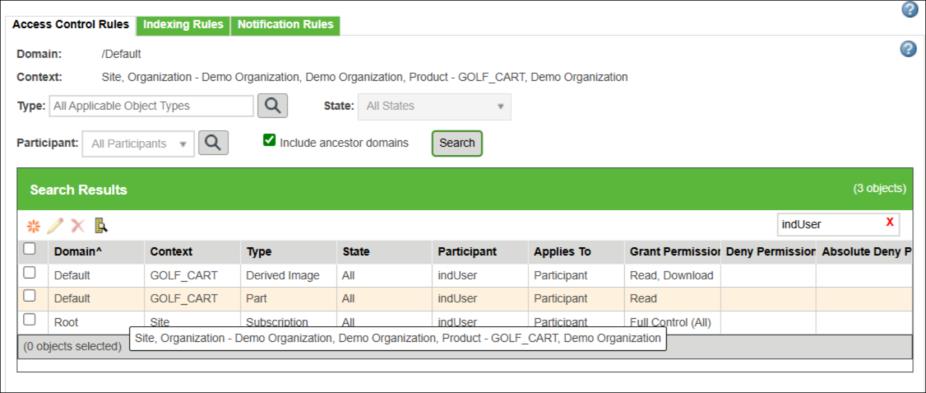
The indexing user must have download access for the Derived Image type. This permission can be inherited from the site-level context or explicitly added to a specific context.
|
|
When configuring the indexing user, it is recommended to provide access to specific contexts—such as Site, Product, Library, Project, or Organization—for the indexing user. If you want to index only certain data within a specific context, you must ensure that permissions for the Part and the Derived Image types in that context are properly granted. If access is not restricted, all parts in the Windchill database will be indexed, which may be unnecessary and will significantly increase the time required for indexing.
Select what to index with caution because the license uses AI credits. Unnecessary indexing consumes these credits, which could lead to additional costs for purchasing more credits later. Configuring permissions carefully helps control what is indexed and prevents unnecessary resource consumption.
|
3. To initiate the indexing process, click Initiate Indexing on the Duplicate Part Search page. For more information, see Duplicate Part Search by an Administrator and Indexing the Data.
4. To configure the indexing user for Project and Library context, the user must log in as a Project or Library creator.
◦ For Project context, go to > >
◦ For Library context, go to > >
5. Set the same policy access that you configured in the PDM context, as described in step 2c.
If you change the indexing user or its associated permissions for a context, the indexed data remains in the vector index even if you later remove those permissions. In other words, once indexing is complete, removing permissions for a context does not delete the corresponding entries from the index. For example, if an indexing user has permission to two contexts and indexing is completed for both. Later, removing permission for one of those contexts will not remove its embeddings. The index will still retain the entries for that context even though the permission has been removed. |