Installing and Configuring the AI Parts Rationalization Plugin on Windchill On-prem Environment
This topic is intended for the Windchill on-prem System Administrator.
The plugin can be installed as an additional component alongside Windchill. The deployment and updates of the plugin are managed by the Plugin Manager available in Windchill.
|
|
The AI Part Rationalization plugin is compatible with the Windchill version listed the Supported Windchill Releases section of the Introduction of the AI Parts Rationalization Plugin topic.
|
The plugin integrates with Windchill in a loosely coupled manner. This means that the plugin can be updated and maintained independently without affecting the core functionality of Windchill.
Authentication
The plugin is made available to the site administrator based on PTC SaaS Platform authentication. To view the Windchill plugin, you must be a Windchill site administrator and have a PTC SaaS Platform account with access to the Windchill product. Follow these steps for the PTC SaaS Platform authentication:
1. Log in to your Windchill account as a site administrator.
3. Enter your PTC SaaS Platform account credentials. You only need to provide your PTC SaaS Platform credentials once per session. After that, you can continue using the Plugin Manager without re-authenticating. However, re-authentication is required if the session expires.
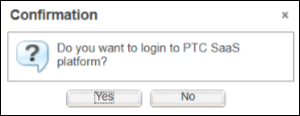
In the Confirmation dialogbox:
◦ If you click No, you cannot view the list of the newly available plugins or the updated plugins. You will continue to see the installed list of plugins and their previous versions.
◦ If you click Yes, you will need to provide your PTC SaaS Platform credentials to proceed. After authentication, you can view the newly listed plugins and the updated versions of existing plugins.
These credentials were provided during the onboarding of the Windchill site administrator to the PTC SaaS Platform step 2. Refer to the Note of the section Invite the Windchill Site Administrator for AI Plugin Installation for further information. |
After logging in with your PTC SaaS Platform credentials, you can view the list of available plugins.
Install AI Parts Rationalization Plugin
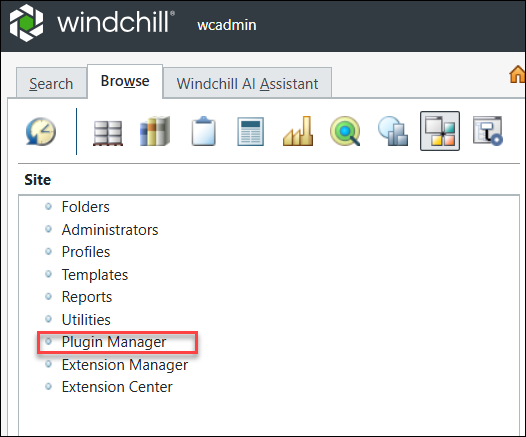
The Plugin Manager allows you to install and configure the available AI Parts Rationalization plugin.
When you click Plugin Manager, the Windchill Plugins page lists the latest versions of the available plugin from the PTC SaaS Platform storage in a table format. The row in the table displays the name, version, and status (Installed or Uninstalled).
Fields | Description |
|---|---|
Plugin Name | Indicates the name of the plugin. |
Installed Version | Indicates the installed version of the plugin. This field is blank if the plugin is not installed. |
Latest Version | Lists the latest available version of the plugin for installation. |
Description | Provides a short description of the available plugin |
Last Modified | Indicates the date the plugin was last modified. |
Plugin Status | Indicates whether the plugin is installed or not. |
Plugin Server | Indicates the status of the plugin server—operational and running or down. This field is blank if the plugin is not installed. |
To install the plugin, follow these steps:
1. Right-click the plugin, and then select Install from the context menu.

2. Enter the following information in the Install Plugin dialog box. After the installation, Windchill Server Manager starts a new plugin server process.
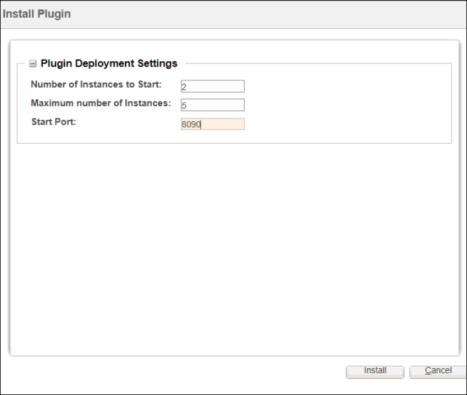
◦ Number of Instances to Start: Number of plugin instances. The number of plugin instances to start should not be more than the maximum number of plugin instances available.
You can add multiple plugin instances during installation. However, once the plugin is configured, the number of instances cannot be changed. To modify the number of plugin instances, you must uninstall the plugin, reinstall it, update the instance count, and then reconfigure the plugin. |
◦ Maximum Number Of Instances:The maximum number of plugin instances you can configure is 5.
◦ Start Port: The first port number in the range where the system should begin. The ports should not be already in use.
3. Click Install. The plugin appears in the Windchill Plugins table.
4. If Windchill is configured with custom certificates for custom applications (for example, the Navigate app), perform the following steps:
a. Manually copy the contents of the custom certificate file to HTTPServer/conf/sslvhostconf.d/allClientCerts.crt.
b. Remove the configuration file that references the custom certificate.
During a rehost operation, only plugin certificates are regenerated by default. As a result, custom certificates must be retained manually. If the allClientCerts.crt file, which contains both plugin and custom certificates, is not copied from the source system to the target system before rehosting, the custom certificates are not retained. To preserve custom certificates, either copy the allClientCerts.crt file before rehosting or manually import the custom certificate into the file after rehosting. For more information, see the “WVS Agent Settings” section in the Windchill 12.1.2.0 Rehost Utility Guide. |
If the installation fails with the message, “AIPartsRationalization installation failed because of a security verification failure. Contact your system administrator for assistance,” ensure that you are using the latest Java build for the corresponding Java version. For more information, see Troubleshooting for On-prem Environment. |
Configure AI Parts Rationalization Plugin
To configure the plugin, you need to register the Windchill product instance and create service principal. For more information, see the Register a Windchill Product Instance section.
Before you begin configuring the plugin, confirm your Windchill deployment scenario. Common scenarios include split‑web server setups and reverse proxy configurations. If your deployment falls under any of these categories, refer to the section “Configuring the Plugin in Windchill Deployment Scenarios” of this topic for detailed instructions.
1. To configure the plugin, right-click the Installed plugin and select Configure Plugin.

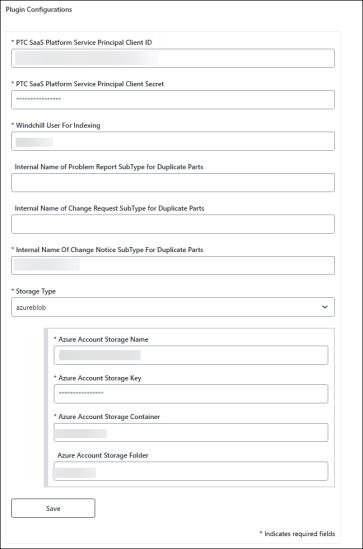
2. Provide the required details in the Plugin Configurations window and then click Save.
◦ PTC SaaS Platform Service Principal Client ID—Enter the Client ID that was generated and displayed on the Create Service Principal page.
◦ PTC SaaS Platform Service Principal Client Secret—Enter the Client Secret that was generated and displayed on the Create Service Principal page.
The Client ID and Client Secret are automatically generated by the system when you register a Windchill product instance in the PTC Admin Center. For more information, see the Register a Windchill Product Instance section. |
◦ Windchill User for Indexing—Specify the indexing user in the Windchill User for Indexing field. You have already provided the user details in the Configure Indexing User section. It is recommended to avoid changing this user frequently.
◦ Internal Name Of Change Notice SubType For Duplicate Parts—Specify the internal name of the change notice type to be used for handling duplicate parts. For example: com.ptc.plugins.cn. It is recommended to create a dedicated change notice subtype for the duplicate part search purpose and provide its internal name here. This ensures that change notices related to duplicate parts are consistently created using the specified subtype.
Similarly, you can also specify the internal names of change objects such as problem report and change request type for handling duplicate parts. Configuring subtypes for Change Requests and Problem Reports is optional. However, if these change objects are not configured, they will not be displayed in the user interface.
◦ Storage Type—Specify the storage type (Azure or AWS).
After installing and configuring the plugin, the Duplicate Part Search tab appears on the Windchill Search page.

Update Windchill AI Parts Rationalization Plugins
The Update Plugin action is available once the latest version of the plugin is available. To update the plugin, right-click the plugin and click Update Plugin. The plugin version is automatically updated.
Once the latest version of the plugin is updated on PTC SaaS Platform, and in the Windchill Plugins table, you can see the new version number of the plugin. For example, if you previously installed version 0.1.32, and version 0.1.33 is now available on the PTC SaaS Platform. The Latest Version column of the Windchill Plugins table displays the 0.1.33 version.
Best Practices
The following best practices will help you install, configure, and update the plugin effectively.
• After completing the installation, manually restart the Apache process on the Windows platform.
• Ensure the appropriate installation directory exists for your platform. The Plugin Manager reports an error if the plugin installation directory is missing.
• All configuration settings, except for the Windchill User for Indexing, must remain unchanged once indexing has begun. Modifying any of these settings will result in the loss of previously indexed data, and the administrator will have to restart the indexing process from the beginning.
The Windchill User for Indexing can be changed as needed. However, that user can only view parts to which they have access.
• During the rehost operations, plugin installed on the target system is retained. After a rehost, you must manually reconfigure the plugin on the target system and use a different service principal for that instance. You must also re‑index the data. While doing so, carefully choose what to index to manage AI credit consumption effectively.
• After rehosting, if you need to change the indexing user from A (source) to B (target), follow these steps:
1. Reconfigure the plugin using indexing user A (source).
2. Save the configuration.
3. Update the indexing user to B (target).
• After updating the plugin, it is recommended to clear the browser cache to ensure optimal performance and prevent any unexpected behavior.
Operations Managed by Plugin
After the plugin is installed using the Plugin Manager, the plugin files are typically downloaded from the PTC SaaS Platform storage and then unzipped into the plugin installation directory on the local server.
The instance operates as a service that handles the AI publishing tasks as outlined below. It provides details of VCS (Visualization Content Service) requests made for the AI publishing jobs, along with the results of polling operations. The instance is responsible for the following tasks:
• Executing indexing jobs.
• Sending requests to the VCS for AI indexing jobs.
• Monitoring and logging of VCS request, polling the VCS to check the status of those jobs (such as, succeeded, failed, or in progress), and logging the details.
• Generating logs and storing them in the plugin installation directory. A dedicated property wt.plugins.logs.dir is provided to specify the custom location for generating plugin logs.
• Updating the status of each job in the queue.
Plugin Certificate Rotation
This topic describes the strategy for managing self-signed certificates used by Windchill plugins. AI plugins rely on self-signed certificates for secure communication. It covers certificate creation, validation, rotation, and integration with Windchill and Apache components to ensure secure communication. The Rotate Certificate action is used to manage these self-signed certificates.
To start the certificate rotation process, click > on the Windchill Plugins page. When you perform the action, the following rotation process takes place:
1. A new certificate is generated with the same names:
◦ certificate.crt (public key)
◦ privateKey.pem (private key)
2. The old certificates are renamed as:
◦ certificate_rotated.crt
◦ privateKey_old.pem
3. The new public key is added to the Apache certificate file.
Retain the previous certificates in both the plugin folder and the Apache certificate file. After the certificate rotation, restart the Apache and Windchill services. |

Using the Rotate Certification Action
The Rotate Certificate action is available only on the Windchill Plugins page, as the plugin certificate rotation applies exclusively to the Windchill on-prem environment.
In cluster environments of Windchill on-prem, running this action on any node rotates the certificate across all nodes.
If one of the nodes is down and certificates are rotated from another node, the clients.crt file must be copied manually from the currently active node to the node that was previously down, before restarting any nodes.
For example, if Node 1 is up and Node 2 is down, and certificates are rotated from Node 1, manually copy the allClients.crt file from Node 1 to Node 2 before starting Node 2. Once the file is copied, then start Node 2.
After performing the Rotate Certificate action, copy the AllClientsCerts file from the local Apache folder to the remote Apache folder for the split‑web server. This step must be completed after configuring the AI Parts Rationalization plugins on the above deployment scenario. For more details on how to configure the plugin, see Installing and Configuring AI Parts Rationalization Plugin. section. |
Managing Self-Signed Certificates
The following points outline key considerations for managing self-signed certificates and maintaining functionality after a rotation:
• The Apache and Windchill services must be manually restarted after the certificate rotation.
• Self-signed certificates have a validity period of 6 months.
• Retain old certificates in both the plugin folder and the Apache certificate file.
• Certificate rotation cannot occur unless at least one hour has passed since the previous rotation.
• If a certificate rotation fails for any plugin, the MethodServer log shows the corresponding plugin ID.
• Failure to restart Apache and Windchill after rotation may result in plugins using outdated certificates.
Configuring the Plugin in Windchill Deployment Scenarios
This topic is intended for the Windchill System Administrator.
This document provides detailed instructions for configuring the AI Parts Rationalization plugin in the Windchill deployment scenarios, such as web server setups, and reverse proxy configurations.
Split‑Web Server Configuration
Follow these steps to configure the AI Parts Rationalization plugin on Windchill with split-web server configuration:
1. Ensure SSL is configured on remote Apache and Windchill.
2. Install the required plugins from the > page.
3. Restart remote Apache (in case of Windows only).
4. Navigate to a local Apache folder:
HTTPServer_HOME\conf\sslvhostconf.d
5. Copy these files:
◦ AllClientsCerts.crt
◦ pluginClients.conf
6. Paste these files into remote Apache at:
HTTPServer_HOME\conf\sslvhostconf.d
After performing the Rotate Certificate action, replace the AllClientsCerts.crt file on the remote Apache server, and then restart both the remote Apache service and the Windchill server. For more information on certificate rotation process, see the “Plugin Certificate Rotation” section of this topic. |
7. Edit pluginClients file to update the path for AllClientsCerts.
8. Copy AIPartsRationalization-proxy.conf from plugin install directory and paste into HTTPServer_HOME\conf\conf.d on remote Apache.
9. Open the AIPartsRationalization-proxy.conf file and replace balancemember localhost with windchill host name and save it.
<Proxy balancer://AIPartsRationalization_lb/>
BalancerMember http://localhost:9090/Windchill/WCPlugins/partsearch route=AIPartsRationalization1
ProxySet stickysession=AIPartsRationalization_sticky
</Proxy>
BalancerMember http://localhost:9090/Windchill/WCPlugins/partsearch route=AIPartsRationalization1
ProxySet stickysession=AIPartsRationalization_sticky
</Proxy>
10. Restart split-web server or remote Apache.
11. Navigate to the > page and configure the plugin. Ensure that the configuration completes successfully.
Reverse Proxy Configuration
Follow these steps to configure the AI Parts Rationalization plugin on Windchill with reverse proxy configuration:
1. Ensure SSL is configured on all relevant Apache servers and Windchill.
To ensure proper communication, add the reverse proxy IP address and its associated public DNS hostname to the hosts file on the Windchill node: • On Linux /etc/hosts or • On Windows C:\Windows\System32\drivers\etc\hosts |
2. Install the required plugins from the > page.
3. Restart Apache (Windows only, Linux not required).
4. Open the 20-mod_ssl.conf file from local Apache located at: %APACHE_HOME%/conf/conf.d and open httpd.conf file located at %APACHE_HOME%/conf.
5. Search for the string: RewriteCond %{HTTP_HOST}. If this string is found, proceed to steps 5a and 5b. If it is not found, omit steps 5a through 5c and proceed directly to step 6:
a. Add the hostname of the reverse proxy system in this condition:
RewriteCond %{HTTP_HOST} !^(<reverse_proxy_hostname>|<local_Apache>):<port>$ [NC]
For example:
▪ Old: RewriteCond %{HTTP_HOST} !^XYZ.localapache.example.com:22444$ [NC]
▪ New: RewriteCond %{HTTP_HOST} !^(XYZ.proxy.example.com|ABC.localapache.example.com):22444$ [NC]
Make sure the locale Apache and reverse proxy Apache are configured to use the same port. |
b. Save the 20-mod_ssl.conf and httpd.conf files.
c. Restart local Apache.
6. Navigate to the > page and configure the plugin. Ensure that the configuration completes successfully.
For more information on how to install and configure the AI Parts Rationalization plugin, see Installing and Configuring AI Parts Rationalization Plugin.