Install the Experience Service on Windows
The Experience Service installer for Windows Server 2016 can be run in the win32 execution mode with a graphical user interface.
Complete the following steps to install Experience Service on a Windows operating system:
|
|
If you are planning on using SSO as your authentication method, see Prepare for Single Sign-On (SSO) to ensure that you’ve completed all prerequisites before continuing with the installation.
|
1. Double-click the .exe file that you downloaded from the PTC Software Download page. For example, es-9.2.0-b643.472-windows-installer.exe.
2. Select your preferred language on the Language Selection window, and click OK.
3. Click Next on the Setup - Experience Service window.
4. Select I accept the agreement and click Next.
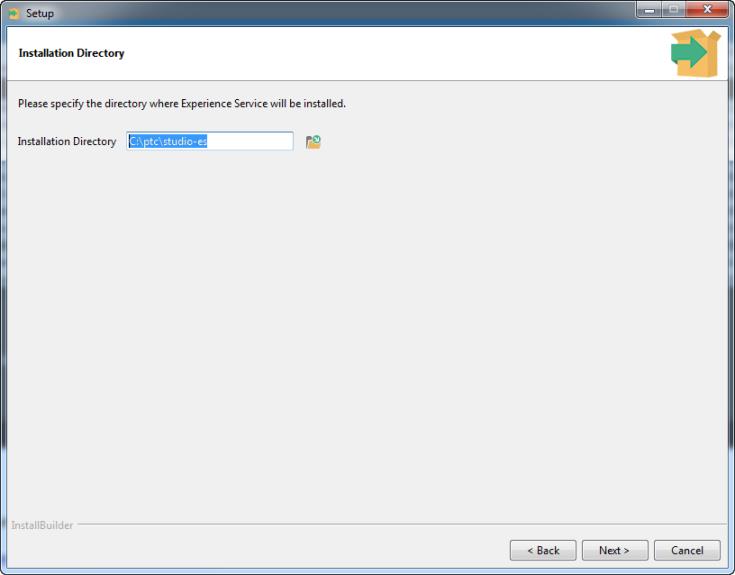
5. On the Installation Directory window, accept the default directory, or navigate to a different, empty directory. Click Next.
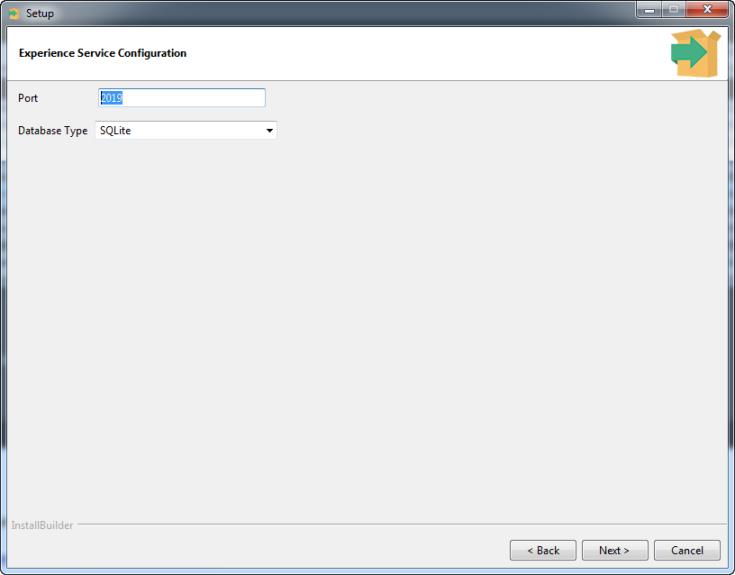
6. Enter the port and select the Database Type on the Experience Service Configuration window. Click Next.
7. If you selected SQLite as the database type, the SQLite Database window appears. Enter both the directory and the file name for the database file.

|
|
You cannot select a file that already exists.
|
If you selected PostgreSQL as the database type, the Database Configuration window appears. Enter the following PostgreSQL connection information:
◦ Database Hostname
◦ Database Port
◦ Database Name
◦ Database Username
◦ Database Password
◦ PostgreSQL Server requires TLS (indicate that the PostgreSQL server uses TLS for connections)
|
|
If you are using the same PostgreSQL instance that is used by the ThingWorx server then the database name and log in/user name used by the Experience Service must be separate from the database name and log in/user name used by the ThingWorx server.
|
For more information, see the “Database” section in Configuration Parameters.
Click Forward.
8. On the TLS Configuration window, select the Use HTTPS (TLS) checkbox to configure the Experience Service to use the secure HTTPS protocol. Otherwise, select the Use HTTP (No TLS) checkbox to use the insecure HTTP protocol. Click Next.
|
|
If you selected Use HTTP (No TLS), skip to Step 11.
|
9. If you’ve selected Use HTTPS (TLS), select one of the following for the encoded key and certificates type::
◦ PEM
◦ PCKS12 (PFX)
Click Next.
10. Depending on which encoded key and certificates type you chose, enter the following information:
|
PEM
|
PCKS12 (PFX)
|
||||||
|---|---|---|---|---|---|---|---|
|
• PEM Private Key—the path to the file that contains the private key
.
• Encrypted—select this checkbox if you want to encrypt the private key and enter the passphrase
• PEM Public Certificate—the path to the file that contains the public certificate.
• PEM Intermediate CA Certificate Bundle—(optional) the path to the certificate bundle file that holds the certificates for the intermediate CAs.
|
• PCKS12 (PFX) Archive File—the path to the archive file.
• Encrypted—select this checkbox if you want to encrypt the private key and enter the passphrase
|
For more information, see the “SSL and TLS Certificates” section in Configuration Parameters and Transport Layer Security (TLS) Certificates. Click Next.
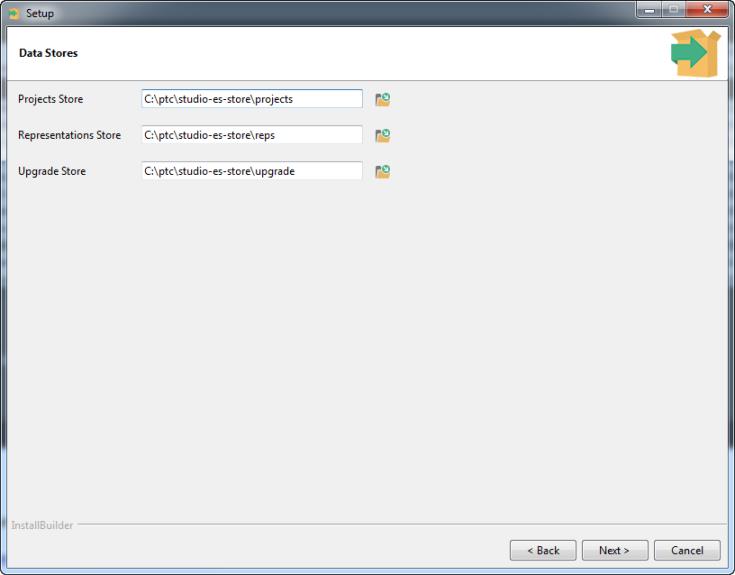
11. On the Data Stores window, enter the following information to configure where the Experience Service data is stored:
◦ Projects Store—the path to the directory where project content is stored.
◦ Representations Store—the path to the directory where representation repository content is stored.
◦ Upgrade Store—the path to the directory where the "success file" for migrators are stored.
|
|
If the Experience Service is being deployed in a cluster then ensure that the data store directories are accessible by all instances running in the cluster.
|
For more information, see the “Content Stores” section in Configuration Parameters.
12. On the Model Target Generation window, select the Enable server-side model target generation checkbox if you want to enable Standard/Advanced Model Target generation. For more information, see Target Generation. At this point, you can continue with the installation without filling out the fields below if you do not want to enable Advanced Model Target generation.
Optionally, if you do want to enable Advanced Model Target generation, fill in the applicable fields upon selecting the Enable server-side model target generation checkbox:

|
Field
|
Description
|
|---|---|
|
Base URL
|
URL for the Model Target service. This field is populated for you. The value is:
https://vws.vuforia.com
|
|
Token Path
|
HTTP request path for OAuth2 authentication. This field is populated for you. The value is:
oauth2/token
|
|
AMTG Path
|
HTTP request path for Advanced Model Target generation. This field is populated for you. The value is:
modeltargets/advancedDatasets
|
|
Access Key
|
The value for this field must be obtained from PTC Technical Support. For more information, see Request Information to Enable Advanced Model Target Generation.
|
|
Secret Key
|
The value for this field must be obtained from PTC Technical Support. For more information, see Request Information to Enable Advanced Model Target Generation.
|
Click Next.
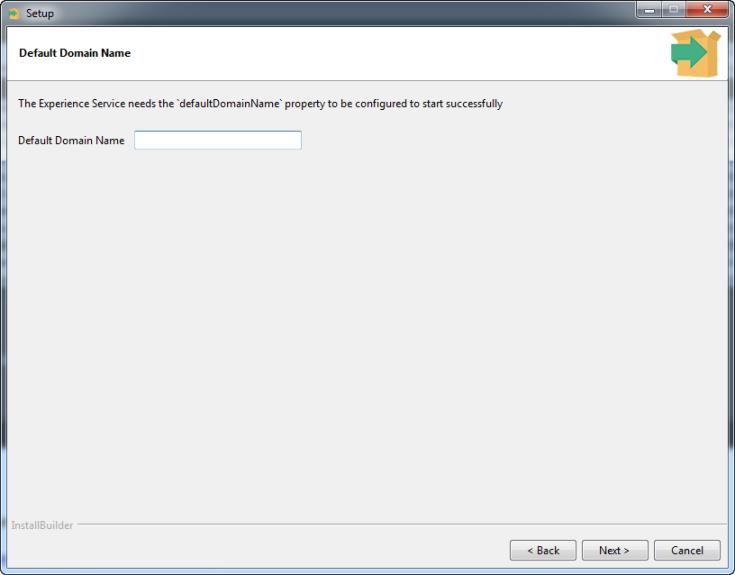
13. Enter the Default Domain Name, and click Next. If you’re not sure what to enter for the default domain name, see the “Domain Name” section in Configuration Parameters.
14. The Project Access window appears. If you want to disable Vuforia Studio authors from publishing projects with Access set to Public, select the Disable publishing projects with public access checkbox.
15. The Project Download for Offline Viewing window appears. If you want to disable Vuforia Studio authors from publishing projects with the Allow download for offline viewing setting enabled, select the Disable publishing projects that can be downloaded for offline viewing checkbox.
16. On the Authentication window, select one of the following:
◦ Basic Authentication
◦ Single Sign-On (OpenID Connect)
|
|
If you selected Basic Authentication, skip Step 17.
|
17. If you selected Single Sign-On (OpenID Connect), enter the following information:
|
Field
|
Description
|
||
|---|---|---|---|
|
Select OpenID Provider for Single Sign-On
|
Select one of the following based on your provider:
• Entra ID
• OKTA
|
||
|
Issuer URL
|
Set this equal to the <as-base-url> parameter identified in SSO Configuration Parameters.
|
||
|
Client ID
|
Set this equal to the <es-client-id> parameter identified in SSO Configuration Parameters.
Choose a unique value to use as the client ID for the Experience Service. For example: studio-es.
|
||
|
Client Secret
|
Set this equal to the <es-client-secret> parameter identified in SSO Configuration Parameters.
When configuring the Experience Service client, PingFederate gives you the option to generate a secret for the client. If you choose to generate a secret for the client, capture the value generated, as it will be required to complete other installation and configuration steps. Alternatively, you can choose your own client secret. In this case, ensure that the secret you choose is a strong password and cannot be easily guessed.
|
||
|
Redirect URL
|
Set this equal to the <es-redirect-uri> parameter identified in SSO Configuration Parameters.
|
||
|
ES Scope
|
If you are using PingFederate as your OAuth provider, set this equal to the <es-scope> parameter identified in SSO Configuration Parameters. If you are using Entra ID as your OAuth provider, set this to api://<applicationId>/THINGWORX"
|
||
|
External Scope
|
By default, this is set to THINGWORX.
If using Entra ID as your Open ID provider, you must add the following additional scope:
“offline_access openid api://<applicationId>/THINGWORX”
|
||
|
ThingWorx Access
|
Select one of the following:
• Use Application Key—select this option to use application keys in ThingWorx
• Use Credentials—select this option to use an account in your IdP
For more information, see ThingWorx Authentication.
|
||
|
Username
|
If you are using PingFederate as your OAuth provider, set this equal to the value of the sub attribute identified in your OpenID Connect Policy. If you are using Entra ID as your OAuth provider, set this value equal to the claims attribute identified in your OpenID Connect Policy.
|
||
|
Timeout (minutes)
|
When the Experience Service is authenticated using OpenID Connect, a session is created for the user that authenticated it. This property specifies how much time (in minutes) must elapse before the session is invalidated and the user must re-authenticate.
|
||
|
Client ID (Studio Client)
|
Enter the name of the Studio client ID. The default value for this field is PTC_Studio_Client_ID. However, if this has been configured to something different, that must be entered here.
|
18. The ThingWorx Server window appears. Enter the appropriate information, and click Next once you’ve finished.
|
Field or Setting
|
Description
|
|---|---|
|
ThingWorx Server URL
|
This is a required field.
Enter the URL to your instance of ThingWorx in the ThingWorx Server URL field. For example, https://twx.example.com:8443/Thingworx.
|
|
Configure Public Access to ThingWorx Server
|
Select this checkbox to allow public Experiences to access ThingWorx data.
For more information about public Experiences and configuring public access to ThingWorx, see Configure Public Access to ThingWorx.
|
|
Administrator Credentials for ThingWorx Server
|
• Basic Authentication—Provide the username and password for an account that has Administrative permissions on your ThingWorx Server. These credentials are used to configure access to the ThingWorx Server that is required by the Experience Service.
• Single Sign-On (OpenID Connect)—Provide the access token that you acquired in Obtain OAuth Access Token for ThingWorx Administrator Using Postman.
For more information, see Configure Access to ThingWorx Group Memberships and Configure Public Access to ThingWorx.
|
19. On the Ready to Install window, click Next.
Post-Installation Steps (Single sign-on only)
For information about post-installation steps for single sign-on authentication, see Single Sign-on Post-installation Steps.
Unattended Mode
To run the installer in unattended mode on Windows, use the following start command:
start /W <name of installer file>.exe --mode unattended --optionfile install.options
The values specified for the options are validated using the same logic used to validate manually entered values. For more information about options that can be specified when the installer is run in Unattended mode, see Unattended Mode. If a value is not supplied, then the default value is used. If a value is not supplied, then the default value is used.