Work with Procedures in Vuforia Editor > Step Check™ > Enable and Train Step Check > Enable Step Check for a Procedure in Vuforia Editor
  
Enable Step Check for a Procedure in Vuforia Editor
* 
Step Check is not supported for steps that contain part markers or multiple point markers.
1. Open the procedure for which you want to enable Step Check.
2. On the step that you want to enable Step Check for, select Pass/Fail with Step Check from the step feedback drop-down menu.
* 
The procedure must contain a 3D model. If it does not, you’ll need to add the model in order for Pass/Fail with Step Check to appear as a feedback type option.
3. Add a point marker to the part on the model that you want to train Step Check for.
* 
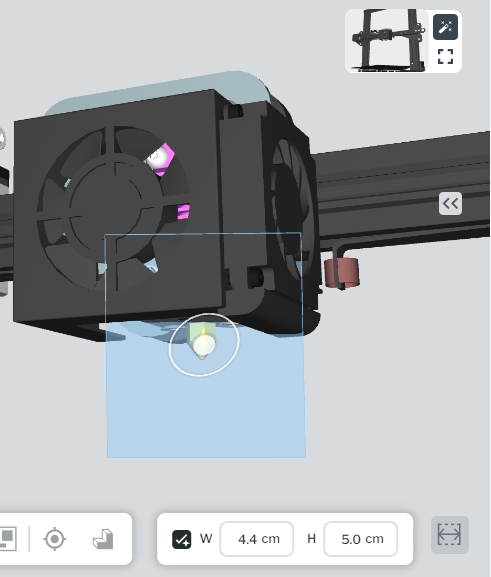
When adding the point marker, make sure that the angle of the 3D model is as close to the angle that you would look at the physical object in a real world use case. For example, if the 3D printer is placed on a table and the user needs to look down, make sure that the angle of the 3D model in Vuforia Editor matches that.
4. If you want to extend the area of Step Check, Select the Show Step Check Area icon. Make sure that the part of the model that needs to be validated is completely within the defined area.
If you need to, you can expand the area by dragging the edges or editing the widget and height.
5. Once you’ve finished enabling Step Check for a step, the Step Check mode and Step Check point marker appear on the step card.
* 
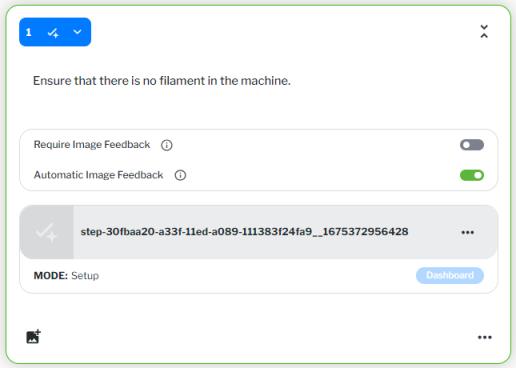
If you want Step Check to automatically suggest an image for the Add Feedback window, enable the Automatic Image Feedback.
6. Repeat steps 2-4 for any other steps you want to enable Step Check.
7. Once you’ve enabled Step Check for all necessary steps, publish the procedure.
* 
Keep in mind that you will need to publish the procedure several times before Step Check will be ready to use in an active environment.
8. Once the procedure has been published, users can begin executing the procedure in Vuforia Vantage to collect training images.