Execute Query
Use the Execute Query action to execute a named query in Windchill RV&S.
Complete the following steps to use the Execute Query action in your workflow:
1. Drag the Execute Query action under Windchill RV&S to the canvas, place the pointer on the action, and then click  or double-click the action. The Execute Query window opens.
or double-click the action. The Execute Query window opens.2. Edit the Label, if needed. By default, the label name is the same as the action name.
3. To add a Windchill RV&S connector type, refer to Supported Windchill RV&S Connector Types.
If you previously added a connector type, select the appropriate Connector Type, and under Connector Name, select the connector.
4. Click TEST to validate the connector.
5. Click MAP CONNECTOR to execute the action using a connector that is different from the one that you are using to populate the input fields. In the Runtime Connector field, provide a valid Windchill RV&S connector name. For more information about MAP CONNECTOR, see Using Map Connector.
6. In the Queries list, select the Windchill RV&S query that you want to execute.
7. Under the Order By group, do the following:
a. In the Attribute list, select the attribute by which you want to sort the result.
b. In the Order list, select Ascending or Descending.
This sorts the contents of the Attribute column in the selected order.
8. Click Show additional fields.
9. Under the Attributes group, click Add, and in the Attribute list, select an attribute. It is mandatory to select at least one attribute.
Click Add to add multiple attributes. Click  to delete attributes.
to delete attributes.10. In the Limit field, enter a value up to 200 that specifies the number of rows that you want to get in the result.
By default, this action returns 25 records.
11. In the Skip field, enter a value that specifies the number of rows that you want to exclude from the result.
12. Click Done.
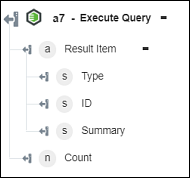
Output schema
The Execute Query action returns a dynamic output schema depending on the attributes that you select. The following image shows the sample output schema: