Configuring User Preferences
To configure user preferences:
1. Launch Max Admin, and then on the User Management ( ) launchpad menu, click User Preferences.
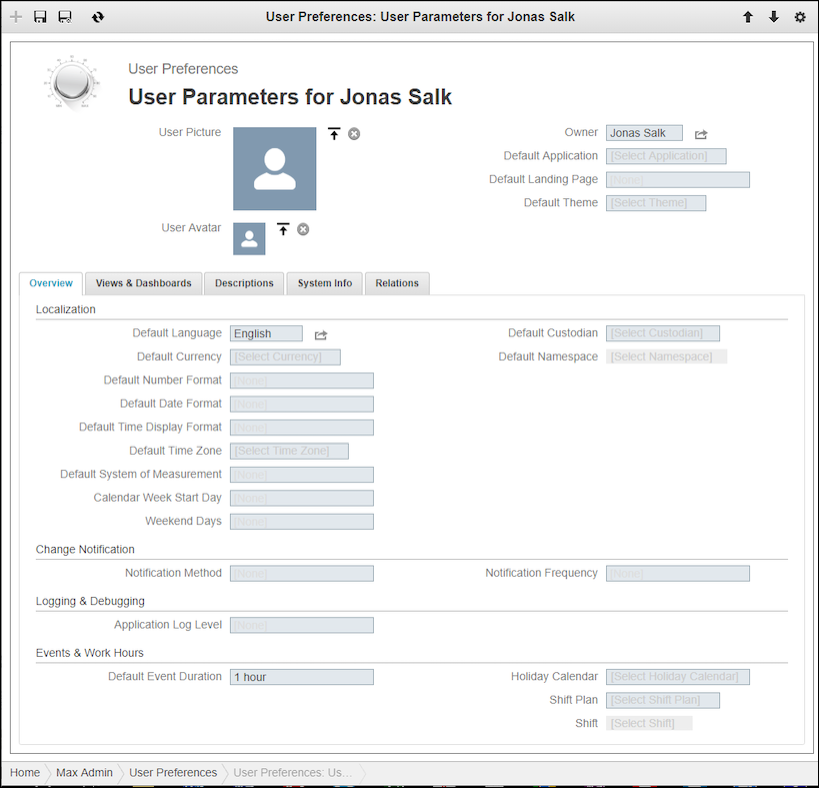
2. In the list view, click the user whose settings you want to configure.

3. On the User Preferences page, in the upper section, do any of the following:
◦ In the User Picture and User Avatar fields, upload a photo or avatar image.
◦ In the Default Application field, specify the application that users see after they log in when the Default Landing Page value is set to Default Application.
◦ In the Default Landing Page field, specify the page that users see after they log in.
▪ Home Page: The main Max landing page, from which you can access Service Board and other Max applications.
▪ Last Accessed Application: The application most recently accessed by the user.
▪ Default Application: The application specified in the Default Application field.
◦ In the Default Theme field, select a set of style properties, such as fonts and colors.
4. On the Overview tab, in the Localization section, modify any of the following:
◦ Default Language
◦ Default Currency
◦ Default Number Format
◦ Default Date Format
◦ Default Time Display Format
◦ Default Time Zone
◦ Default System of Measurement
◦ Calendar Week Start Day
◦ Weekend Days
◦ Default Custodian
◦ Default Namespace
5. In the Change Notification section, do any of the following:
◦ In the Notification Method field, click Email or No Notification.
◦ In the Notification Frequency field, click Daily or Immediately.
6. In the Logging & Debugging section, in the Application Log Level field, click one of the following:
◦ ERROR
◦ WARN
◦ INFO
◦ DEBUG
◦ TRACE
7. In the Events & Work Hours section, modify any of the following:
◦ Default Event Duration
◦ Holiday Calendar
◦ Shift Plan
◦ Shift
8. In the top left corner, click Save and Close ( ).
).
For more information: