Adding Parts to a Solution
Add the parts required for a resolution to an Investigation Solution that is not linked to a Work Plan, using product and search filters to select the right components and quantities directly from the Solution.
You can add parts to an Investigation Solution that is not linked to a Work Plan. Use parts to define the components required for a resolution.
To add parts to a Solution:
1. Open the relevant Work Order.
2. Select the Investigations tab.
3. In the Solutions section, locate the Solution where you want to add parts.
|
|
Parts are available only for Solutions that are not linked to a Work Plan.
|
4. In the Work Plan and Parts column, select Add Parts for the required Solution.

The Add Parts window is displayed and includes the following controls:
◦ Filter by Product: A dropdown list at the top-left corner. Select a product to narrow the parts list to that Product Structure. The default value is Show All Products, which displays every available part. When the administrator enables Product Structure filtering, the dropdown defaults to the Product Structure instead.
◦ Search: A text field next to the product filter. Type a Part Name, Part Code, or Part Type to filter the table dynamically. Search results are limited to the selected product filter.
◦ Show only Selected Parts : A toggle button at the top-right corner. Turn it on to display only the parts you have already selected. Turn it off to return to the full list.
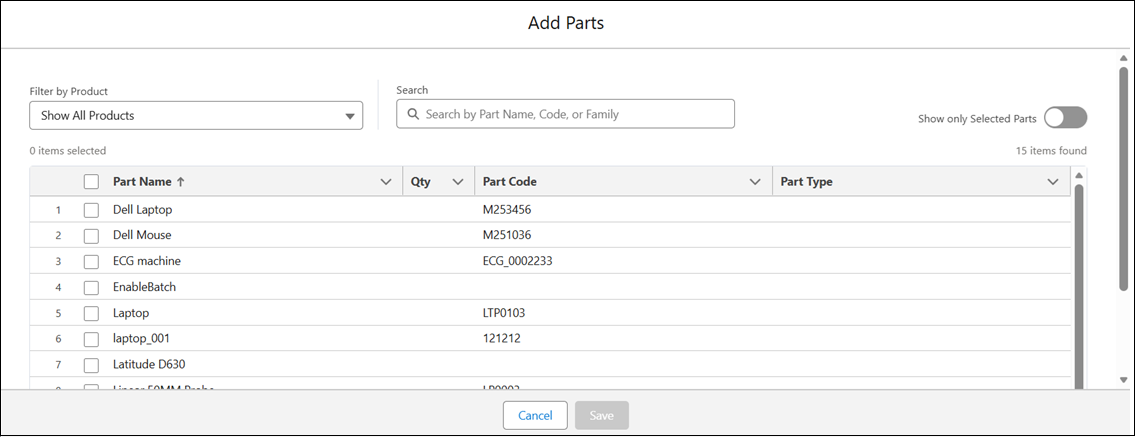
The parts table displays the following columns:
|
Column
|
Description
|
|---|---|
|
Checkbox
|
Select the checkbox next to a part to include it. Select the header checkbox to select all visible parts at once.
|
|
Part Name
|
Displays the name of the part as defined in the product catalog. Click the column header to sort alphabetically.
|
|
Qty
|
Displays the quantity for the selected part. The field defaults to 1 when you select a part. Update the value directly in this field to specify a different quantity.
|
|
Part Code
|
Displays the unique identifier or product code assigned to the part. Use the Part Code to distinguish parts that share similar names.
|
|
Part Type
|
The classification or category of the part (for example, Consumable, Spare, Accessory). This column may be blank if no Part Type is defined for the record.
|
A count of selected parts appears at the top left of the table (for example, 5 items selected). The total number of parts appears at the top right of the table (for example, 15 items found).
5. Use the Filter by Product dropdown to filter the parts list to a specific Product Structure, or select Show All Products to display all available parts.
6. Use the Search field to locate the required parts.
7. Select the parts and specify quantities as needed. Perform one of the following:
◦ Select parts first: Select the checkbox next to a part to include it. The Qty field defaults to 1.
◦ Set or update quantity: Hover over the Qty field for the part and select the pencil icon. Enter the required quantity. The checkbox next to the part is automatically selected.
8. Click Save.
|
|
If you click Cancel or close the window without saving, a Discard Changes? confirmation dialog appears with the message: "Unsaved changes will be lost upon cancel/close. Do you want to continue?" Select Yes to discard all changes and close the window. Select No to return to the Add Parts window and continue editing.
|
The selected parts are added to the Solution. The Parts (n) link updates to reflect the number of parts. Hover over the link to preview parts and quantities. For more information, see Viewing Parts in a Solution.
Related Topics