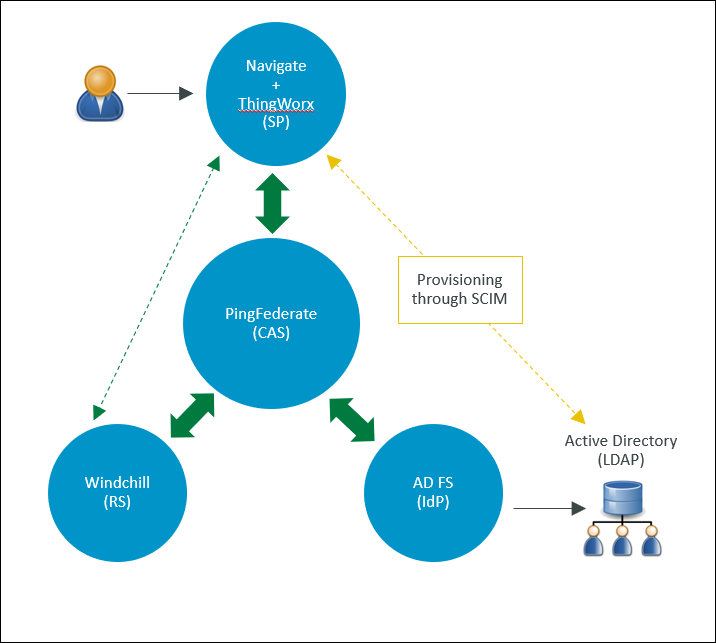
Example: Implementing SSO with PingFederate as the Central Auth Server, AD FS as the Identity Provider, SCIM as the User Provisioning Method, and Windchill as the Resource Server
This example provides detailed steps on how to configure an environment that has ThingWorx configured for single sign-on with PingFederate as the Central Auth Server (CAS), Active Directory Federation Services (AD FS) as the Identity Provider (IdP), and Windchill as the Resource Server.
The following table displays the applications configured and their role in this example:
|
Role
|
Application
|
|---|---|
|
Service Provider
|
ThingWorx
|
|
Central Auth Server
|
PingFederate
|
|
Identity Provider
|
AD FS
|
|
Resource Server
|
Windchill
|
The following diagram displays the configuration discussed in this example.
For an overview of SSO implementation using this architecture, see the video provided in article CS271789.
Before beginning the SSO implementation, review the following decision tree that highlights key decision points in the deployment process for Windchill Navigate (formerly ThingWorx Navigate) and Windchill with PingFederate. This chart presents the recommended paths based on best practice, usability, and typical use cases.
There are other combinations of IdP and LDAP that are not covered in this chart. For example, you could use Microsoft Active Directory on a Windows host in combination with ThingWorx and Windchill on Linux hosts, but this scenario is not typical or preferred. Using Shibboleth SP to facilitate SSO for Windchill requires 11.0 M020 or later. |

Part A: Prerequisites
1. Update the hosts files of the machines used in your environment with the following:
◦ PingFederate machine—Add the AD FS, ThingWorx, and PingFederate machines.
◦ ThingWorx machine—Add the AD FS, ThingWorx, and PingFederate machines.
◦ Windchill machine—Add the ThingWorx and PingFederate machines.
Stop the ThingWorx server.
Ensure that you update and configure Tomcat to allow ThingWorx to operate in cross-domain environments. For more information, see this article. |
4. Ensure that you have set up Windchill. For more information, see the appropriate Windchill Help Center.
5. Set up and configure AD FS, and ensure that you have the following attribute values and files:
◦ uid
◦ email
◦ group
◦ Metadata file
◦ Signing certificates
Part B: Configure Authentication for AD FS Manually
Step 1: Create the PingFederate global SSL certificate
1. Login to PingFederate as an Administrator. Search for SSL Server Certificates and open the search results.
2. Click Create New to create the global SSL certificate, and do the following:
1. In the Common Name field, provide the FQDN of the PingFederate machine.
2. Provide other details on the page, and click Next.
3. Make sure the following checkboxes are checked and click Save.

4. Click SSL Server Certificates.
5. For the SSL certificate that you created, in the Select Action list, select Activate Default for Runtime Server, and then select Activate Default for Admin Console. Click Save.
This SSL certificate is marked as default for the Admin console and Runtime Server.
3. For the localhost certificate, do the following:
1. In the Select Action list, select Deactivate for Runtime Server, and then select Deactivate for Admin Console.
2. Delete the localhost certificate, and click Save.
Step 2: Create the Service Provider contract
1. In PingFederate, search for Policy Contract and open the search result.
2. Click Create New Contracts, and do the following:
1. In the Contract Info field, enter a contract name, for example, SPContract, and click Next.
2. Under Contract Attributes, to extend the contract for the following attributes, click Add for each attribute:
▪ uid
▪ email
▪ group
By default, the subject attribute is present.
3. Click Next, and on the Summary page, click Save.
4. On the Authentication Policy Contracts page, click Save.
For more information, see Configure PingFederate to redirect user login requests to your IdP.
Step 3: Download the AD FS FederationMetadata.xml file
1. In your AD FS machine browser, enter the following URL to download the Federation Metadata file:
https://ADSF_Host.ADFS_Domain/FederationMetadata/2007-06/FederationMetadata.xml
2. Copy the downloaded file to the PingFederate machine.
Step 4: Create the PingFederate IdP connection
A) Specify general information to create an IdP connection
1. In PingFederate, search for IdP Connections and open search results. Click Create Connection.
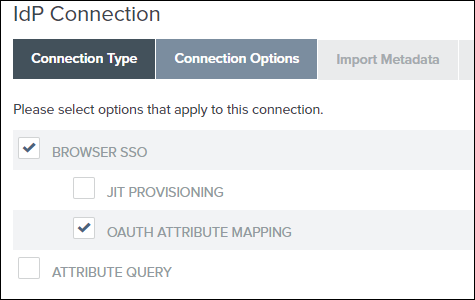
2. On the Connection Type tab, select the BROWSER SSO Profiles check box, and click Next.
3. On the Connection Options tab, select the BROWSER SSO check box and the OAUTH ATTRIBUTE MAPPING check box, and click Next.
4. On the Import Metadata tab, select File, and click Choose File to browse to the FederationMetadata.xml file, and click Next.
5. On the Metadata Summary tab, click Next.
6. The General Info tab is prepopulated with data. You can change the CONNECTION NAME, if you want. Verify the rest of the information, and click Next.
7. On the Browser SSO tab, click Configure Browser SSO. The Browser SSO page opens, where you need to specify the settings for single sign-on for your browser.
B) Configure Browser SSO settings
1. On the SAML Profiles tab on the Browser SSO page, select the following options, click Next:
▪ IDP-INITIATED SSO
▪ SP-INITIATED SSO
2. On the User-Session Creation tab, click Configure User-Session Creation. The User-Session Creation page opens, where you need to specify the settings to configure user creation.
C) Configure User-Session Creation settings
1. On the Identity Mapping tab, accept the default settings, and click Next.
2. On the Attribute Contract tab, verify the auto-filled attributes, and click Next.

3. On the Target Session Mapping tab, click Map New Authentication Policy. The Authentication Policy Mapping page opens, where you need to specify the settings for authentication policy mapping.
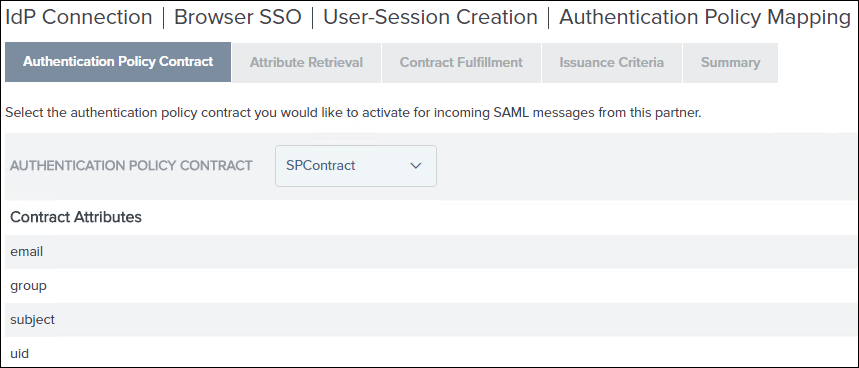
D) Configure Authentication Policy Mapping settings
1. In the Authentication Policy Contract list, select the contract that you created in Part B—Step 2, that is, SPContract. Verify that all attributes are displayed, and click Next.
2. On the Attribute Retrieval tab, accept the default settings, and click Next.
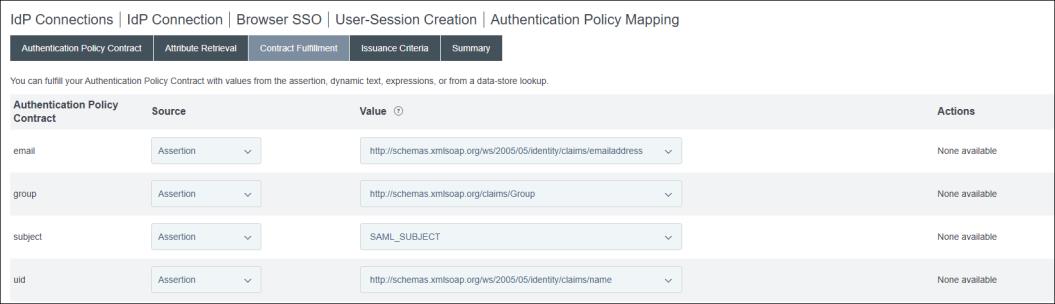
3. On the Contract Fulfillment tab, select the following values for the email, group, subject, and uid authentication policy contracts:
▪ In the Source list, select Assertion.
▪ In the Value list, select the corresponding entry from the list.
Click Next.
4. On the Issuance Criteria tab, click Next.
5. Review the information on the Summary tab. If the information is correct, click Done. The User-Session Creation page opens, where you need to review the configuration settings for user session creation.
E) Review User-Session Creation configuration settings
1. The Target Session Mapping tab on the User-Session Creation page displays the information that you selected while mapping a new authentication policy. Click Next.
2. Review the information on the Summary tab. If the information is correct, click Done. The Browser SSO page opens.
3. The User-Session Creation tab on the Browser SSO page displays the information that you entered while configuring user-session creation. Click Next.
4. On the OAuth Attribute Mapping tab, select Map Directly Into Persistent Grant, and select Configure OAuth Attribute Mapping, and then do the following:
1. On the Data Store tab, click Next.
2. On the Contract Fulfilment tab, for USER_KEY and USER_NAME, select Source as Assertion and the Value as name attribute from ADFS, and click Next.

3. On the Issuance Criteria tab, click Next.
5. Review the information on the Summary tab. If the information is correct, click Done. Click Next on the OAuth Attribute Mapping Configuration page.
6. On the Protocol Settings tab, click Configure Protocol Settings. The Protocol Settings page opens, where you need to specify the protocol settings.
F) Configure and review Protocol settings
1. On the SSO Service URLs tab, click Next.
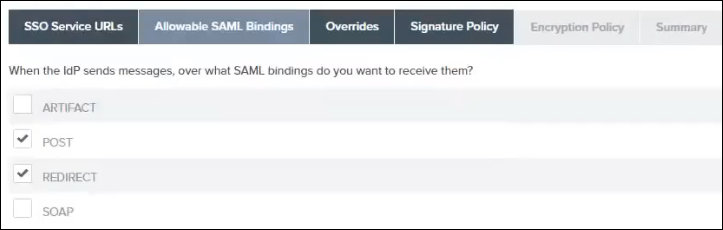
2. On the Allowable SAML Bindings tab, do the following, and click Next:
1. Select the following check boxes:
▪ POST
▪ REDIRECT
2. Clear the following check boxes:
▪ ARTIFACT
▪ POST
3. Skip the settings on the Overrides tab, and click Next.
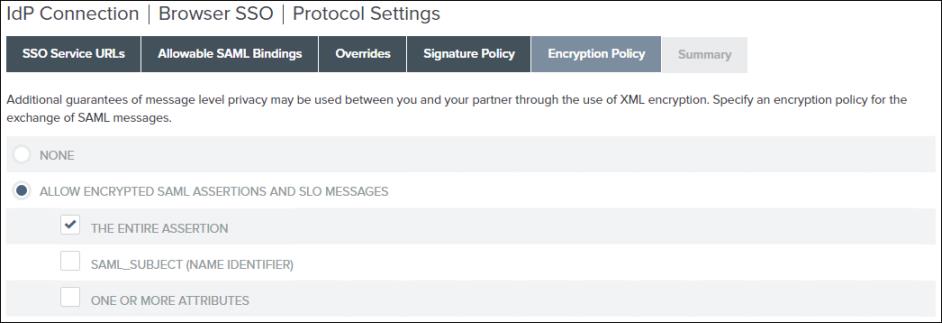
4. On the Signature Policy tab, click SPECIFY ADDITIONAL SIGNATURE REQUIREMENTS, select the two check boxes under it, and click Next.
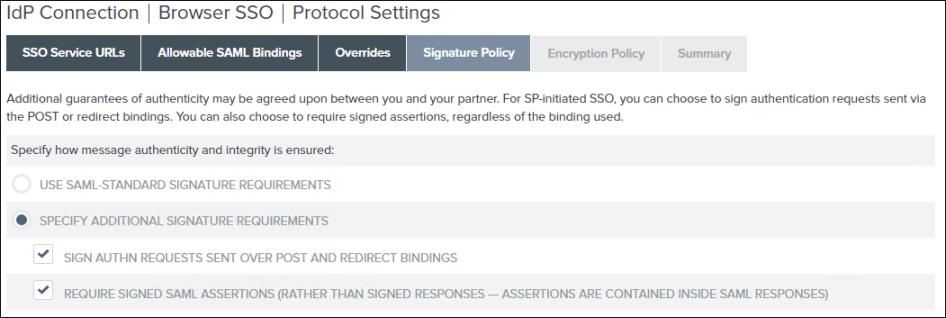
5. On the Encryption Policy tab, click ALLOW ENCRYPTED SAML ASSERTIONS AND SLO MESSAGES, select the THE ENTIRE ASSERTION check box, and click Next.
6. Review the information on the Summary tab. If the information is correct, click Done. The Browser SSO page opens.
7. The Protocol Settings tab on the Browser SSO page displays the information that you selected while configuring protocol settings. Click Next.
8. Review the information on the Summary tab. If the information is correct, click Done. The IdP Connection page opens.
9. On the Browser SSO tab of the IdP Connection page, click Next.
10. On the Credentials tab, click Configure Credentials. The Credentials page opens, where you need to specify the settings to configure credentials.
G) Configure credentials
1. On the Digital Signature Settings tab, click Manage Certificates.
2. To create a signing certificate, click Create New, provide the following values, and click Next:
▪ COMMON NAME
▪ ORGANIZATION
▪ COUNTRY
▪ VALIDITY (DAYS)—365
▪ KEY ALGORITHM—RSA
▪ KEY SIZE (BITS)—2048
▪ SIGNATURE ALGORITHM—RSA SHA256
3. Review the information on the Summary tab. If the information is correct, click Save, click Done.
4. On the Digital Signature Settings tab, for the SIGNING CERTIFICATE that you created, select the INCLUDE THE CERTIFICATE IN THE SIGNATURE <KEYINFO> ELEMENT check box, and click Next.
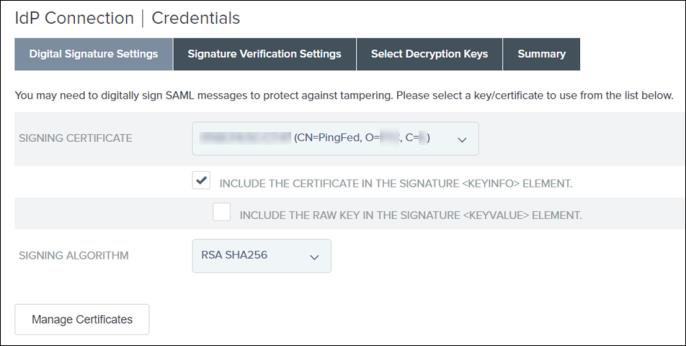
This is the application layer certificate used for digitally signing the request from PingFederate to the IdP.
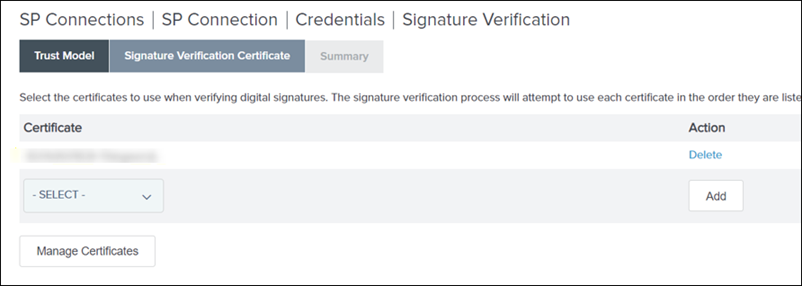
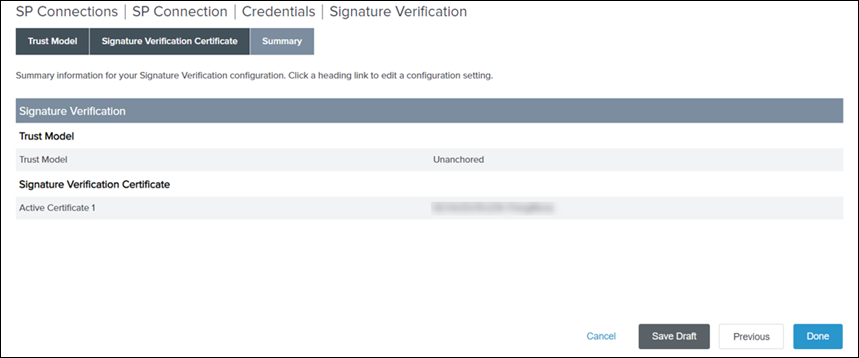
5. On the Signature Verification Settings tab, click Manage Signature Verification Settings.
a. On the Trust Model tab, select UNANCHORED, and click Next.
b. On the Signature Verification Certificate, verify that the IdP Signing Certificate is displayed, and click Next.
This is the application layer certificate used for Signature Verification for requests from the IdP to PingFederate. This was automatically imported to PingFederate when you imported the metadata.xml file from the IdP.
c. Review the information on the Summary tab. If the information is correct, click Done.
d. On the Signature Verification Settings tab, click Next.
e. On the Select Decryption Keys, select the PingFederate Certificate, and click Next.
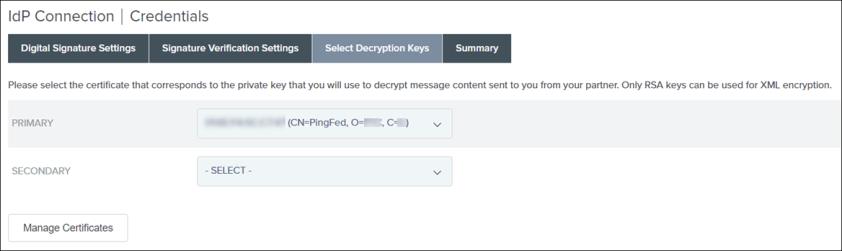
f. Review the information on the Summary tab. If the information is correct, click Done.
g. On the Credentials page, click Next.
H) Activate the IdP connection
On the Activation & Summary page, ensure that the SSO Application Endpoint is activated, and click Save.

The IdP connection is now created and activated.

I) Verify the IdP connection
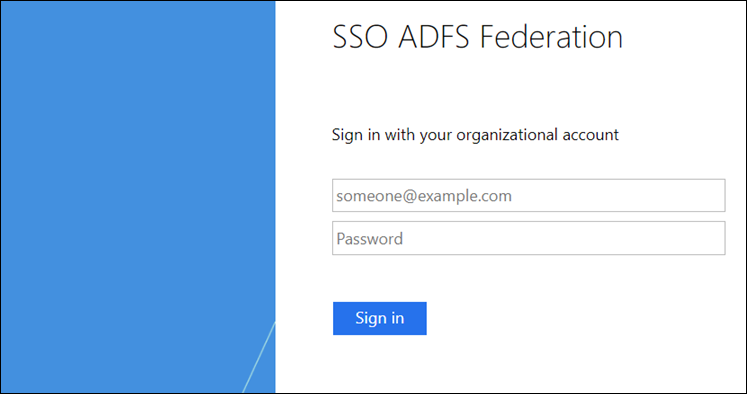
Click the IdP connection that you created, copy the SSO Application Endpoint URL, paste it in a browser, and verify that it redirects to the IdP. Thus, this URL from PingFederate must be redirected to AD FS. You will see a page similar to the following and it includes an error message.

Part C: Configure the AD FS Relying Party
Step 1: Export the metadata XML file from PingFederate
1. In PingFederate, go to Service Provider, and under IDP Connections, click Manage All.
2. For your IdP connection, in the Select Action list, click Export Metadata.
3. On the Metadata Signing page, click Next.
4. On the Export & Summary page, click Export to download the metadata file to the Downloads folder on your machine, and click Done.
5. Copy the metadata XML file to the AD FS machine.
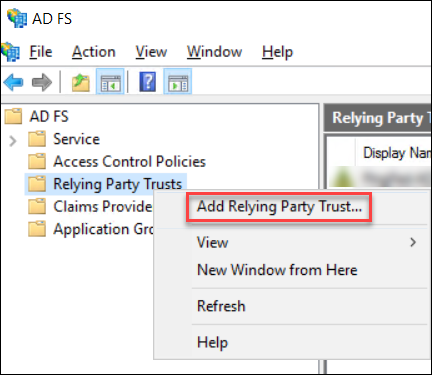
Step 2: Add the relying party in AD FS
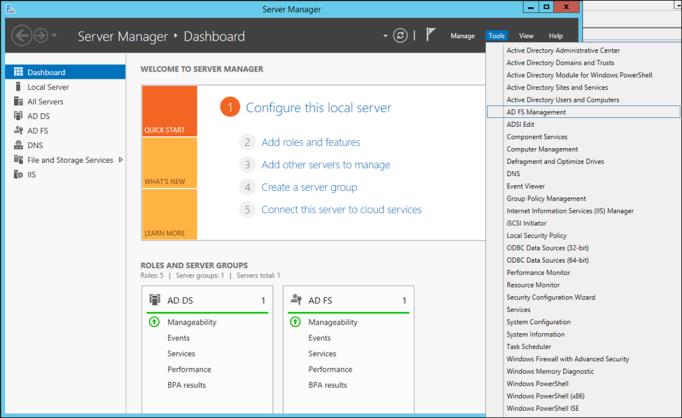
1. Login to the AD FS Server, and open Server Manager.
2. Go to > .
3. Under AD FS, right-click Relying Party Trusts, and then select Add Relying Party Trust. This is to ensure that AD FS trusts that the connection comes from PingFederate.
4. In the Add Relying Party Trust Wizard window, do the following:
1. Click Start.
2. On the next screen, click Import data about the relying party from a file.
3. Click Browse to navigate to the location of the Metadata.xml that you copied from PingFederate to create a Relying Party in AD FS, and click Next.
4. Provide a Display name, and click Next.
Make note of this name as it will be required later.
5. Click Next in the following windows until you reach the Finish screen. Then, click Close.
Your current entry is added to the Relying Part Trusts list.
You should also see the following window (It might be hidden behind the current window):
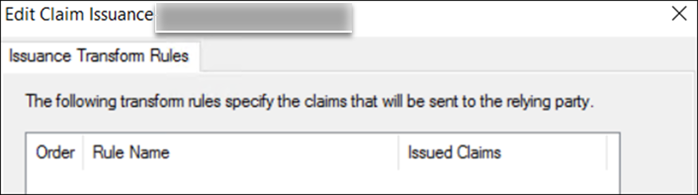
5. To map the AD FS attributes to Active Directory, do the following:
1. In the Edit Claim Issuance Policy for <Relying Part Trust Name> window, click Add Rule, and click Next.
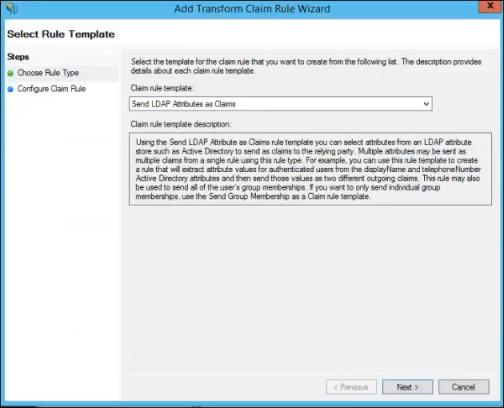
2. Provide a Claim rule name, and set Attribute store to Active Directory.
3. In the Mapping of LDAP attributes to outgoing claim types table, select the values from the lists to map the AD FS attributes to the Active Directory attributes:
If you do not map these attributes correctly, single sign-on will not work. |
Display-Name | Name |
SAM-Account-Name | Name ID |
E-Mail-Addresses | E-Mail Address |
Is-Member-Of-DL | Group |
4. Click Finish, and click OK.
Step 3: Set up AD FS to encrypt the complete message and assertion
1. On the AD FS machine, open Windows PowerShell as Administrator.
2. Run the following command on the AD FS machine for the communication to work:
Set-ADFSRelyingPartyTrust -TargetName <Relying Party Trust Name> -SamlResponseSignature "MessageAndAssertion"
where <Relying Party Trust Name> is the relying party trust name that you created and noted in Step 2 above.
This command configures the SAML response signature via Windows PowerShell.
Part D: Verify the IdP connection end point URL
1. From PingFederate, copy the SSO Application Endpoint URL and paste it in an incognito window.
2. Log in using the domain name and administrator user that you created for AD FS.
You should get the following message:

Part E: Create the PingFederate Service Provider connections for ThingWorx
Step 1: Create the ThingWorx signing certificate
1. In the <ThingWorx Installation Folder>/ThingworxPlatform folder, create the ssoSecurityConfig folder.
2. Create a KeyStore of type JKS, and name it as sso-keystore.jks as follows:
▪ Generate a key pair.
▪ Specify the common name (CN) of the certificate as ThingWorx.
3. Export thingworx.cer from sso-keystore.jks to the ssoSecurityConfig folder.
Step 2: Configure Service Provider connection for ThingWorx
A) Specify general information to create a service provider connection
1. On the PingFederate main page, search for SP Connections group, click Create Connection. The SP Connection page opens.
2. On the Connection Template tab, select the DO NOT USE A TEMPLATE FOR THIS CONNECTION, and click Next.

3. On the Connection Type tab, select the Browser SSO Profiles check box and the SAML 2.0 Protocol check box, and click Next.
4. On the Connection Options tab, select the BROWSER SSO check box, and click Next.
5. On the Import Metadata tab, select None, and click Next.
6. On the General Info tab, perform the following tasks:
a. In the Partner’s Entity ID (Connection ID) field, provide a unique value, for example, TWX_SP.
Note this value because you will use it while configuring the ThingWorx sso-settings.json file.
b. In the Connection Name field, provide a descriptive name, for example, TWX_SP.
This is the name that will be displayed in the PingFederate SP Connections list.
c. In the Base URL field, type the URL of the server where ThingWorx is deployed, and click Next. For example: https://{ThingWorxHost_FQDN}:8443.
7. On the Browser SSO tab, click Configure Browser SSO. The Browser SSO page opens, where you need to specify the settings for single sign-on for your browser.
B) Configure Browser SSO settings
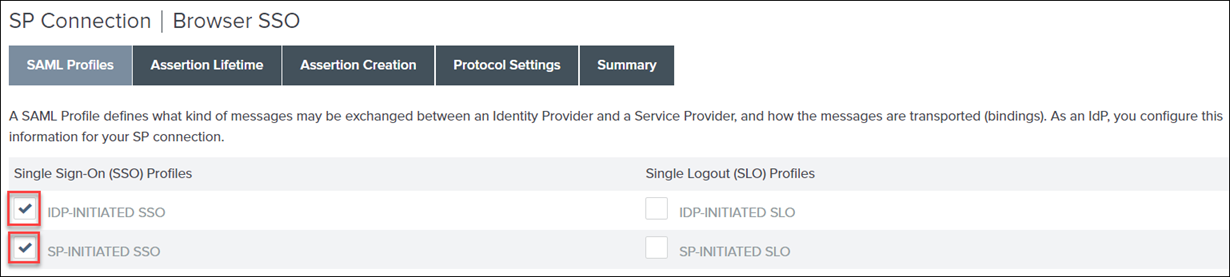
1. On the SAML Profiles tab on the Browser SSO page, under the Single Sign-On (SSO) Profiles section, select the following options, and click Next:
▪ IDP-INITIATED SSO
▪ SP-INITIATED SSO
Do not select any options in the Single Logout (SLO) Profiles column.
2. On the Assertion Lifetime tab, set Minutes Before to 60 and Minutes After to 480. Click Next.
3. On the Assertion Creation tab, click Configure Assertion Creation. The Assertion Creation page opens, where you need to specify the settings for assertion creation.
C) Configure Assertion Creation settings
1. On the Identity Mapping tab on the Assertion Creation page, click Standard, and click Next.
2. On the Attribute Contract tab, under Attribute Contract, type SAML_Subject, and select the value under Subject Name Format.
3. On the Attribute Contract tab, in the Extend the Contract field, configure the following settings, and click Add after each value:
Extend the Contract | Attribute Name Format |
|---|---|
group | urn:oasis:names:tc:SAML:2.0:attrname-format:unspecified |
uid | urn:oasis:names:tc:SAML:2.0:attrname-format:unspecified |
email | urn:oasis:names:tc:SAML:2.0:attrname-format:unspecified |
Click Next.
4. On the Authentication Source Mapping tab, click Map New Authentication Policy. The Authentication Policy Mapping page opens, where you need to specify the settings for authentication policy mapping.
D) Configure Authentication Policy Mapping settings
1. In the Authentication Policy Contract list on the Authentication Policy Mapping page, select the attribute contract that you created in Part B—Step 2, that is, SPContract. Click Next.
2. On the Mapping Method tab, click USE ONLY THE AUTHENTICATION POLICY CONTRACT VALUES IN THE SAML ASSERTION, and click Next.
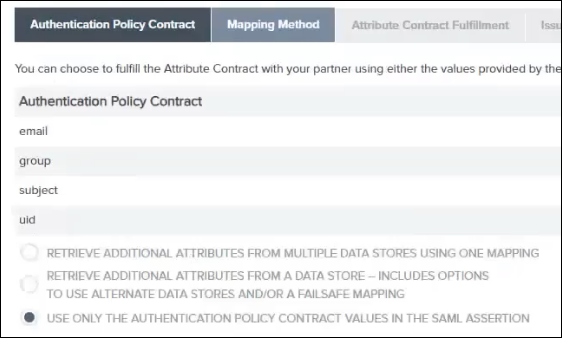
3. On the Attribute Contract Fulfillment tab, select the following values for the email, group, SAML_SUBJECT, and uid authentication policy contracts:
▪ In the Source list, select Authentication Policy Contract.
▪ In the Value list, select the corresponding entry from the list.
Click Next.

4. Skip the settings on the Issuance Criteria tab, and click Next.
5. Review the information on the Summary tab. If the information is correct, click Done. The Assertion Creation page opens, where you need to review the configuration settings for assertion creation.
E) Review Assertion Creation configuration settings
1. The Authentication Source Mapping tab on the Assertion Creation page displays the information that you selected while mapping a new authentication policy. Click Next.
2. Review the information on the Summary tab. If the information is correct, click Done. The Browser SSO page opens.
3. The Assertion Creation tab on the Browser SSO page displays the information that you entered while configuring assertion creation. Click Next.
4. On the Protocol Settings tab, click Configure Protocol Settings. The Protocol Settings page opens, where you need to specify the protocol settings.
F) Configure and review Protocol settings
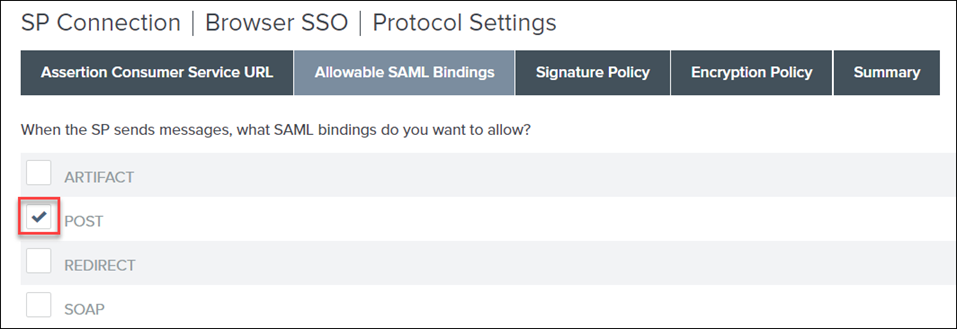
1. On the Assertion Consumer Service URL tab on the Protocol Settings page, do the following:
a. Select the Default check box.
b. In the Index field, type 0.
c. In the Binding list, select POST.
d. In the Endpoint URL field, enter either of the following URLs depending on your ThingWorx version:.
▪ For ThingWorx 10.0.0 and later versions, enter this URL: /Thingworx/login/saml2/sso
▪ For ThingWorx 9.7.0 and earlier versions, enter this URL: /Thingworx/saml/SSO
e. Click Add, and click Next.
2. On the Allowable SAML Bindings tab, select the POST check box, and click Next.
3. On the Signature Policy tab, select the following options, and click Next:
▪ REQUIRE AUTHN REQUESTS TO BE SIGNED WHEN RECEIVED VIA THE POST OR REDIRECT BINDINGS
▪ ALWAYS SIGN THE SAML ASSERTION
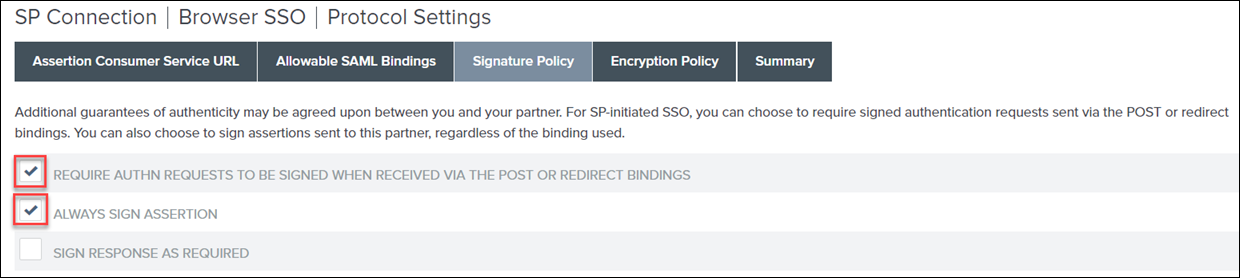
4. On the Encryption Policy tab, select The Entire Assertion, and click Next.
5. Review the information on the Summary tab. If the information is correct, click Done. The Browser SSO page opens.
6. The Protocol Settings tab on the Browser SSO page displays the information that you selected while configuring protocol settings. Click Next.
7. Review the information on the Summary tab. If the information is correct, click Done. The SP Connection page opens.
8. On the Browser SSO tab of the SP Connection page, click Next.
9. On the Credentials tab, click Configure Credentials. The Credentials page opens, where you need to specify the settings to configure credentials.
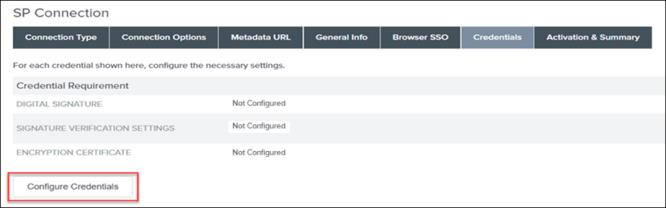
G) Configure credentials
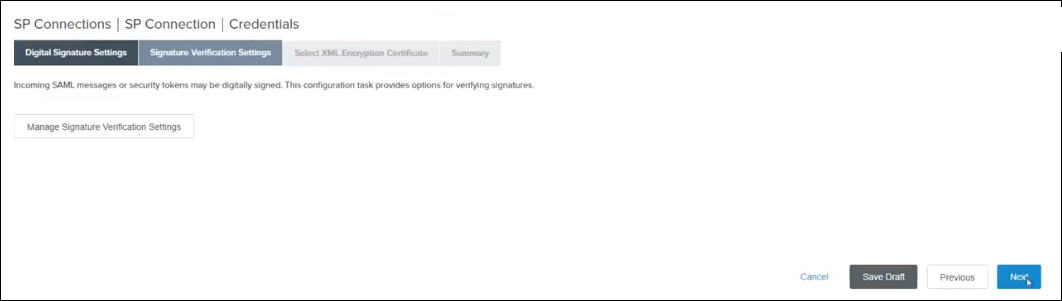
1. On the Digital Signature Settings tab, perform the following tasks:
1. In the SIGNING CERTIFICATE list, select the certificate from the list.
2. Select the INCLUDE THE CERTIFICATE IN THE SIGNATURE <KEYINFO> ELEMENT check box.
Click Next.

2. On the Signature Verification Settings tab, click Save Draft.
3. Click Manage All and click Save.
H) Configure Signature Verification settings and import and encrypt the certificate
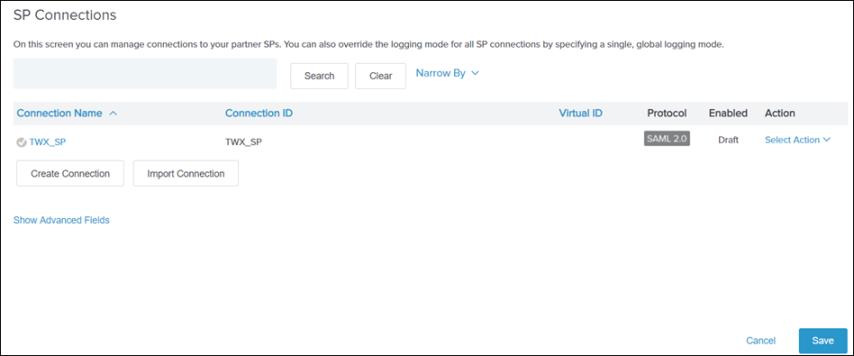
1. To restore the saved configuration, click Identity Provider, and in SP Connections, click Manage All.
2. Click the SP connection, TWX_SP, which you saved as a draft, and click Manage Signature Verification Settings.

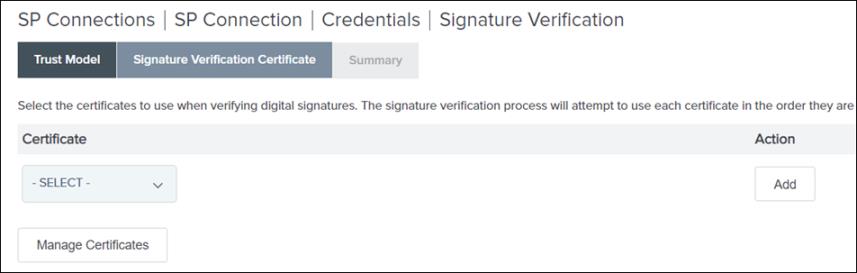
3. On the Trust Model tab, select UNANCHORED, and click Next.
On the Signature Verification Certificate, no certificate is available in the list.
4. Click Manage Certificates, and then click Import.
5. On the Import Certificate tab, click Choose file to browse to the certificate file that you created in Part E—Step 1, and click Next.
6. On the Summary tab, make sure that the MAKE THIS THE ACTIVE CERTIFICATE check box is selected.

7. Review the information on the Summary page. If the information is correct, click Done. The Certificate Management page opens.

8. Click Done. The Signature Verification page opens.
9. On the Signature Verification Certificate tab, you should see the certificate that you imported. Click Next.
10. On the Summary page, click Done.
11. On the Signature Verification Settings tab, click Next.
J) Encrypt the certificate
1. On the Select XML Encryption Certificate tab, do the following, and click Next:
1. Select AES-128 for Block Encryption Algorithm.
2. Select RSA-OAEP for Key Transport Algorithm.
3. Select the certificate from the list.
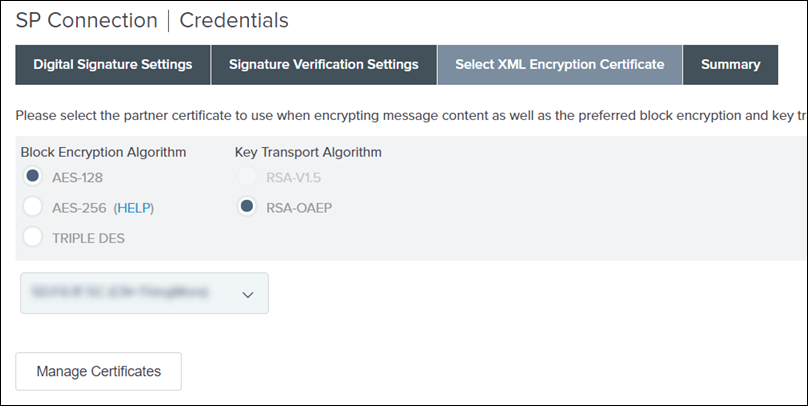
2. Review the information on the Summary tab. If the information is correct, click Done. The Credentials page opens, where you need to review the settings for signature verification.
K) Activate the SP connection
1. The Credentials tab on the SP Connection page displays the information that you selected while configuring credentials. Click Next.
2. On the Activation & Summary page, under Connection Status, make sure that the connection is enabled.

3. Click Save.

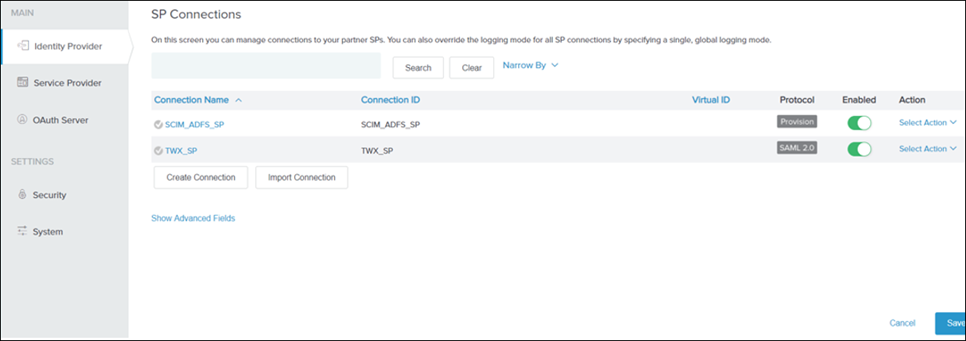
The connection is displayed under the SP Connections group on the Identity Provider page.
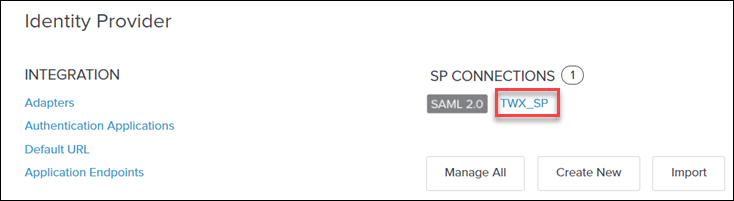
Step 3: Export the ThingWorx service provider connection metadata and PingFederate public certificate
A) Export metadata from PingFederate for ThingWorx
1. In PingFederate, under SP Connections, click Manage All.
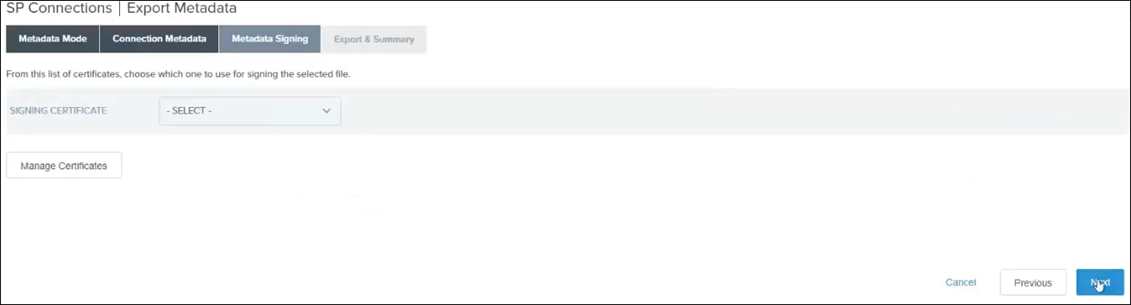
2. For the SP connection that you created in Part E—Step 2, that is, TWX_SP, in the Select Action list, click Export Metadata.

3. In the Metadata Signing tab, click Next.
4. In the Export & Summary tab, click Export.
The file is downloaded.
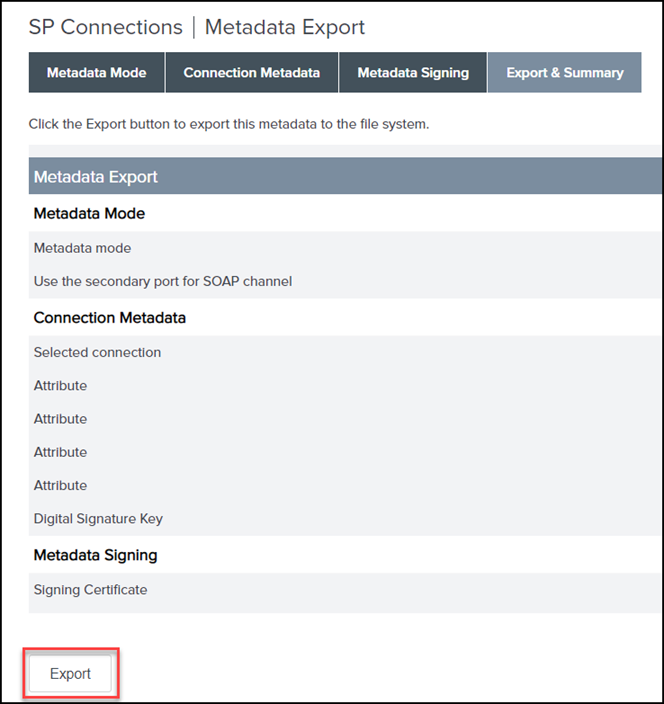
5. Click Done.
B) Export the PingFederate public certificate
1. In PingFederate, under SP Connections, click the SP connection that you selected, TWX_SP.
2. On the Activation & Summary tab, under the Credentials section, click Digital Signature Settings, and do the following:
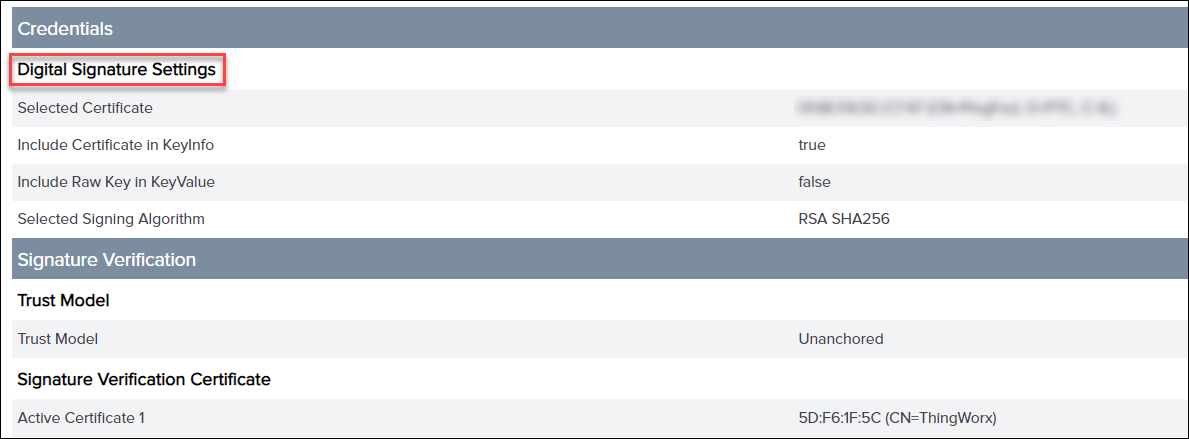
3. Click Manage Certificates.

4. For your certificate, in the Select Action list, click Export.
5. Select the CERTIFICATE ONLY check box, and click Export.
The file is downloaded. Rename this file to an appropriate name. For example: pingfedsigning.crt
6. Import this PingFederate public certificate file to the sso-keystore.jks KeyStore that you created in Part E—Step 1.
Step 3: Export the ThingWorx service provider connection metadata and PingFederate public certificate
A) Export metadata from PingFederate for ThingWorx
1. In PingFederate, under SP Connections, click Manage All.
2. For the SP connection that you created in Part E—Step 2, that is, TWX_SP, in the Select Action list, click Export Metadata.
3. In the Metadata Signing tab, click Next.
4. In the Export & Summary tab, click Export.
The file is downloaded.
5. Click Done and click Save.
B) Export the PingFederate public certificate
1. In PingFederate, under SP Connections, click the SP connection that you selected, TWX_SP.
2. On the Activation & Summary tab, under the Credentials section, click Digital Signature Settings, and do the following:
3. Click Manage Certificates.
4. For your certificate, in the Select Action list, click Export.
5. Select the CERTIFICATE ONLY check box, and click Export.
The file is downloaded. Rename this file to an appropriate name. For example: pingfedsigning.crt
6. Import this PingFederate public certificate file to the sso-keystore.jks KeyStore that you created in Part E—Step 1.
Part F: Configure ThingWorx for Single Sign-on
1. Stop the ThingWorx server.
2. Follow the steps detailed in Configure ThingWorx for Single Sign-On.
Once you have finished configuring ThingWorx for single sign-on, your ssoSecurityConfig must contain the following files:

Part G: Create SSL Certificates
Step 1: Import the ThingWorx SSL certificate to the PingFederate Java cacerts file
1. Create a KeyPair (KeyStore) for ThingWorx. Make sure that you use the FQDN of the ThingWorx host as the CN value.
2. Export the ThingWorx public SSL certificate from this key pair.
3. Import the ThingWorx SSL certificate (.crt) to the Java cacerts file on the PingFederate machine.
4. Restart PingFederate.
Step 2: Import the PingFederate SSL certificate to the ThingWorx Java cacerts file
1. To export the PingFederate certificate, do the following:
1. In PingFederate, click > .
2. For your certificate, in the Select Action list, click Export, and click Next.
3. On the Export Certificate tab, ensure that CERTIFCATE ONLY is the default value, and click Next.
4. On the Export & Summary tab, click Export.
The certificate is downloaded.
5. Rename the certificate to an appropriate name. For example: pingfedssl.cer.
2. Import the PingFederate SSL certificate (.crt) to the Java cacerts file on the ThingWorx machine.
Part H: Creating OAuth Client Connection for ThingWorx
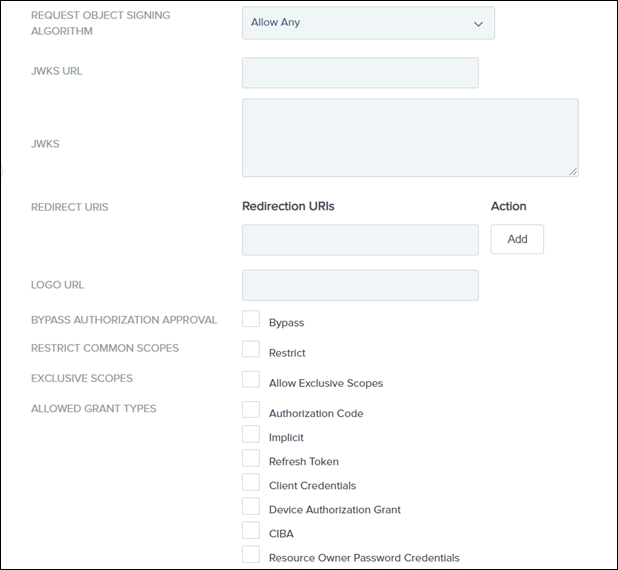
Complete the steps in Creating OAuth Client Connection for ThingWorx.
Make sure that there are no spaces in the Redirect URIS field, and click Save at the end of the configuration. |
Part I: Verify that ThingWorx starts before proceeding with SCIM configuration
1. Start ThingWorx.
Check the log file to ensure that there are no errors.
2. Log in to ThingWorx with the Domain\username that you created in AD FS.
Part J: Configure SCIM with ThingWorx
For more information, see Provisioning.
Step 1: Enable outbound provisioning
1. Stop PingFederate.
2. Stop ThingWorx.
3. In the run.properties file located at <pf_install>/pingfederate/bin, where <pf_install> is the installation location for PingFederate, update the value of pf.provisioner.mode to STANDALONE.
pf.provisioner.mode=STANDALONE
4. Start PingFederate.
For more information, refer to Configure PingFederate to Redirect User Login Requests to Your IdP.
Step 2: Create a data store for Active Directory
1. In PingFederate, search for Data Stores.
2. Click Add new Data Store.
3. Enter a NAME, for example, LDAP_ADFS, and for TYPE, select Directory (LDAP), and click Next.
4. For HOSTNAME(S), provide the FQDN of the AD FS machine.
5. For the USER DN, provide cn=Administrator,cn=Users,dc=thingworx,dc=com
6. For PASSWORD, provide the same Administrator password that you set in Active Directory, and click Next.
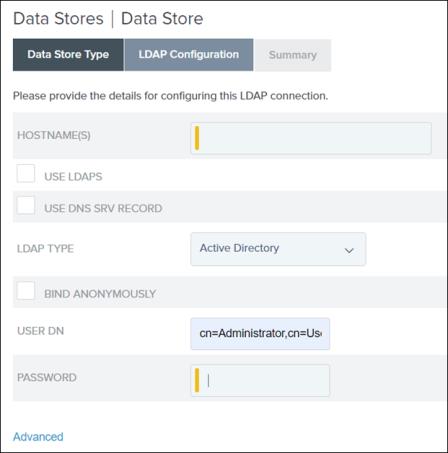
7. On the Summary tab, click Save.
For more information, refer to Add the LDAP as a Data Store.
Step 3: Create a Password Credential Validator instance
1. In PingFederate, search for Password Credential Validators.
2. Click Create New Instance.
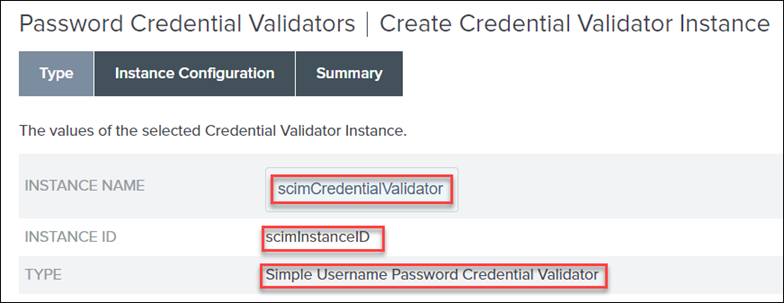
3. Provide values for INSTANCE NAME and INSTANCE ID.
4. In the TYPE list, select Simple Username Password Credential Validator, and click Next.
5. On the Instance Configuration tab, click Add a new row to ‘Users’.
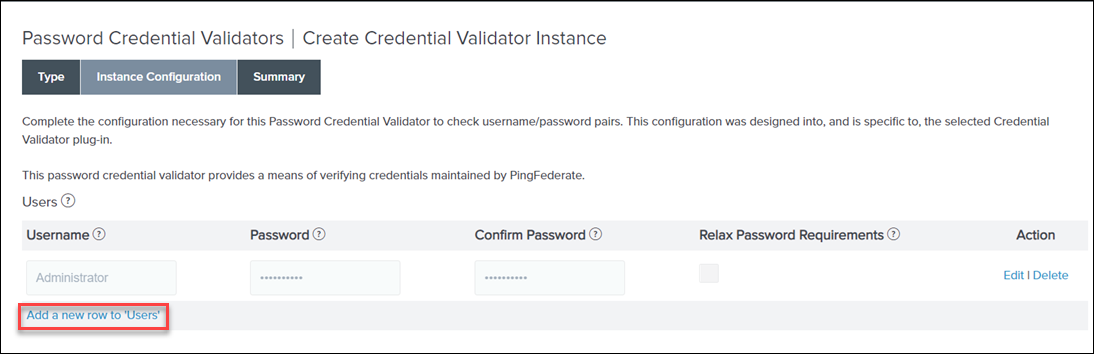
6. Provide the Username and Password of an existing ThingWorx user, for example, Administrator. Click Update and click Next.

7. On the Summary tab, click Done and Save.
For more information, refer to Configure a Password Credential Validator Instance.
Step 4: Map the Password Credential Validator instance to the persistent grant contract
1. In PingFederate, search for Resource Owner Credentials Grant Mapping.
2. In the SOURCE PASSWORD VALIDATOR INSTANCE, select the validator that you created above, and click Add Mapping.
3. On the Attribute Sources & User Lookup tab, click Next.
4. On the Contract Fulfillment tab, set Source to Password Credential Validator, Value to username, and click Next.

5. On the Issuance Criteria tab, click Next.
6. On the Summary tab, click Save.
For more information, refer to Configure a Password Credential Validator Instance.
Step 5: Create an OAuth client for SCIM
The OAuth client is a connection point for PingFederate to provide access tokens to ThingWorx. Service Providers use these access tokens to request OAuth-protected resources from ThingWorx.
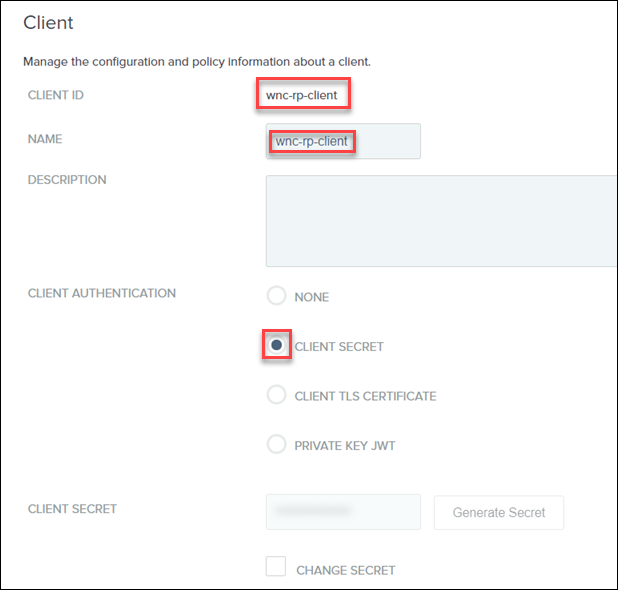
1. In PingFederate, search for Clients and open the search results. Click Add Client.
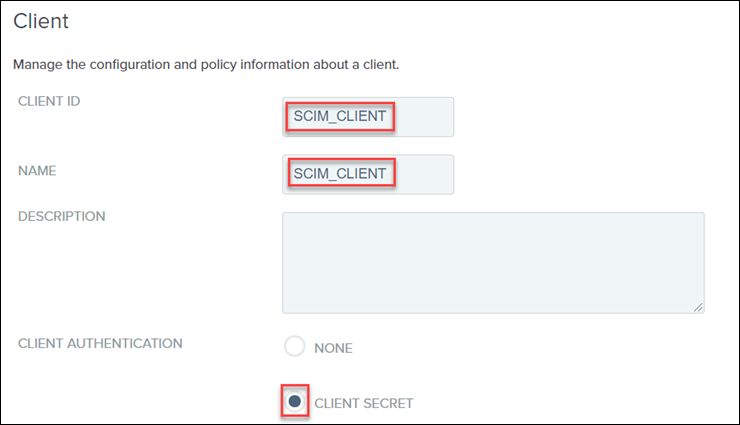
2. Provide a unique value for the CLIENT ID and NAME.
3. Set CLIENT AUTHENTICATION to CLIENT SECRET.
4. For CLIENT SECRET, select the CHANGE SECRET check box, and then click Generate Secret.

Note the value of CLIENT ID and CLIENT SECRET as you will need them while configuring the SCIMAccessTokenServicesSettings section in the sso-settings.json file.
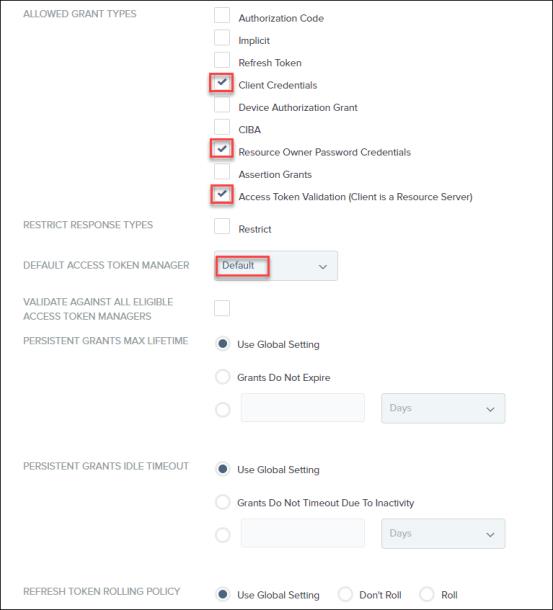
5. In the REDIRECT URIS field, enter https://{THINGWORX HOST}:8443/Thingworx/SCIMProvider/SCIM, and click Add.
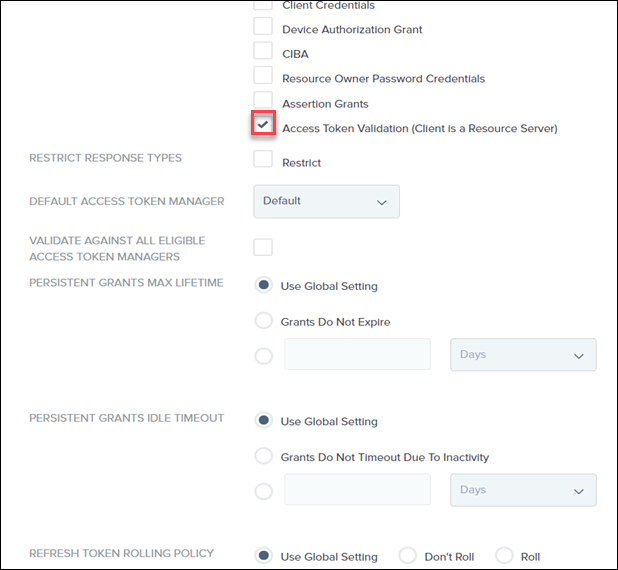
6. For ALLOWED GRANT TYPES, select the Client Credentials, Resource Owner Password Credentials, and Access Token Validation (Client is a Resource Server) check boxes.
7. Set DEFAULT ACCESS TOKEN MANAGER to Default.
8. Ensure that you set the remaining values as per the following image:
9. Click Save.
For more information, refer to Create an OAuth Client for SCIM.
Step 6: Configure SCIM in the platform-settings.json file
Complete the steps in Configure SCIM in Platform Settings and in SSO Settings for ThingWorx – PingFederate.
Step 7: Verify if the SCIM Subsytem is running
1. Start the ThingWorx server.
2. In ThingWorx Composer, click Browse and select Subsystems.
3. Select SCIMSubsystem, and verify that it is running.
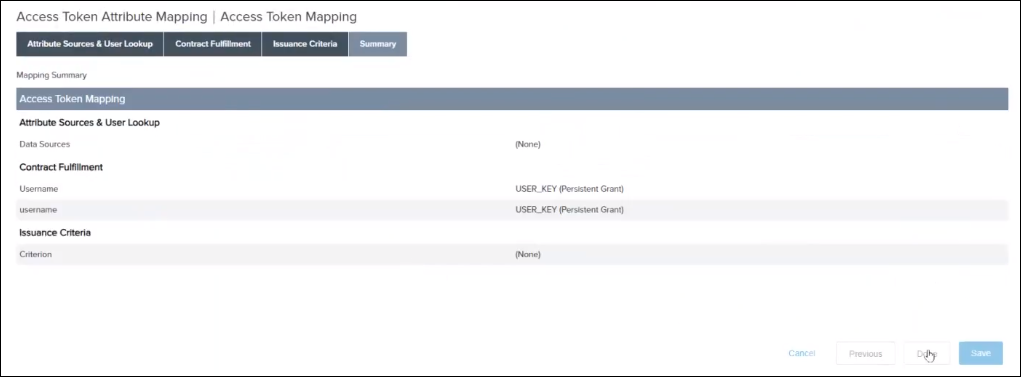
Step 8: Map USERNAME and USER_KEY
1. In PingFederate, search for Access Token Management.

2. Click Create New Instance.
3. Provide an INSTANCE NAME.
4. For INSTANCE ID, type default.
5. Set TYPE to Internally Managed Reference Tokens, and click Next.
6. On the Instance Configuration tab, click Next.
7. On the Session Validation tab, click Next.
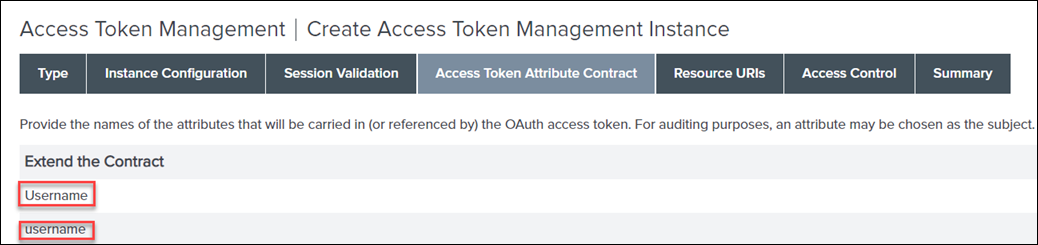
8. On the Access Token Attribute Contract tab, do the following, and click Next:
1. Under Extend the Contract, add Username for Windchill, and click Add.
Make sure that you specify the same case as noted here. |
2. Under Extend the Contract, add username for SCIM, and click Add.
Make sure that you specify the same case as noted here. |
9. On the Resource URIs tab, click Next.
10. On the Access Control tab, click Next.
11. On the Summary tab, click Save.
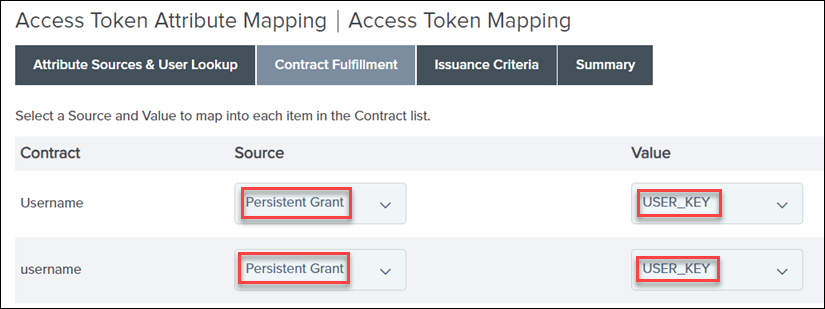
12. Search for Access Token Mapping, and then click Add Mapping (to the Default context).
13. Click Next until you reach the Contract Fulfillment tab.
14. On the Contract Fulfillment tab, for the Username and username contracts, do the following:
▪ Set Source to Persistent Grant.
▪ Set Value to USER_KEY.
15. On the Issuance Criteria tab, click Next.
16. On the Summary tab, click Save.
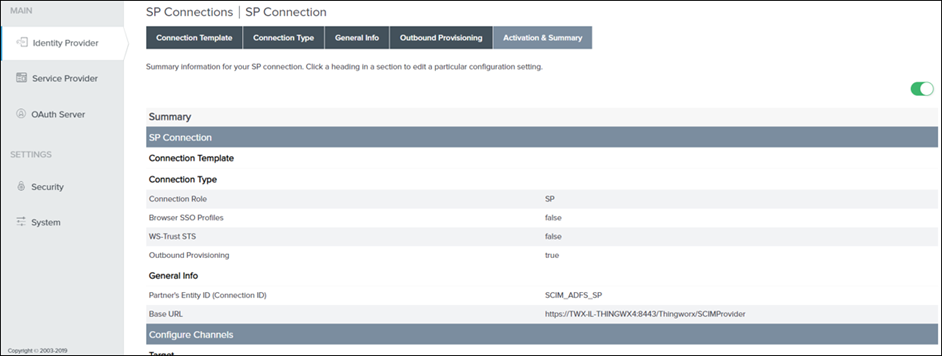
Step 9: Define a service provider connection for SCIM
1. In PingFederate, search for SP CONNECTIONS and create a new connection.
2. On the Connection Template tab, select the DO NOT USE A TEMPLATE FOR THIS CONNECTION, and click Next.
3. On the CONNECTION TYPE tab, do the following, and click Next:
1. Ensure that the BROWSER SSO PROFILES check box is not selected.
2. Select the OUTBOUND PROVISIONING check box, and set TYPE to SCIM 1.1 Service Provider.

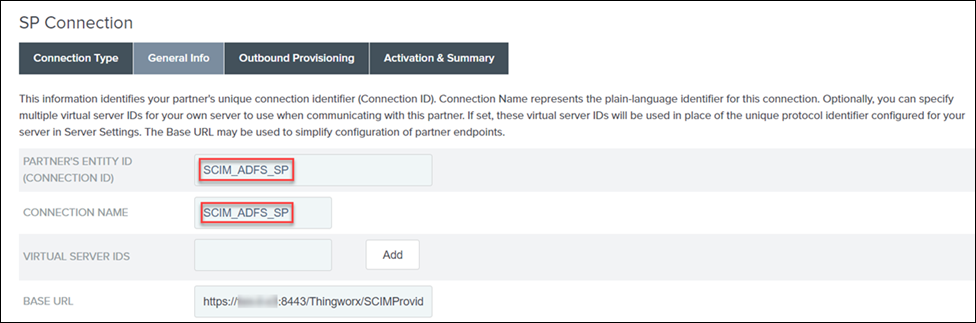
4. On the General Info tab, do the following, and click Next:
1. Specify the PARTNER’S ENTITY ID (CONNECTION ID) and CONNECTION NAME. For example: SCIM_ADFS_SP
2. In the BASE URL field, enter https://ThingWorx_FQDN:8443/Thingworx/SCIMProvider.
Make sure that there are no spaces at the end of the URL when you copy it to PingFederate. |
5. On the Outbound Provisioning tab, click Configure Provisioning.
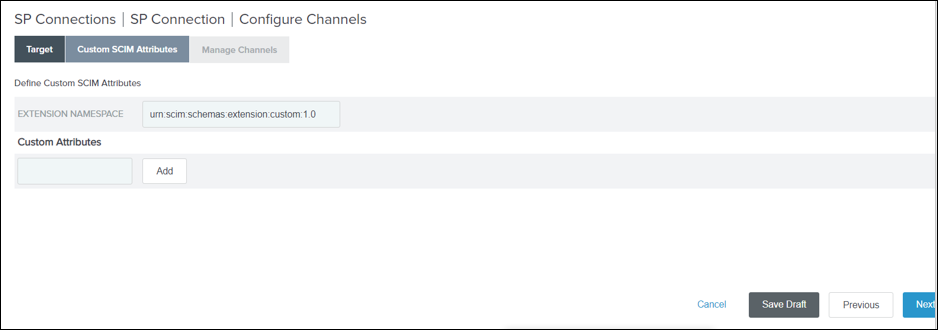
6. On the Custom SCIM Attributes tab, do the following, and click Next:
1. In the USERS RESOURCE URL field, enter https://ThingWorx_FQDN:8443/Thingworx/SCIMProvider/SCIM/Users
Make sure that there are no spaces at the end of the URL when you copy it to PingFederate. |
2. In the GROUPS RESOURCE URL field, enter https://ThingWorx_FQDN:8443/Thingworx/SCIMProvider/SCIM/Groups
Make sure that there are no spaces at the end of the URL when you copy it to PingFederate. |
3. Set AUTHENTICATION METHOD to OAUTH 2.0 BEARER TOKEN.
4. Specify the USER as Administrator, and enter the PASSWORD.
5. Specify the values of CLIENT ID and CLIENT SECRET from the sso-settings.json file.
6. In the TOKEN END POINT URL, enter https://PingFederate Host:9031/as/token.oauth2
Make sure that there are no spaces at the end of the URL. |
7. Ensure that the SCIM SP SUPPORTS PATCH UPDATES and PROVISION GROUPS WITH DISTINGUISHED NAME check boxes are not selected.
8. Set DEPROVISION METHOD to DELETE USER.

7. On the Custom SCIM Attributes tab, click Next.
For more information, refer to Define an SP Connection for SCIM.
Step 10: Create a channel to the data store
1. On the Manage Channels tab, click Create.
2. Provide the CHANNEL NAME.
3. Select the ACTIVE DATA STORE as the one you created in Step 2, that is, LDAP_ADFS, and click Next.
4. On the Source Settings tab, click Next.
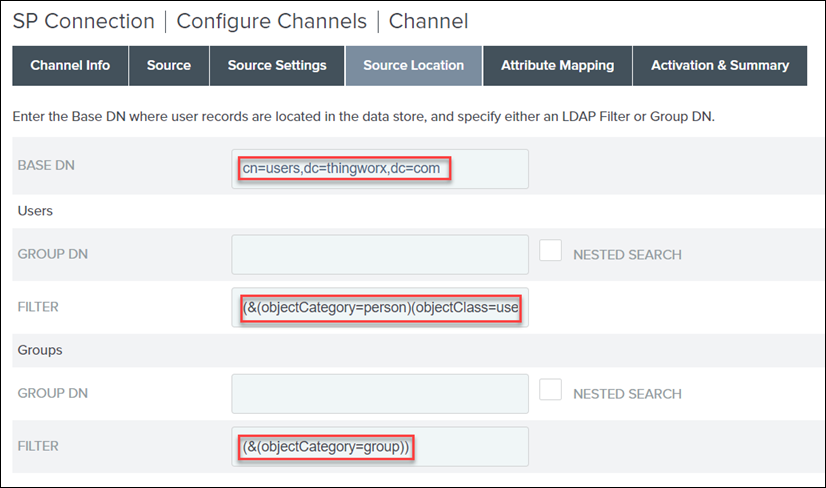
5. On the Source Location tab, do the following, and click Next:
a. In the BASE DN field, enter cn=users,dc=thingworx,dc=com
b. Under Users, in the FILTER field, enter (&(objectCategory=person)(objectClass=user)(cn=*))
c. Under Groups, in the FILTER field, enter (&(objectCategory=group))
6. On the Attribute Mapping tab, click Next.
7. On the Activation & Summary tab, set Channel Status to ACTIVE, and click Done.
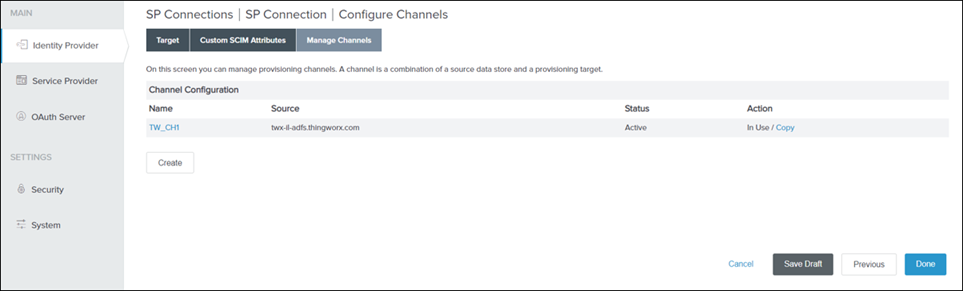
8. On the Manage Channels tab, click Done.
9. On the Outbound Provisioning tab, click Next.

10. Ensure that the SP connection is active (green), and click Save.
The SP connection is listed on the SP connections page.
For more information, refer to Create a Channel to the Data Store.
Step 11: Add LDAP binary attribute
1. Go to > > .
2. Click the LDAP_ADFS data store and select the LDAP Configuration tab.
3. Click Advanced to see additional settings for binding and configuration.
4. Click the LDAP Binary Attributes tab and add a new binary attribute with objectGUID as the value.
5. Click Save.
Part K: Configure Windchill as the Resource Server
Step 1: Prerequisites
◦ Windchill is configured for SSL/ OAuth 2.0.
◦ ThingWorx and PingFederate SSL certificates were imported into the jssecacerts/ cacerts file on the Windchill machine.
◦ Integration Runtime is configured on the ThingWorx instance. See Initial Setup of Integration Runtime Service for Integration Connectors for details.
◦ Windchill SSL certificate was imported into the jssecacerts / cacerts file on the ThingWorx machine.
◦ Windchill SSL certificate was imported into jssecacerts / cacerts file on the PingFederate machine.
Step 2: Complete Windchill OAuth 2.0 file configuration
Update the securityContext.properties file available at <WC_install_root>\Windchill\codebase\WEB-INF\security\config:
◦ checkTokenEndpointUrl—FQDN of the PingFederate machine.
◦ clientId—OAuth client ID, for example, wnc-rp-client.
◦ clientSecret—OAuth client secret.
◦ resourceScopes—Windchill scope, for example, WINDCHILL_READ.
Step 3: Create OAuth client connection for Windchill as resource server
Complete the steps in Creating OAuth Client Connections for Windchill.
You can retrieve the value of clientId and clientSecret from the securityContext.properties file. |
Step 4: Create Windchill scopes in PingFederate
1. In PingFederate, on the OAuth Server page, click Scope Management.
2. Under Scope Value, click Add to add the same scopes, for example, WINDCHILL_READ, which you added for the resourceScopes value in the securityContext.properties file.
3. Click Save.