Entering Historical Scrap Events
Quality checks on produced material often occur after a job order is completed, resulting in some produced materials being marked as scrap after production blocks are complete. For production blocks still within the last 24 hours, you can enter scrap loss events by editing the production block. To enter scrap events for job orders that completed more than 24 hours ago, you must enter a historical scrap event.
To enter a historical scrap event, complete the following steps:
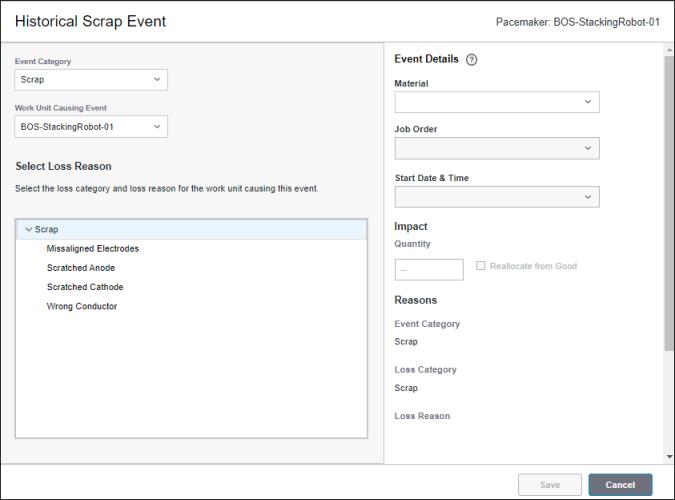
1. From the expanded event log, click Add Historical Scrap Event. The Historical Scrap Event Entry window opens, identifying the current pacemaker for the work center.

2. The Event Category for a historical scrap event is always Scrap.
3. For Work Unit Causing Event, select the work unit which caused the scrap loss to occur on your pacemaker. By default, the pacemaker for the work center is selected. If the reason for the loss event occurred on a work unit that is upstream or downstream from the pacemaker, you can select that work unit instead.
4. Under Select Loss Reason, navigate to and select the loss reason for the work unit which caused the event. If the pacemaker is selected as the Work Unit Causing Event, you can only select reasons from the Scrap loss category. If a work unit other than the pacemaker is selected as the Work Unit Causing Event, you can select any loss reason that is valid for the selected work unit, from any loss category.
5. Under Event Details, you must specify the material to enable the fields for job order, and start date and time for the historical scrap event.
◦ For Material, select the material from the drop-down list to which you are adding the historical scrap event. The list includes materials that were produced by this work unit within the last 14 days, starting from the day before the current date. You can narrow down the list of materials by entering text in the Start typing field of the drop-down list. Wildcard search is not supported.
◦ For Job Order, select a job order from the drop-down list. If you do not know the job order, select the Start Date & Time first to automatically populate the Job Order field. You can narrow down the list of job orders by entering text in the Start typing field of the drop-down list. Wildcard search is not supported. If the selected material is produced by a single job order, that job order is automatically displayed in the Job Order field.
If the pacemaker for the work center has been changed, the historical scrap event is logged against the pacemaker that was set when the job order was in production. |
◦ For Start Date & Time, select the start date and time from the drop-down list. If you do not know the start date and time, select the Job Order first to automatically populate the Start Date & Time field. You can narrow down the list of start dates and times by entering text in the Start typing field of the drop-down list. Wildcard search is not supported. If the selected material is produced by a single job order, the start date and time for that job order is automatically displayed in the Start Date & Time field.
6. Under Impact, enter the quantity of scrapped material in the Quantity field. The Quantity value can include decimals, but can contain no more than 13 digits.
The Reallocate from Good checkbox determines whether the quantity being scrapped is removed from the Good count. To determine when to select the checkbox, consider whether the quantity that is being scrapped has already been logged as Good.
◦ If the quantity that is being scrapped has already been logged as Good, select the Reallocate from Good checkbox. When the checkbox is selected, the Scrap count increases and the Good count decreases. Production time for any count that is reallocated from the Good count is reallocated from effective production time to scrap loss time.
Selecting the Reallocate from Good checkbox for a historical scrap event can result in a negative Good count for the production block in which the historical scrap event is added. This is allowed as long as the Scrap count does not exceed the total Good count for the job order. |
◦ If the quantity that is being scrapped has not yet been logged as Good, do not select the Reallocate from Good checkbox. When the checkbox is not selected, the Scrap count increases and the Good count remains the same.
7. Under Reasons, the Event Category, Loss Category, and Loss Reason fields are populated based on the selections made. If the selected loss reason is not at the lowest level of the reason tree, an alert shows below the Loss Reason field. You can save the loss event with this alert present, but your data will not be complete for the Pareto and trend charts in Performance Analysis.
8. Enter an optional comment in the Comments field.
Depending on the number of events in the event log and the filters applied, the new scrap event entry might not appear in the visible portion of the event log. To view the new scrap event in the list, select the Scrap Only (Week) filter and search for or sort on one of the known values for the entry, such as the job order or material. If the scrap event is more than a week old, it cannot be viewed in the event log. |