Starting Creo+
2. If not already logged in, log in to the Creo+ Portal from the PTC Control Center (https://creo.portal.ptc.com/creoplus/) with your organizational account. Note that you can run Creo+ only if you are logged in to the Creo+ Portal.
3. Start Creo+ from any of the following locations:
◦ Windows Start Menu—Click  >
>
◦ PTC Control Center—Click to open the PTC Control Center.
4. If you are a member of different profiles, select a suitable profile.
5. Click Run Creo+ to start Creo+.
6. After the Creo+ session starts, your initials are displayed at the top right corner of the Creo+ window. Hover your pointer over the initials to view the user name, email address, and the active profile for the session.
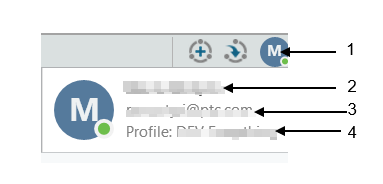
1. initials of the user
2. name of the user
3. email address of the user
4. active profile for the session
Modifying Creo+ Desktop Shortcut Parameters
You can modify or add Creo+ command line parameters when starting Creo+ from the desktop shortcut.
Right-click the desktop shortcut > and select Properties. Select the Shortcut tab. Add or modify the following parameters in the Target field.
• --run-app <CREO_UUID>—runs the application specified by the UUID.
• --cwd <directory name>—sets the current working directory for Creo+.
• --profile <profile name>—starts Creo+ with the specified profile.
• --no-error-msg—Hides profile error messages.
• --pid-info <file_name>—Outputs PID information to the specified file.
For example, if you use the following parameters:
uisc.exe --run-app 01382eb7-0c8b-57b1-8a85-edfb68d1071c --profile manufacturing --no-error-msg.
Creo+ starts with the profile named manufacturing and hides profile error messages.