Quick tour
The menu panel
Once you start Creo Elements/Direct Model Manager, there are three ways to access Creo Elements/Direct Model Manager commands:
• To open the toolbar:
a. Click View and then, in the Window group, click the arrow next to  Toolbars.
 Toolbars.
b. Click > . The Model Manager toolbar opens.

From the toolbar, click the folder icon.
• To open the database menu: Click > > . Alternatively, click Model Manager and then, in the Workspace group, click  Workspace.
 Workspace.
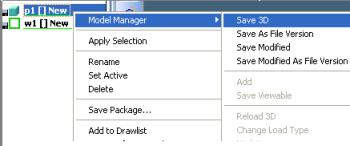
Use right-click menus in the Creo Elements/Direct Modeling Structure Browser: Right-click a part or assembly and hover over theCreo Elements/DirectModel Manager menu. The Creo Elements/Direct Model Manager actions open.

Use the Creo Elements/Direct Model Manager Workspace to access a variety of functions for data management.
The Workspace window
With Creo Elements/Direct 18.0, a Fluent user interface has been introduced for Model Manager. The Fluent user interface facilitates faster access to commands by grouping the commands according to their functions.
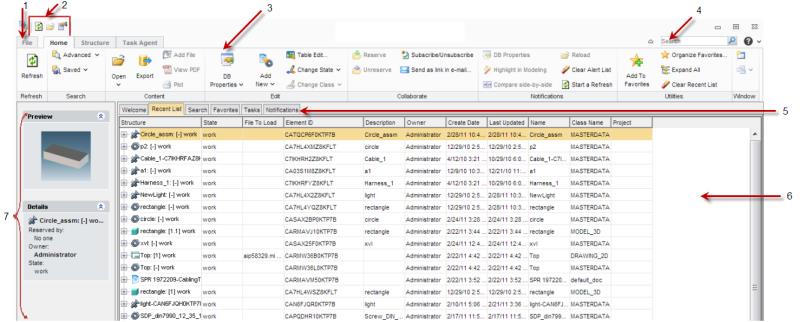
The Creo Elements/Direct Model Manager user interface consists of the following elements:
1. File Menu
3. Ribbon
4. Quick Search
7. Left Pane

1. File Menu: The File button in the upper-left corner of the Creo Elements/Direct Model Manager window opens the File menu. The File menu contains the following commands:
◦ New: Opens a new document, masterdata, packet, project, XVL file, or eDrawing.
◦ Send To: Sends the information from the information panel to an HTML, MS Excel, or CSV file.
◦ Change Password: Changes your Creo Elements/Direct Model Manager login password.
◦ My Profile: Displays your complete profile information and also allows you to update it.
◦ Modules: Activates or deactivates the BOM Editor.
◦ Options: Changes the workspace, thumbnail, and advanced preferences. For more information, see Change your preferences.
◦ Exit: Closes the Creo Elements/Direct Model Manager window.
2. Quick Access Toolbar: The Quick Access toolbar is by default at the top of the Creo Elements/Direct Model Manager window. It provides quick access to frequently-used commands.
3. Ribbon: The ribbon contains commands organized as a set of tabs. On each tab, related commands are grouped. The following figure shows the different elements of a ribbon.

a. Tab: The available tabs are Home tab, Structure tab, and Task Agent tab.
b. Group: Commands are placed within groups according to their functions.
c. Button: Each button on the ribbon consists of an icon and a label. Some buttons have two portions; an icon and an arrow. The icon displays the icon of the last-selected command in the current session and the arrow opens a list of related buttons. Click an icon to execute the command which the icon represents. The label remains unchanged irrespective of the last selection. The tooltip shows the name of the command which the icon represents.
4. Quick Search: The quick search allows you to easily locate the items in your Creo/ Elements Direct Manager Server database. For details, see Quick Search.
5. Workspace Bar: The workspace bar provide access to the Welcome, Recent List, Search, Favorites, Tasks, Notifications, and My Projects panes.
◦ The Welcome pane provides up-to-date database status information and quick access to the key topics.
◦ The Recent List pane is a dynamic list which changes depending on the recently accessed items. For details, see Getting the most out of Creo Elements/Direct Model Manager.
◦ The Search pane allows you to easily search for items in the database and save the information which is found. For details, see Search for data.
◦ The Favorites pane contains items from the Recent list that you had marked as favorites. For details, see Getting the most out of Creo Elements/Direct Model Manager.
◦ The My Projects pane contains a list of projects which you own. For details, see Create projects, folders, and packets.
◦ The Notifications pane displays the status alerts. For details, see Subscriptions and notifications.
You can resize columns in some of the panes simply by dragging the column separator. Creo Elements/Direct Model Manager remembers the changed column sizes. |  |
6. Information Panel: The information panel displays information specific to each pane on the workspace bar.
7. Left Pane: The left pane provides easy access to tasks and information.