Getting the most out of Creo Elements/Direct Model Manager
The previous three tutorials covered how to Save and Load your 3D and 2D data. Now search for your data with Creo Elements/Direct Model Manager.
Below are tips to help you find your data. With this knowledge, you're ready to use Creo Elements/Direct Model Manager in your daily design!
Recent List
Look at all of the information that the Recent List shows you: revision, model name, and so on. This is a dynamic list - it changes depending on which items you've accessed recently. Note the different icons for Masterdata 
 , assemblies
  , models
  , and drawings
 .
.
 , models
1. The left pane displays information specific to the item which is selected in the workspace. The Preview section displays the thumbnail of the selected item and the Details section displays the reserve status, controlling project, owner, and the state of the selected item.
2. The columns in the workspace show you a variety of information as follows:
◦ Structure column shows the Masterdata name, the revision, and the state (work). The Name column shows the Model Name.
◦ The Description column shows a description of the item. By default, Creo Elements/Direct Model Manager uses the instance name of the item for the Structure name, Name, and the Description. You can edit the information as follows:
a. Click Home and then, in the Edit group, click the arrow next to  DB Properties.
b. Click Attributes. The DB Properties dialog box opens.
c. Click the Edit and Full check boxes.
d. Type new values in the Description box and the Name box.
e. Click OK. The description and name are now changed.
3. To reserve or unreserve an item, click Home and then, in the Collaborate group, click  Reserve or click
  Unreserve. Alternatively, you can right-click the item and select Reserve or Unreserve.
Attachments: Design data documents
In addition to your models and drawings, you may want to keep other design data documents.
• eDrawings and XVL files:
eDrawings are lightweight representations of 2D drawings and 3D models. XVL files are highly compressed 3D models. These files can help non-CAD users who want to inspect your 2D and 3D design data.
Creo Elements/Direct Model Manager maintains links between an eDrawings/XVL file and the model or drawing from which it was derived. You must save the model or drawing before saving the eDrawings/XVL file so Creo Elements/Direct Model Manager can create the links between them.
You can save multiple eDrawings/XVL files with each version of a model or drawing. For example, you could have one eDrawings/XVL file for a design review and another for manufacturing.
• PDF files:
You can create a PDF of a drawing by selecting the Create PDF check box in the Save dialog box.
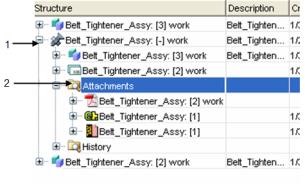
1. Click the + to expand the view of an item in the workspace.
2. The Attachments folder exists for each Masterdata item in the database. It contains documents such as eDrawings, XVL files, and PDF files of your drawings.
History: The life of your models and drawings
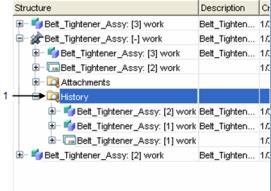
1. The History folder exists for each Masterdata item in the database. It shows each revision of your models and drawings, except for the highest revision.
Search
Use the Search tab to look for your models, drawings, and other design data.
1. Click Home and then, in the Search group, click the arrow next to  Advanced to search for items from the database. Alternatively, click the Search tab on the Workspace bar, and specify the search options in the left pane.
 Advanced to search for items from the database. Alternatively, click the Search tab on the Workspace bar, and specify the search options in the left pane.
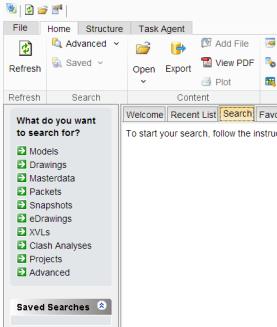
2. Tips for using the Search function:
◦ Categorize your items by common values such as Material. Find the item values in the DB Properties dialog box.
◦ Use * in your query as a wild card.
◦ Save your query for later use. With a saved search you can find your data with a single click. The left pane lists your searches under Saved Searches pane.
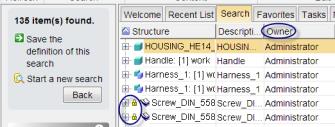
3. The left pane shows the number of items found, the description of the selected item in the Details section, and a list of Saved Searches.
Note that the table shows you who owns the item (Owner). The little yellow lock identifies that the item cannot be overwritten.
Favorites
You can create a list of most frequently used modelsin the Favorites tabbed page, much like creating bookmarks for Web pages.
To add an item to your Favorites list, click Home and then, in the Utilities group, click  Add to Favorites. Alternatively, you can right-click the item in the Recent List tabbed page and select Add to Favorites.
 Add to Favorites. Alternatively, you can right-click the item in the Recent List tabbed page and select Add to Favorites.
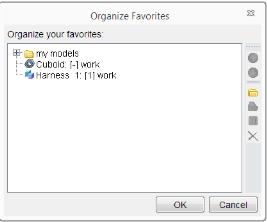
1. You can to organize your models by project, customer, or release date as follows:
◦ Click Home and then, in the Utilities group, click Organize Favorites.
◦ The Organize Favorites dialog box opens. You can create, delete, or rename folders, move items across folders, and remove items from the Favorites list.
◦ Click OK to complete the operation.
DB Properties
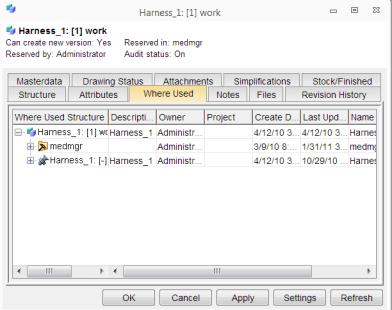
Click Home and then, in the Edit group, click  DB Properties. The DB Properties dialog box opens. The DB Properties dialog box includes the following tabs:
• Masterdata: Displays information about the masterdata associated with the selected item.
• Drawing Status: Displays information about the drawing associated with the selected item.
• Attachments: Displays all files, except models, drawings, and masterdata, that are linked to the selected item.
• Simplifications: Displays information about the simplification associated with the selected item.
• Stock/Finished: Displays information about the stock parts and finished parts associated with the selected item.
• Structure: Displays the structure of the selected item.
• Attributes: Displays information such as Create Date, Description, and Note, about the selected item. Click the Edit and Full check boxes to modify the information.
• Where Used: Displays all the parent assemblies that contain the selected item. The Where Used Structure column shows the 2D3D-Link, which identifies that there is a 2D drawing associated with the selected item.
• Notes: Displays the change note information which was added during the save operation.
• Files: Displays all the files associated with the selected item.
• Revision History: Displays all the revisions of the selected item.
The DB Properties tabs will vary depending on whether you've selected Masterdata, models, or drawings.