Integrity Lifecycle Manager
The Integrity Lifecycle Manager (ILM) connector allows ThingWorx Flow workflows to access and execute actions on Integrity Lifecycle Manager.
Prerequisites
Depending on the version of Integrity Lifecycle Manager that you are using, ensure that you set the correct prerequisites:
If you are using Integrity Lifecycle Manager 12.1
1. Set up and configure the following:
▪ Integrity Lifecycle Manager 12.1 Server
▪ Integrity Lifecycle Manager REST Services 12.1
▪ Integrity Lifecycle Manager Requirements and Validation Solution
2. Run the following Bootstrap API endpoint:
https://<HOSTNAME>:<PORT>/rws/odata/ptc/ilm/resources/jsongenerators
You must run this endpoint every time the REST service or Integrity Lifecycle Manager server is restarted.
If you are using Integrity Lifecycle Manager 12.2
1. Set up and configure the following:
▪ Integrity Lifecycle Manager 12.2 Server
▪ Integrity Lifecycle Manager Requirements and Validation Solution
2. In the ResourcesNameMapping.xml file at <Integrity_Server_Directory>/data/rws, for the following target fields, modify the source values as shown below:
|
Target
|
Source
|
|---|---|
|
Live Item ID
|
LiveItemID
|
|
Major Version ID
|
MajorVersionID
|
|
Minor Version ID
|
MinorVersionID
|
|
Type
|
Type
|
The field names of the various actions of the Integrity Lifecycle Manager connector will be the same as the source values in the ResourcesNameMapping.xml file. To see appropriate field names for the actions, you can change the source values for the other target fields. However, ensure that there are no spaces in the source values.
3. Execute the following endpoint:
https://<HOSTNAME>:<PORT>/rws/odata/ptc/ilm/resources/jsongenerators?updateformapping=true
|
|
Note the following points:
• Ensure that you run this endpoint every time you update the ResourcesNameMapping.xml file.
• Whenever the server is restarted, the ResourcesNameMapping.xml file is reset to original and the modified file is saved as backup as ResourcesNameMapping.xml.bak.
Delete the ResourcesNameMapping.xml file, rename the ResourcesNameMapping.xml.bak to ResourcesNameMapping.xml, and run the endpoint again.
|
In ThingWorx Flow, you can use the HTTP Request action of the HTTP utility to run the endpoint. For using the HTTP Request action, set the URL value to the Bootstrap API endpoint URL and in additional fields for Basic Auth, set the username and password of an admin user. If the Integrity Lifecycle Manager is not configured to use SSL/TLS, then set SSL Certificate Verification to false, else set it to true. For more information, refer to HTTP Request.
Connector Release Version
Integrity Lifecycle Manager connector was delivered in the 8.4.1 release.
Supported Actions
Supported Triggers
None
Supported Authorizations
Integrity Lifecycle Manager connector requires the following authorization:
• Basic
• OAuth
|
|
Before adding an OAuth connection, ensure that you follow the steps provided in Obtaining Client Id and Client Secrets.
|
Authorize Integrity Lifecycle Manager
You need to authorize Integrity Lifecycle Manager for each Integrity Lifecycle Manager connector action. To authorize the Integrity Lifecycle Manager connector, select one of the following authentication schemes:
• Basic — In the Select an Authentication Scheme list, select Basic, and complete the following steps:
1. Click Add New, and then enter the following details:
▪ Connection Label—Autopopulated. You can provide connection label of your choice.
▪ Integrity Lifecycle Manager REST URL—Enter the REST URL such as https://<REST server host name>:<REST Server port number>
▪ Enter the user name and password.
2. Click ADD.
|
|
Click TEST to validate the connection.
|
• OAuth — In the Select an Authentication Scheme list, select OAuth, and complete the following steps:
1. Click Add New, and then enter the following details:
▪ User Name—Enter the user name.
▪ Password—Enter the password.
▪ Click ALLOW, and then complete the authorization process.
▪ In the Add Authorization window, rename the Authorization Label, if needed, and then add the resource URL such as https://<REST server host name>:<REST Server port number>
2. Click ADD
|
|
Click TEST to validate the connection.
|
Using the OData Connector Action
You can use the Get Properties action for OData connector to get the content or properties for one or more Integrity Lifecycle Manager items. To use the Get Properties action in your flow, use the following format for the base URL: https://<hostname>:<port>/rws/odata/ptc/ilm/items/$metadata
For more information, refer to OData Connector.
Examples
Let us see how you can integrate the Excel Online and Integrity Lifecycle Manager actions using ThingWorx Flow.
Pull Integrity Lifecycle Manager Query results into an Excel sheet
Prerequisite:
1. You should have access to Excel Online as well as Integrity Lifecycle Manager using same enterprise account.
2. Some queries are already created in Integrity Lifecycle Manager. For example, the query issues which returns all the issues. To find out how to create custom queries, refer to Integrity Lifecycle Manager documentation on the PTC support website.
Steps:
Configure the Execute Query Action of Integrity Lifecycle Manager
1. Drag the Execute Query action under the Integrity Lifecycle Manager connector to the canvas, place the pointer on the action, and then click  or double-click the action. The Execute Query action window opens.
or double-click the action. The Execute Query action window opens.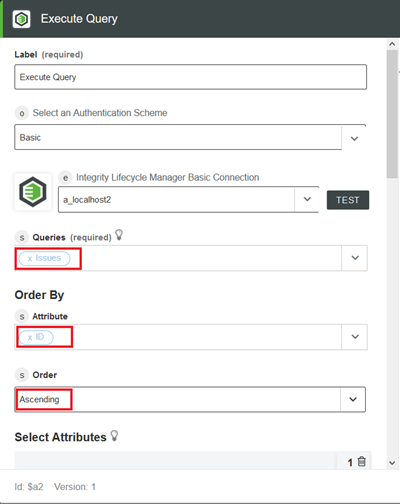
2. Create a connection in Execute Query action. For information on creating a connection, refer to the topic Integrity Lifecycle Manager connector.
3. Enter the information that follows:
a. In the Queries field, select the Issues.
b. In the Order By section, select the Attribute to sort the result.
c. Select the Order of the result, ascending or descending.
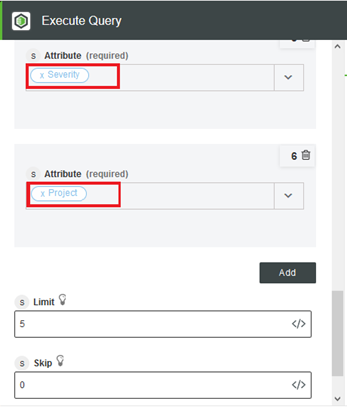
d. Select attributes to be shown in the output of the query. In this example, seven attributes are added—ID, Summary, Project, Priority, Severity, State, and Description by clicking Add in the section Select Attributes.
4. Connect the Execute Query action to the start icon  on the canvas.
on the canvas.Configure Loop for Query Output Processing
In this example, Loop is used to write data one row at a time into an Excel Table. For more information on the Loop utility, refer to the Loop action.
Loop action can be found under the Utility tab or by simply searching Loop in the search box. You need to drag the actions in the Loop action.
1. Click  an drag the Loop action under the Loop utility to the canvas.
an drag the Loop action under the Loop utility to the canvas.2. Connect Execute Query action to the Loop tool.
3. Connect Loop to the stop icon  on the canvas.
on the canvas.4. In the Select Loop Type list, select Each Item. The loop action is executed the same number of times as the items in the result of Execute Query action.
5. In the Source Array or Object field, select the result item from the trigger data for the Execute Query action by clicking  besides Result Item.
besides Result Item.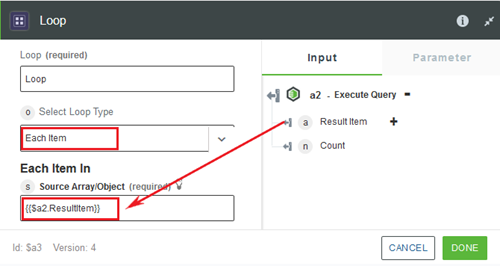
Let us create a table in the Excel Online connector.
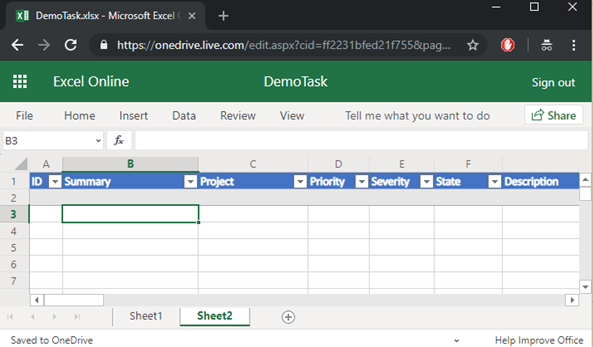
1. Go to the Microsoft Excel Online website and login using your enterprise account credentials. Create a workbook. In this example, we create a workbook named DemoTask.
There will a default sheet in our workbook—Sheet 1.
2. Add other sheets by clicking + besides the Sheet tab located at the lower left corner.
3. Create a table with any name. Let us say, you create Table 1. The table should have similar number of columns to the fields you get from the Integrity Lifecycle Manager query. In this example, 7 columns are created—ID, Summary, Project, Priority, Severity, State and Description.
4. Connect the Add Rows to Table action on both left and right side to the Loop.
Configure the Add rows to Table Action of ThingWorx Flow Excel Online Connector
1. Drag the Add Rows to Table action under the Excel Online connector to the canvas, place the pointer on the action, and then click or double-click the action. The Add Rows to Table action window opens.
or double-click the action. The Add Rows to Table action window opens.2. Edit the label name, if needed. By default, the label name is same as the action name.
3. To add an authorization, refer to the section Authorize Excel Online in the Excel Online connector topic.
If you previously added an authorization for Excel Online, select an authorization from the list. |
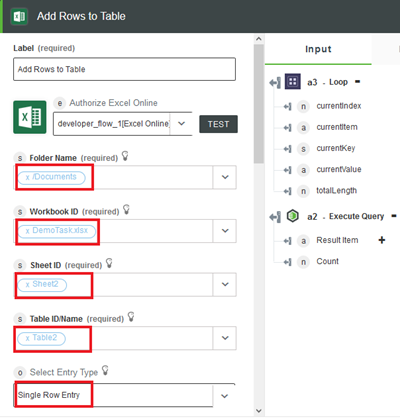
4. Enter the details that follow:
a. Folder Name—Select Documents from the list.
b. Workbook ID—Select the name of the workbook created. In this case, it is DemoTask.
c. Sheet ID—Select the name of the sheet in which the table is present. In this case, the table is in Sheet 1.
d. Table ID/Name—Name of the table in which you want the result of the query to be written. Select the table name from the list.
e. Select Entry Type—Select a single row entry as well as multiple row entry. In this tutorial we will be using single row entry with loop tool, so the loop will run as many times as the number of items returned from the Integrity Lifecycle Manager query and will be pushed onto the table one by one.
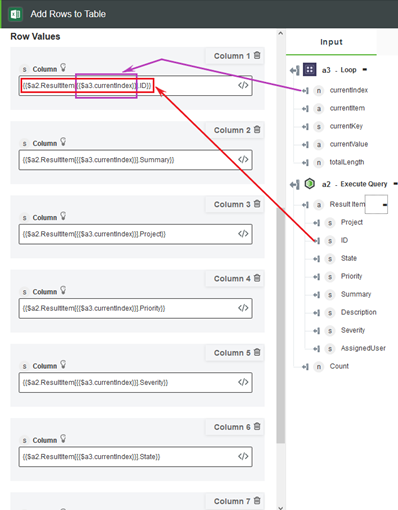
Row Values—Map the row values that will populate the table. In the Row Values field, 7 columns are added as 7 fields are required to be populated. ID, Summary, Project, Priority, Severity, State, and Description are added in column 1, 2, 3, 4 ,5,6 and 7 respectively as shown in the figure that follows. The order of the columns is same as the table we created in the Excel Sheet in step 1.
These Result Items are in an array and each time Loop runs, it is required to insert the current value of the Loop index. So, in the index, the current index of the loop, is added as shown in the figure that follows:
Start the flow by clicking the Execute button at top right corner.
Result
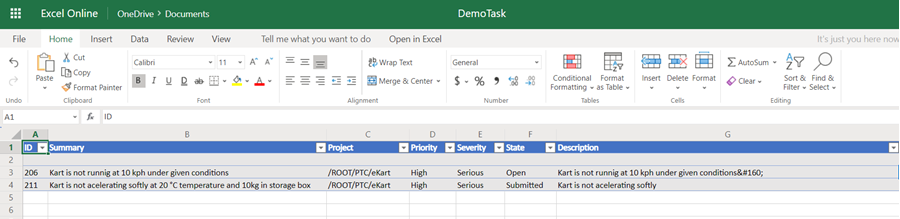
As the flow is completed, Excel table gets populated by the query results. In the given image, it can be seen 2 issues are added to the table with all seven fields.
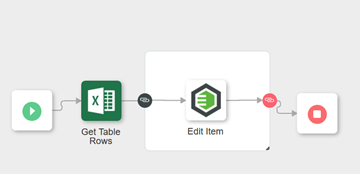
Editing Integrity Lifecycle Manager Item Using Excel Data
Prerequisite
1. You should have access to Excel Online as well as Integrity Lifecycle Manager using same Enterprise account.
2. Integrity Lifecycle Manager 12.1 server
a. REST Web Services
b. Integrity Lifecycle Manager Requirements and Validation Solution
3. ThingWorx Flow
Steps:
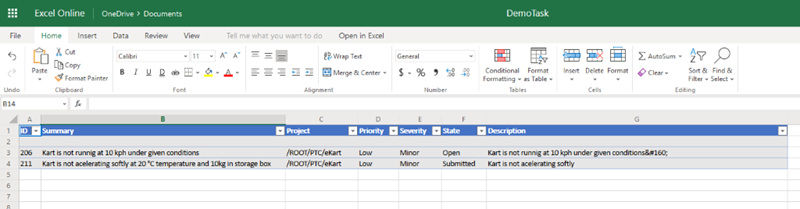
Edit the field values in Excel sheet.
Priority and Severity are changed to Low and Minor respectively for both the items.
Configuring the Get Table Rows Action of Excel Online Connector:
1. Drag the Add Rows to Table action under the Excel Online connector to the canvas, place the pointer on the action, and then click or double-click the action. The Add Rows to Table action window opens.
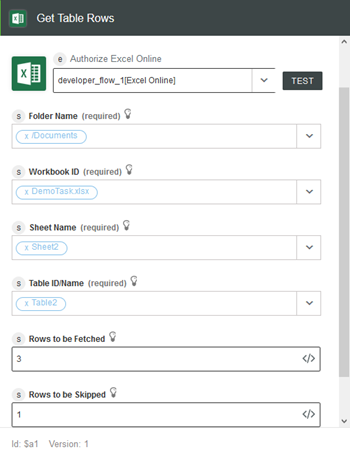
or double-click the action. The Add Rows to Table action window opens.2. Enter the information in the fields that follow:
a. Folder Name—Select Documents from the list.
b. Workbook ID—Select the name of the workbook created from the list. In this case it is DemoTask.
c. Sheet ID—Select name of the sheet your table is present from the list. Our table is in Sheet 2.
d. Table ID—Name of the table you have created in which you want result of the query to be written. Select table name from the list.
e. Rows to be Fetched—Enter the number of the rows user wants to read from the table and edit in Integrity Lifecycle Manager.
f. Rows to be Skipped—You can skip some rows from the top of the table. Enter the value for rows to be skipped.
3. Connect the Get Table Rows action to the start icon on the canvas.
on the canvas.The configuration is complete.
Configuring the Loop Action for Query Output Processing
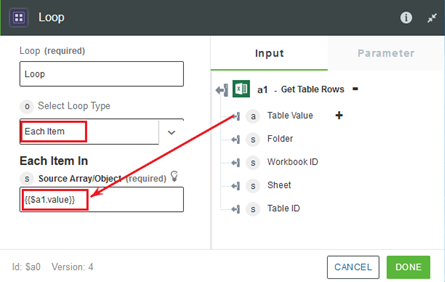
Loop action can be found under the Utility tab or by simply searching Loop inside search. Any connector is required to be dragged inside the Loop to use it with it. In This tutorial is used to edit items one by one in Integrity Lifecycle Manager. In the Source Array or Object action, Result Item, which is the output of Get Table Rows is selected.
1. Click an drag the Loop action under the Loop utility to the canvas.
an drag the Loop action under the Loop utility to the canvas.2. In the Select Loop Type field, select Each Item from the list. Execute the Loop same number of times as the number of items in the result of Get Table Rows action.
3. In the Source Array or Object field, map the Table Value from the trigger data section by clicking .
.
4. Connect the Get Table Rows action to the Loop action.
5. Connect Loop action to the output on the canvas.
on the canvas.The Loop action is configured.
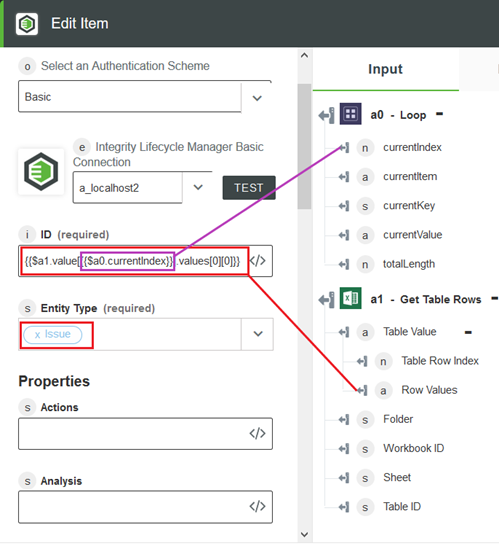
Configuring the Edit Item Action of Integrity Lifecycle Manager
1. Drag the Edit Item action under the Integrity Lifecycle Manager connector to the canvas, place the pointer on the action, and then click or double-click the action. The Edit Item action window opens.
or double-click the action. The Edit Item action window opens.2. In the Entity Type field, enter the type of items to be edited. Issues in our case. The fields related to the type of item selected appear after the selection.
3. Map the values from table values and change the index according to the current index.
4. All the other fields are mapped from the table values under the Get Table Rows action.
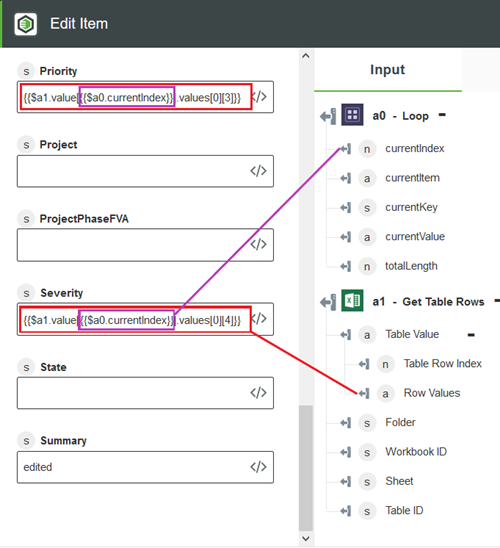
5. Connect the Edit Item action to the right side of the Loop action.
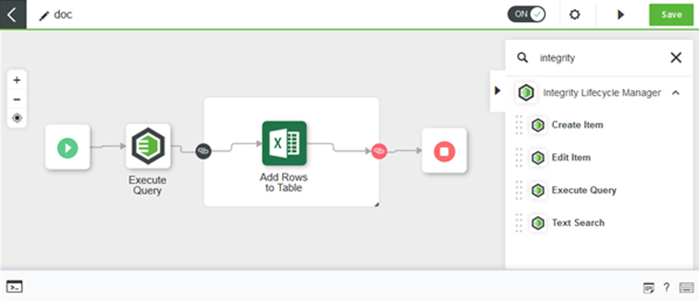
6. Execute the flow by clicking the Execute button at top right corner. After the flow is completed, user can see the edited fields in Integrity Lifecycle Manager. The final flow is shown in the figure that follows: