HTTP Request
Use this action to make an HTTP request to the server.
Using the HTTP Request Action
To use this action in your workflow, connect it to ThingWorx Flow. To connect to the flow, do the following:
1. Click  and drag the HTTP Request action under the HTTP utility to the canvas, place the pointer on the action, and then click
  or double-click the action. The HTTP Request action window opens.
and drag the HTTP Request action under the HTTP utility to the canvas, place the pointer on the action, and then click or double-click the action. The HTTP Request action window opens.2. Edit the label name, if needed. By default, the label name is same as the action name.
3. Select the HTTP method according to the action to perform on the resource identifier. The available methods are as follows:
◦ GET
◦ POST
◦ PUT
◦ DELETE
◦ PATCH
◦ OPTIONS
◦ HEAD
4. Enter the full URL including the protocol to make an HTTP request.
5. In the Timeout field, enter the timeout wait in seconds for a server to send response headers.
6. From the Decode Gzip Response list, select an option to auto decode gzip response.
7. From the Response Encoding list, select the response encoding type.
8. Select an option from the Follow Redirect field to follow HTTP 3xx responses as redirects. The default value is true.
9. Select an option from the Follow Non-GET Redirects field to follow non-GET HTTP 3xx responses as redirects. The default value is false.
10. Click + to view additional fields, and then enter the details that follows:
◦ URL Params—Click Add to enter the Key and Value pairs.
Click Add to enter multiple URL Params.
◦ Basic Auth—Click Add to enter the Username and Password.
◦ Headers—Click Add to enter the Key and Value pairs.
◦ SSL Certificate Verification—The required SSL certificates must be valid in case of https call. The default value is true.
11. Click Done.
GET Method
The GET method is used to retrieve information from the given server using a given URI.
1. In the URL field, enter the full URL including the protocol to make an HTTP request.
2. In the Timeout field, enter the timeout wait in seconds for a server to send response headers.
3. From the Decode Gzip Response list, select an option to auto decode gzip response.
4. From the Response Encoding list, select the response encoding type.
5. Select one option from the Follow Redirect field to follow HTTP 3xx responses as redirects. The default value is true.
6. Select one option from the Follow Non-GET Redirects field to follow non-GET HTTP 3xx responses as redirects. The default value is false.
7. Click + to view additional fields, and then enter the details that follows:
◦ URL Params—Click Add to enter the Key and Value pairs.
Click Add to enter multiple URL Params.
◦ Basic Auth—Click Add to enter the Username and Password.
◦ Headers—Click Add to enter the Key and Value pairs.
◦ SSL Certificate Verification—The required SSL certificates must be valid in case of https call. The default value is true.
8. Click Done.
POST Method
A POST request is used to send data to the server, for example, customer information, file upload, and so on using HTML forms.
1. In the URL field, enter the full URL including the protocol to make an HTTP request.
2. In the Timeout field, enter the timeout wait in seconds for a server to send response headers.
3. Select a Set Body Type option from the list.
4. Click Add to enter the Name and Value information in the Body section.
5. From the Decode Gzip Response list, select an option to auto decode gzip response.
6. From the Response Encoding list, select the response encoding type.
7. Select one option from the Follow Redirect field to follow HTTP 3xx responses as redirects. The default value is true.
8. Select one option from the Follow Non-GET Redirects field to follow non-GET HTTP 3xx responses as redirects. The default value is false.
9. Click + to view additional fields, and then enter the details that follows:
◦ URL Params—Click Add to enter the Key and Value pairs.
Click Add to enter multiple URL Params.
◦ Basic Auth—Click Add to enter the Username and Password.
◦ Headers—Click Add to enter the Key and Value pairs.
◦ SSL Certificate Verification—The required SSL certificates must be valid in case of https call. The default value is true.
10. Click Done.
PUT Method
Replaces all the current representations of the target resource with the uploaded content.
1. In the URL field, enter the full URL including the protocol to make an HTTP request.
2. In the Timeout field, enter the timeout wait in seconds for a server to send response headers.
3. Select a Set Body Type option from the list.
4. Click Add to enter the Name and Value information in the Body section.
5. From the Decode Gzip Response list, select an option to auto decode gzip response.
6. From the Response Encoding list, select the response encoding type.
7. Select one option from the Follow Redirect field to follow HTTP 3xx responses as redirects. The default value is true.
8. Select one option from the Follow Non-GET Redirects field to follow non-GET HTTP 3xx responses as redirects. The default value is false.
9. Click + to view additional fields, and then enter the details that follows:
◦ URL Params—Click Add to enter the Key and Value pairs.
Click Add to enter multiple URL Params.
◦ Basic Auth—Click Add to enter the Username and Password.
◦ Headers—Click Add to enter the Key and Value pairs.
◦ SSL Certificate Verification—The required SSL certificates must be valid in case of https call. The default value is true.
10. Click Done.
DELETE Method
Removes all the current representations of the target resource given by URI.
1. In the URL field, enter the full URL including the protocol to make an HTTP request.
2. In the Timeout field, enter the timeout wait in seconds for a server to send response headers.
3. Select a Set Body Type option from the list.
4. Click Add to enter the Name and Value information in the Body section.
5. From the Decode Gzip Response list, select an option to auto decode gzip response.
6. From the Response Encoding list, select the response encoding type.
7. Select one option from the Follow Redirect field to follow HTTP 3xx responses as redirects. The default value is true.
8. Select one option from the Follow Non-GET Redirects field to follow non-GET HTTP 3xx responses as redirects. The default value is false.
9. Click + to view additional fields, and then enter the details that follows:
◦ URL Params—Click Add to enter the Key and Value pairs.
Click Add to enter multiple URL Params.
◦ Basic Auth—Click Add to enter the Username and Password.
◦ Headers—Click Add to enter the Key and Value pairs.
◦ SSL Certificate Verification—The required SSL certificates must be valid in case of https call. The default value is true.
10. Click Done.
PATCH Method
The PATCH method is a request method supported by the HTTP protocol for making partial changes to an existing resource.
1. In the URL field, enter the full URL including the protocol to make an HTTP request.
2. In the Timeout field, enter the timeout wait in seconds for a server to send response headers.
3. Select a Set Body Type option from the list.
4. Click Add to enter the Name and Value information in the Body section.
5. From the Decode Gzip Response list, select an option to auto decode gzip response.
6. From the Response Encoding list, select the response encoding type.
7. Select one option from the Follow Redirect field to follow HTTP 3xx responses as redirects. The default value is true.
8. Select one option from the Follow Non-GET Redirects field to follow non-GET HTTP 3xx responses as redirects. The default value is false.
9. Click + to view additional fields, and then enter the details that follows:
◦ URL Params—Click Add to enter the Key and Value pairs.
Click Add to enter multiple URL Params.
◦ Basic Auth—Click Add to enter the Username and Password.
◦ Headers—Click Add to enter the Key and Value pairs.
◦ SSL Certificate Verification—The required SSL certificates must be valid in case of https call. The default value is true.
10. Click Done.
OPTIONS Method
Describe the communication options for the target resource.
1. In the URL field, enter the full URL including the protocol to make an HTTP request.
2. In the Timeout field, enter the timeout wait in seconds for a server to send response headers.
3. From the Decode Gzip Response list, select an option to auto decode gzip response.
4. From the Response Encoding list, select the response encoding type.
5. Select one option from the Follow Redirect field to follow HTTP 3xx responses as redirects. The default value is true.
6. Select one option from the Follow Non-GET Redirects field to follow non-GET HTTP 3xx responses as redirects. The default value is false.
7. Click + to view additional fields, and then enter the details that follows:
◦ URL Params—Click Add to enter the Key and Value pairs.
Click Add to enter multiple URL Params.
◦ Basic Auth—Click Add to enter the Username and Password.
◦ Headers—Click Add to enter the Key and Value pairs.
◦ SSL Certificate Verification—The required SSL certificates must be valid in case of https call. The default value is true.
8. Click Done.
HEAD Method
This method is similar to GET, but it transfers the status line and the header section only.
1. In the URL field, enter the full URL including the protocol to make an HTTP request.
2. In the Timeout field, enter the timeout wait in seconds for a server to send response headers.
3. From the Decode Gzip Response list, select an option to auto decode gzip response.
4. From the Response Encoding list, select the response encoding type.
5. Select one option from the Follow Redirect field to follow HTTP 3xx responses as redirects. The default value is true.
6. Select one option from the Follow Non-GET Redirects field to follow non-GET HTTP 3xx responses as redirects. The default value is false.
7. Click + to view additional fields, and then enter the details that follows:
◦ URL Params—Click Add to enter the Key and Value pairs.
Click Add to enter multiple URL Params.
◦ Basic Auth—Click Add to enter the Username and Password.
◦ Headers—Click Add to enter the Key and Value pairs.
◦ SSL Certificate Verification—The required SSL certificates must be valid in case of https call. The default value is true.
8. Click Done.
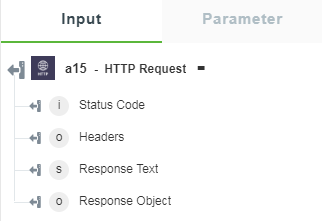
Output Schema
The output schema for the HTTP Request action returns the information for status code, headers, response text, and response object as shown in the figure that follows: