1. Click Structure and then, in the Part & Assembly group, click Copy. The Create Copy dialog box opens.
2. Click Source and double-click the part or assembly in the Structure Browser, or select the part or assembly in the viewport. The Position options are now visible in the Create Copy dialog box.
In an assembly containing lightweight parts:
• You can share but not copy a lightweight part.
• You can copy the assembly as long as you share all lightweight parts in the assembly; for example, in a one-level copy (all children elements will be shared).
• An error message appears if you try to create a deep copy of an assembly (all components are copied), which has a lightweight part.
3. Type a Name.
4. Optional: Click Model Name and type a name. Model Name is the contents file name for the element when you save
3D Data files.
5. Optional: Type the name of a parent assembly in Owner if you want this element created as part of an existing assembly.
6. Click One Level if you want to share the children of the source assembly instead of making individual copies.
7. Click Rec.Share to ensure that the shared parts retain their sharing in the copy. By default, the Rec.Share checkbox is not selected.
For example, as shown in the following images,
◦ If you copy the table legs, with Rec.Share selected, then the sharing is retained in the copy. The image below shows a blend created is shared with all table legs in the copy.
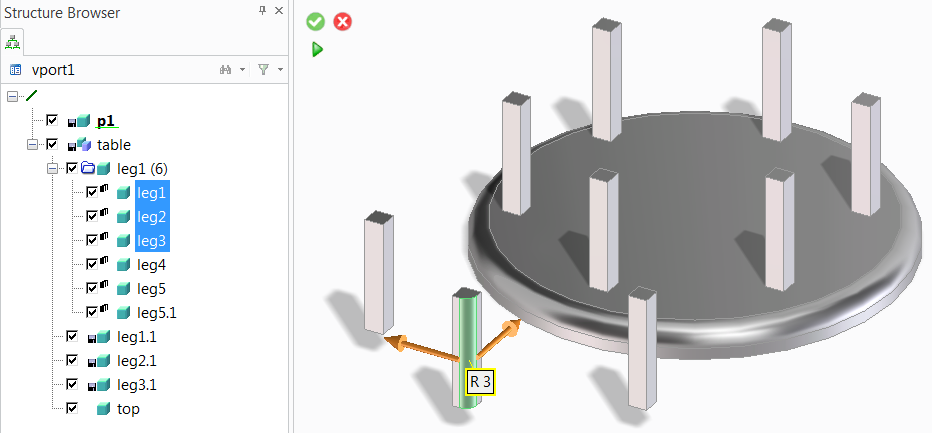
◦ If you copy the table legs, with Rec.Share cleared, then the sharing is not retained in the copy. The image below shows a blend created only on one table leg is not shared with the other table legs in the copy.
8. See
Position options if you want to position the new element.
9. To position multiple elements:
Start Multiple Positioning is available only in the Copy and Share commands; it is not available in the Position command.
a. In the Methods section, click Mate Align or Two Points.
b. For Mate Align, select the first element (face, edge, or vertex) in the viewport; for Two Points, click anywhere in the viewport to specify the first point.
c. For Mate Align, select the second element in the viewport; for Two Points, click anywhere in the viewport to specify the second point. A copy of the original source part or assembly is created in the viewport and Start Multiple Positioning is activated in the Create Copy dialog box.
d. Click Start Multiple Positioning and select any element in the viewport (for Mate Align) or click anywhere in the viewport (for Two Points). On each selection or click, a copy of the source element is created either mated to the selected element or positioned at the point that you click on the viewport. You can create any number of such copies. Other Position options disappear from the Create Copy dialog box.
• You must clear Advanced under Mate Align to use multiple positioning.
• Click Stop Multiple Positioning to stop multiple positioning.
• Click Rev Prev to activate the reverse mate action on the previously created copy of an element. It reverses the orientation of the previous copy. For example, you can click Rev Prev to reverse the orientation of a previously created copy of a screw so that the shaft points towards the hole.
• Click Back to go back one copy that you have created in multiple positioning mode.
 Copy. The Create Copy dialog box opens.
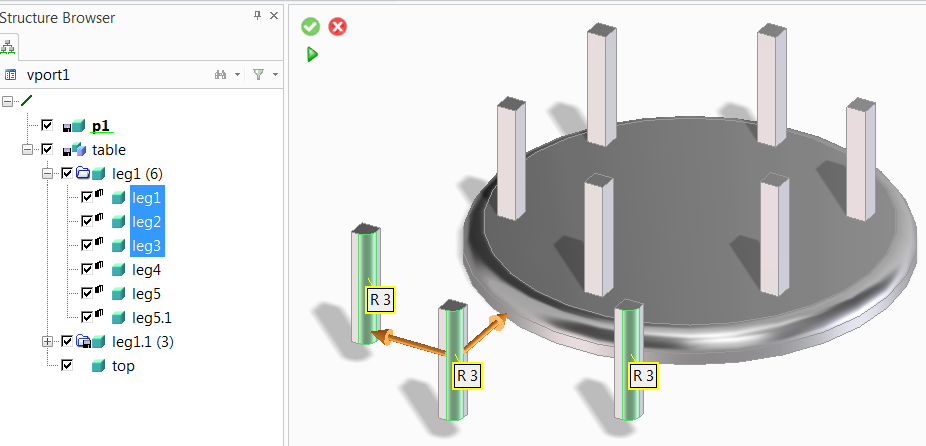
 to complete the operation.