Customizing Reusable Wizard Steps
Overview
You need to develop a wizard to capture user input and from that input create or edit a Windchill business object in the database. The wizard will have common steps that already exist in other wizards and should not be duplicated.
Background
Windchill provides many reusable wizard steps that can be configured and added to a custom wizard.
In many cases reusing a wizard step is as simple as adding the correct wizard step tag specifying the wizard step action to your wizard tag. This document is not intended to cover this simplest case. In some cases there can be additional information required by a step or additional customizations you may want to do on a step. This document describes a few available reusable steps that have some additional required information or customization options. This section details when and how to use these steps.
Scope/Applicability/Assumptions
Assume you have created a custom Windchill business object class or subtype and you want to develop a wizard that will allow users to create or edit one instance of that object type in the database.
This document describes common wizard steps that are available for reuse. Additionally, if your custom type extends an existing Windchill business class, such as WTPart, WTDocument, or WTChangeIssue, there may be components more specific to those classes that could or should be used instead of the components described herein. These class-specific components are built on top of the common components described in this document. A discussion of those class-specific components is beyond the scope of this document.
Intended Outcome
Add a preexisting step to the new wizard and configure the step.
Prerequisite Knowledge
To apply this best practice, you need to have an understanding of the following:
• The Windchill framework for creating wizards, creating custom wizard steps, and processing wizard data. For more information see:
These topics have multiple prerequisites of their own which you should also study. This document will build on this knowledge and provide additional information on the components available to help you create and process wizards for the specific purpose of creating a Windchill business object in the database.
Definition of Terms Used
|
Term
|
Definition
|
|
base type
|
A hard or subtype class that is the root type of the wizard's type picker. If the wizard does not have a type picker, this is the type of object that will be created. The base type is used to look up the correct JSPs for wizard steps that have different jsp variants for different subtypes until a specific type is selected by the user.
|
|
classification attribute
|
An attribute associated with a classification node that has been assigned to a part. Classification Attributes are generally specified and edited on a separate step from hard and global attributes.
|
|
Context
|
The container (Product, Library, Project, etc.) in which the object(s) are being created.
|
|
dependent attribute
|
An attribute whose value and/or display characteristics are wholly or partially determined by the value of another attribute (called the "driver attribute") via an object initialization rule (OIR), access control policy, or other mechanism.
|
|
driver attribute
|
An attribute whose value drives the value and/or display characteristics of another attribute (called a "dependent" attribute) via an object initialization rule (OIR), access control policy, or other mechanism.
|
|
hard attribute
|
An object attribute defined in a Java class.
|
|
hard type
|
An object type defined in a Java class. Hard types are typically created in java classes using annotations and may extend out-of-the-box Windchill business object classes.
|
|
object type
|
A Java class or subtype defining the attributes and behavior of the business object(s) being created.
|
|
global attribute
|
An attribute of the object defined in the Windchill Type and Attribute Management utility. These attributes are not defined in the Java business object class and are stored in database tables separate from the table for the business class.
|
|
subtype
|
An object type defined using the Type and Attribute Management utility rather than in a Java class. Subtypes may extend other subtypes but all have a hard type as their root type. The Literature object created for the examples at the end of this document is an example of a subtype.
|
Reusable Wizard Steps
The following reusable wizard steps are available:
• defineItemAttributesWizStep
• editAttributesWizStep
• SetContextWizStep
• .setClassificationAttributesWizStep
• attachments_step
• setAccessControlWizStep
defineItemAttributesWizStep
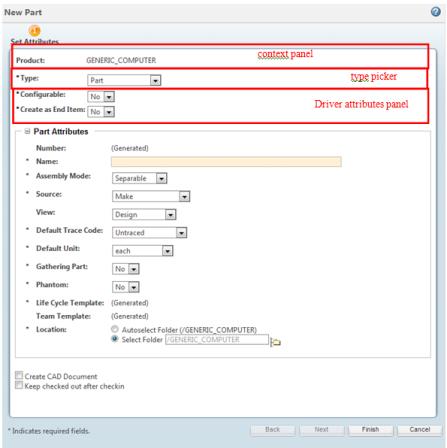
The body of this step typically contains four sections: a read-only context property panel, a type picker, and a driver attributes property panel and the editable attributes panel. It is configured using MVC framework and jsps. An MVC builder defines the content of and configures the (non-driver) attributes panel in the step. The context panel, type picker, driver attributes panel, primary content panel (if any), and other components are configured via jsps. Only the type picker is required.
• Context panel
Read-only information about the object being created that is derived from the launch context or entered on previous wizard steps. If the object is WTContained this typically displays the container for the new object
• Driver attributes
This property panel displays input fields for attributes that can drive the values of and/or constraints on other attributes to be entered by the user. If a value in this panel is changed, all subsequent wizard steps are automatically refreshed based on the new attribute value(s). Therefore it is important to place all driver attributes in this section.
If the preference > is set to true and the object is OrganizationOwned, this panel should include a picker for the organization attribute of the object. Although organization id does not drive the value of other attributes out-of-the-box, customers often want to set up such dependencies.
The object type indicates which other attributes should be included, if any. See How to create a step with additional driver attributes for more information.
• Editable Attributes Panel
Typically contains all the soft and hard attributes for the object type that were not entered on previously, except for part classification attributes, which are entered on a following step.
Note that one of the attributes typically presented in this list is folder location. Folder location drives administrative domain which, in turn, drives access control policies which, in turn, drives the list of object types available for creation by the user. The list of types presented in the type picker is based on a default folder derived from the launch context. The user could potentially select a different folder location for which the access control policies vary. Thus it is possible the user could select a folder for which they do not have permission to create the selected type. If this happens, an error message will be displayed when the user clicks OK.
• Checkboxes
This section contains checkboxes to provide processing instructions for the new object. These include:
Checkbox label | Applicability | Description |
Keep checked out | Used for new RevisionControlled objects | If checked, the system checks out the object after creation |
Checkout and download | Used for creating documents from templates | If checked, the new document is checked out and downloaded |
Enabled | Used for creating document templates | If checked, the new template is immediately available for use |
editAttributesWizStep
This step is common to almost all edit wizards and is where the user edits most of the object’s attributes. It generally contains a read-only context property panel and an attribute input panel.
By default there are no read only attributes. The desired attributes vary by object type. An MVC builder is used to configure the set of read only attributes to be displayed foa given type when it is desired. Some typical attributes displayed in the read only are are:
• the object type
• the container name (If the object is WTContained)
• the organization id (If the new object is OrganizationOwned and the preference Display -> Expose Organization is set to true)
You will need to decide what, if any, information needs to be displayed in this panel for your object type.
The attribute input panel typically contains input fields for all the editable soft and hard attributes for the object type, it does not contain input fields for part classification attributes. These are entered on a following step. The set of attributes displayed in this panel is controlled by the Type and Attribute Management utility.
Solution
Add the editAttributesWizStep to your new wizard and configure the step.
When to use this step
This step is intended for use for editing objects. For Creating objects see defineItemAttributesWizStep.
Solution Elements
Action
<action name="editAttributesWizStep" id="editAttributesWizStep"
preloadWizardPage="false"
required="true" afterVK="editAttributes" resourceBundle=
"com.ptc.core.ui.componentRB">
<component name="editAttributesWizStep" typeBased="true"
windowType="wizard_step"/>
</action>
Action file: <Windchill>/codebase/config/actions/actions.xml
Note that the editAttributesWizStep action specifies the page as non-preloaded in case in is not the first step in the wizard and is dependent on an earlier step. However, if it is the first step, the framework will preload it regardless of how it is specified on the action.
JSP
View JSP Page: <Windchill>/codebase/netmarkets/jsp/object/propertyAttributesWizStep.jsp
Validator
The EditAttributesStepValidator is available to validate the data entered in this step. This class will validate whether or not all the input attributes in the edit attributes step have valid values by checking constraints. The "required" attribute validation will be done on the client with javascript.
Other Java Classes
These additional java classes are also involved in the creation of this step and available for advanced customization.
• DefaultEditAttributesWizStepBuilder : MVC Builder for the Set Attributes step which includes an empty read only attributes area and the editable attributes panel. Extend this class to define a non empty set of read only attributes.
• TypedAttributesPanelBuilder : MVC Builder for the attributes panel.
Procedure — Configure the Step
Add the Action to Your Wizard Tag
To add this step to your wizard you can use: <jca:wizardStep action="editAttributesWizStep" type="object"/>
Add the initalizeItem Tag
Like the defineItemAttributesWizStep, editAttributesWizStep requires an initializeItem tag. Instead of setting the operation attribute of this tag to ${createBean.create}, you should set it to ${createBean.edit}. The following tag attributes are not applicable to edit wizards: objectHandle, baseTypeName.
Layout the Attributes
The attributes displayed on this step are controlled in the Type and Attribute Management utility. For details on laying out the attributes on this step see
Attribute Panels.
Customization
How to Modify the Conents of the Read-Only Property Panel in the Step
To modify the read only attribute panel to have it contain some attribute, write an EditAttributesWizStepBuilder. The new builder should extend from DefaultEditAttributesWizStepBuilder and implement the buildReadOnlyAttributePanelConfig method. In this method, create an AttributePanelConfig containing the desired attributes. Use the TypeBased annotation to specify the type the builder applies to. An Example builder can be found in the Basic Edit Wizard example in
Building Wizards to Edit a Single Object.
A basic builder might look like the following:
@TypeBased(value = "FakeLiterature")
public class LiteratureEditDetailsWizStepBuilder extends
DefaultEditAttributesWizStepBuilder {
@Override
protected AttributePanelConfig buildReadOnlyAttributePanelConfig
(ComponentParams params) throws WTException {
ComponentConfigFactory factory = getComponentConfigFactory();
AttributePanelConfig attrPanel = factory.newAttributePanelConfig();
attrPanel.addComponent(getContainerAttributeConfig(params));
attrPanel.addComponent(factory.newAttributeConfig(DescriptorConstants.
ColumnIdentifiers.TYPE));
return attrPanel;
}
}
SetContextWizStep
This step typically has only one input field, which is a picker for the owning container of the object being created. The selected container will be used to select the appropriate OIRs for other attributes.
In many cases, the container is determined from the launch context of the wizard and this step is not needed. For example, if the wizard is launched from the folders page of a product, the container is assumed to be that product.
Solution
Add the SetContextWizStep to your new wizard and configure the step.
When to use this step
This step is for WTContained objects only. This step contains a context (container) picker and should be included in a create wizard for a WTContained object if the container cannot be determined from the launch context and/or you want to allow the user to choose a container.
Solution Elements
Action
<action name="setContextWizStep" id="setContextWizStep" preloadWizardPage="true"
required="true"
afterVK="setContextWizStep">
<command windowType="wizard_step"/>
</action>
Action file: <Windchill>/codebase/config/actions/actions.xml
JSP
View jsp page: <Windchill>/codebase/WEB-INF/jsp/netmarkets/object/setContextWizStep.jsp
Validator
The ContextWizardStepValidator is available to validate the data in the set context wizard step. The ContextWizardStepValidator just validates that the form data contains a valid container object reference.
This validator also determines if the step should be displayed in the wizard. If the context has been determined from the launch point the step will be skipped even though it is included in the wizard.
Procedure — Configure the Step
Add the Action to Your Wizard Tag
To add this step to your wizard you can use: <jca:wizardStep action="setContextWizStep" type="object"/>
When you are using this step it is recommended that this be the first step in your wizard.
Customizations
Creating a Custom Set Context Step JSP Page
If a custom wizard has a Set Context step, the out-of-the-box step jsp listed above will usually suffice. The only time it might be necessary to develop a custom step jsp is if there is a need to capture additional attribute values before the display attributes are presented on the Define Object step.
For example, assume that:
• The wizard launch point has no folder context
• There are not any OIRs that set a default folder location for new objects
• There are defined access control policies denying users create permission for certain object subtypes. These policies are based on the administrative domain associated with the folder in which the new object is located.
In this case, the object container will have no effect on folder selection and you may want the user to select a folder location so the list of types available to him/her can be accurately determined. In this case you may want to put a folder input field on a step prior to the Define Object step. You could either add this input field to the Set Context step or add additional step to the wizard to capture folder location either before or after the Set Context step. (Either way, you will also need your own JSP for the Define Object step so you set the administrative domain parameter on the type picker based on the user’s folder selection in the Set Context step.)
If a custom Set Context jsp is needed and it needs to have a container picker, it is recommended that the out-of-the-box jsp is included in it rather than copying the contents of the out-of-the-box jsp. This will ensure the custom page will continue to behave correctly even if the context picker is modified in a future release.
setClassificationAttributesWizStep
Solution
Add the setClassificationAttributesWizStep to your new wizard and configure the step.
When to use this step
This step only applies to WTParts and subtypes thereof when PartsLink is installed. It is a dynamic step that only appears if the part is classified. It allows the user to modify the classification attributes of the part. It displays the classification of the part in view mode at the top and then includes a table of input fields for classification attributes. This step can be used for both creating and editing objects.
Note that the Set Classification Attributes step is marked as hidden. It is dynamically inserted into the
wizard if the user clicks the “Choose Classifications” radio button on the Set Attributes step. It is dynamically removed if the user clicks the “Do Not Classify” radio button to unclassify the part.
Solution Elements
Reusable Wizard Steps
The following reusable wizard steps are available:
• defineItemAttributesWizstep
• editAttributesWizStep
• SetContextWizStep
• .setClassificationAttributesWizStep
• attachments_step
• setAccessControlWizStep
defineItemAttributesWizStep
The body of this step typically contains four sections: a read-only context property panel, a type picker, and a driver attributes property panel and the editable attributes panel. It is configured using MVC framework and jsps. An MVC builder defines the content of and configures the (non-driver) attributes panel in the step. The context panel, type picker, driver attributes panel, primary content panel (if any), and other components are configured via jsps. Only the type picker is required.
• Context panel
Read-only information about the object being created that is derived from the launch context or entered on previous wizard steps. If the object is WTContained this typically displays the container for the new object
• Driver attributes
This property panel displays input fields for attributes that can drive the values of and/or constraints on other attributes to be entered by the user. If a value in this panel is changed, all subsequent wizard steps are automatically refreshed based on the new attribute value(s). Therefore it is important to place all driver attributes in this section.
If the preference > is set to true and the object is OrganizationOwned, this panel should include a picker for the organization attribute of the object. Although organization id does not drive the value of other attributes out-of-the-box, customers often want to set up such dependencies.
The object type indicates which other attributes should be included, if any. See How to create a step with additional driver attributes for more information.
• Editable Attributes Panel
Typically contains all the soft and hard attributes for the object type that were not entered on previously, except for part classification attributes, which are entered on a following step.
Note that one of the attributes typically presented in this list is folder location. Folder location drives administrative domain which, in turn, drives access control policies which, in turn, drives the list of object types available for creation by the user. The list of types presented in the type picker is based on a default folder derived from the launch context. The user could potentially select a different folder location for which the access control policies vary. Thus it is possible the user could select a folder for which they do not have permission to create the selected type. If this happens, an error message will be displayed when the user clicks OK.
• Checkboxes
This section contains checkboxes to provide processing instructions for the new object. These include:
Checkbox label | Applicability | Description |
Keep checked out | Used for new RevisionControlled objects | If checked, the system checks out the object after creation |
Checkout and download | Used for creating documents from templates | If checked, the new document is checked out and downloaded |
Enabled | Used for creating document templates | If checked, the new template is immediately available for use |
Solution
Add the defineItemAttributesWizStep to the new wizard and correctly configure the step.
When to use this step This step is intended for use for creating Typed objects. For Edit Wizards see editAttributesWizStep.
Solution Elements
Action
The action for this step is:
<action name="defineItemAttributesWizStep" afterVK="setAttributesWizStep"
id="defineItemAttributesWizStep " preloadWizardPage="false" required="true"
resourceBundle="com.ptc.core.ui.componentRB">
<component name=" defineItemAttributesWizStep"
typeBased="true" indowType="wizard_step"/>
</action>
Action file: <Windchill>/codebase/config/actions/actions.xml
| The action for this step has a component attribute instead of a command attribute because it is created using a MVC builder Java class. |
JSPs
View jsp page: <Windchill>/codebase/WEB-INF/jsp/netmarkets/object/defineItemAttributesWizStep.jsp
This is the default JSP that defines the view for this step. This view includes a read-only property panel for the context name, a type picker, the driver attributes panel and the editable attributes panel for entering attribute values.
The OOTB view jsp includes other jsps that do some of the work. The table below describes these sub-jsps
JSP | Description |
defineItemAttributesWizStep.jsp | The view jsp for the Set Attributes step; includes configureTypePicker tag for presenting & configuring the type picker, the driver attribures panel, Primary Content Panel (if any), the attribute table and check boxes(if applicable). |
defineItemReadOnlyPropertyPanel.jspf | Contains the describePropertyPanel tag for the read-only panel |
defineItemReadOnlyProperties.jspf | Contains describeProperty tags for the attributes in the read-only panel |
defineItem.jspf | Looks up the JSP for the driver attributes panel and gets the data for and renders all the page elements. Contains a renderPropertyPanel tag that contains the read-only subpanel, type picker, and driver attributes subpanel;. The type picker is configured to call a js function that will refresh the driver attributes panel, editable attributes panel, and downstream non-preloaded steps any time the type value is changed. |
driverAttributesSetup.jspf | Makes an ajax call to the TypeBasedIncludeServlet to get the JSP containing the describePropertyPanel, getModel, and renderPropertyPanel tags for the driver attributes panel. Unless overridden by a service.properties entry for a specific type, one of the following JSPs will be used: • <Windchill>/codebase/netmarkets/jsp/object/defineItemAttributesPanel.jsp (for OrganizationOwned objects) ◦ This contains a component for input of the owning organization. ◦ Note this is only displayed if the preference Display -> Expose Organization is set to true. • <Windchill>/codebase/netmarkets/jsp/object/defineItemAttributesPanelEmpty.jsp (for all other objects) ◦ Empty |
defineItemStepContextPanel.jspf | Contains the getModel and renderPropertyPanel tags for the read-only attributes subpanel |
Validator
The SetAttributesStepValidator is available to validate the data in the set attirbutes wizard step.
This class will validate whether or not alla the input attributes in the set attributes step have valid values by checking constraints. This class does not do the "required" attribute validation. That is done on the client with javascript.
Tags
All the tags below are defined in the <Windchill>/codebase/WEB-INF/tlds/components.tld file.
See the javadoc for the Windchill Client Architecture Common Components tag library and the javadoc for the tag handlers listed below for more information on the tags and their attributes.
Element | Description |
initializeItem | Initializes some data for the object being created using attribute values passed on the tag and the launch context of the wizard. This data is stored as hidden fields in the HTML form data and in the HTTPRequestData parameter map of the NmCommandBean. Tag handler: com/ptc/core/components/tags/components/InitializeItemTag |
attributesTableWizComponent | Builds an attribute layout of object attributes used for entering attribute values. The layout contains a group of name value pairs and is controlled by Type and Attribute Management utility. This tag only renders the attributes after validation of the driver attributes and if the driver attributes are valid. WEB-INF\tags\mvc\attributesTableWizComponent.tag |
configureTypePicker | Configures the type picker table for more details see Configure the Type Picker. Tag handler: com/ptc/core/components/tags/components/ConfigureTypePickerTag |
Other Java Classes
These additional java classes are also involved in the creation of this step and available for advanced customization.
• DefineItemAttributesWizStepBuilder : MVC Builder for the Set Attributes step which includes the driver attributes and the attributes table.
• TypedAttributesPanelBuilder : MVC Builder for the attributes panel.
Procedure – Configure the Step
Add the action to the wizard tag
To add this step to the wizard, use: <jca:wizardStep action="defineItemAttributesWizStep" type="object"/>
Add the initializeItemTag
The InitializeItem tag initializes some data for the object being created from the launch context of the wizard and the attributes passed to the tag. This information includes:
• type of operation (create or edit)
• the base type of the object being created
• default container
• initial value for the type picker
• type instance identifier for the object being created
• AttributePopulator class, if any
See Default view JSP for the Set Attributes Step for the attributes of this tag. The only required attribute is “operation”.
<jca:initializeItem operation="${createBean.create}" baseTypeName="wt.doc.WTDocument|org.rnd.FakeLiterature"/>
Layout the attributes
The attributes displayed on this step are controlled in the Type and Attribute Management utility. For details on laying out the attributes on this step see
Attribute Panels.
Customizations
If the Set Attributes step is the first step in the wizard or nothing in this step is affected by data on prior steps then it can be preloaded. Otherwise, specify it to not be preloaded in the step action. If the wizard has a Set Context step and a type picker, it should not be preloaded as the context will affect the content of the type picker.
The sections below describe how to perform common customizations of this step.
| Please remember that you should always place your custom jsp and jspf files in a directory under wtSafeArea, as described in Managing Customizations. |
<initializeItem> Tag Parameters
See the javadoc for com.ptc.core.components.tags.InitializeItemTag and the Common Components tag library for the most up-to-date information on tag parameters.
Parameter | Default Value | Possible Values | Req? | Description |
operation | None | CreateAndEditWizBean.CREATE CreateAndEditWizBean.EDIT | Yes | Indicates whether the object is being created or edited. |
objectHandle | | | | Not used for single-object creation wizards |
baseTypeName | the type associated with the wizard action | any Windchill type identifier string | No | The string form of the Windchill type identifier for the class of object to create. For example, "wt.part.WTPart" or "wt.part.WTPart|MySoftPart". This class will be the root type in the wizard's type picker. It is also used to look up the correct jsps for wizard steps that have different variants for different subclasses until a specific type is selected in the type picker. Optional. If not specified, the type associated with the wizard action will be used. |
Configure the Type Picker
The base type for the wizard is derived from an attribute on the InitializeItem tag or, if none, from the object type associated with the wizard action. (More about the InitializeItem tag later.) If you want to allow users to create either the base type or a subtype of the base type you would include a type picker in your wizard.
The list of types available in the type picker is typically determined as follows:
1. Compute the list of hard and soft subtypes of the base type. Soft subtypes are the instantiable subtypes defined for the base type in the given organization container.
2. Determine the default life cycle and initial life cycle state for the base type and each subtype based on the composite object initialization rules for the type in the given container.
3. Determine a default folder location context for the new object. This is done as follows:
4. If the renderer constraint “SelectGeneratedFolderByDefault” is defined in the composite OIRs for the base type or the user is creating a shared object from the shared-to container’s folder browser
◦ Use the folder defined by the OIRs for the base type in the target container
◦ If no OIR folder is defined, use the default cabinet for the target container
5. If no renderer constraint is defined and it is not a shared-to object
◦ Use the folder selected in the launch context. This could be the folder checked in the folder browser table, the folder highlighted in the left pane of the folder browser, or the folder associated with the business object from whose info page the create action was launched.
◦ If no folder can be determined from the launch context, determine the folder as shown under item i. above
6. Based on the default initial life cycle state and the administrative domain of the folder location, determine whether the user has create permission for each type. If not, filter that type from the list.
7. Display the remaining types in the picker.
The default value for the type picker is determined from a preference for some base types, as follows:
Base Type | Preference |
WTPart | Create and Edit -> Part Create Default Type |
WTDocument | Create and Edit -> Document Create Default Type |
WTChangeIssue (ProblemReport) | Create and Edit -> Problem Report Create Default Type |
WTChangeRequest2 (Change Request) | Create and Edit -> Change Request Create Defaualt Type |
WTChangeOrder2 (Change Notice) | Create and Edit -> Change Notice Create Default Type |
WTChangeActivity2 (Change Task) | Create and Edit -> Change Task Create Default Type |
WTVariance (Variance) | Create and Edit -> Variance Create Default Type |
For all other wizards, the base type is used as the default type.
When the user selects a type in the type picker, javascript is executed that refreshes the driver attributes panel below it and all following wizard steps. This is necessary because object type can affect which jsps are used for subsequent steps as well as the attribute input fields displayed.
How to reconfigure the type picker
The type picker can be modified to filter certain types from the list, specify a different default value, etc. The configuration parameters are described in the javadoc for the ConfigureTypePicker tag.
To specify different picker parameters you will need to:
1. In your wizard jsp,add the following line to the top of the file:
<%@ taglib uri="http://www.ptc.com/windchill/taglib/picker" prefix="p"%>
2. Add the configureTypePickerTag
3. Add “pickerParam” subtags to the configureTypePicker tag as shown in the javadoc for the ConfigureTypePickerTag.
<configureTypePicker> Tag Parameters
Parameters to this tag are in the form of pickerParam subtags. All of these parameters are optional. Example syntax:
<jca:configureTypePicker>
<p:pickerParam name="seedType" value="wt.part.WTPart|org.r_and_d.
SoftPartType1/>
<p:pickerParam name="filterType"
value="wt.part.WTPart|org.r_and_d.SoftPartType1|org.r_and_d.
SoftPartType1B"/>
<p:pickerParam name="showRoot" value="false"/>
</jca:configureTypePicker>
Parameter | Default Value | Possible Values | Description |
seedType | None | any Windchill type identifier string (logical or external) | The top-level type that should be used to generate the list of types. For example, "wt.part.WTPart". May include more than one of these parameters. |
defaultType | May be taken from a preference (see table above) For all other wizards, the base type is used. | any Windchill type identifier string (logical or external) | The type that should be selected by default. For example, "wt.part.WTPart." May be a string, such as "Select a Type" rather than a type name. |
filterType | None | any Windchill type identifier string (logical or external) | A type that should be excluded from the type list. For example, "SoftPartType1". The descendants of the filter type are also excluded. May include more than one of these parameters. |
displayHierarchy | false | true (to display hierarchy) false (to display flat list) | Indicates whether the type list should be displayed as a flat list or in hierarchical form. |
showRoot | true | true (to display seed types) false (to not display seed types) | Whether the seedTypes should not be displayed. |
adminDomainRefString | The domain associated with the default folder location (see Overview | any administrative domain reference string | String representation of the administrative domain reference that should be used for access-control filtering of the type list. For example, "wt.admin.AdministrativeDomain:7" |
Type | BOTH | ROOT_TYPES (only seedTypes will be displayed) SOFT_TYPES (only subtypes will be displayed) MODELED_TYPES (only modeled types will be displayed BOTH (both modeled and subtypes will be displayed) | Indicates the kind of types to be displayed. Value should be one of the enum constants defined in com.ptc.windchill.enterprise.picker.type.server.TypePickerTypes. |
How to add components to the step
To add components to the step (for example, additional checkboxes at the bottom) do the following:
1. Create a new main jsp file for the step
2. Copy the contents of the file <Windchill>/netmarkets/jsp/object/defineItemWizStep.jsp into the new file.
3. Add the desired components to the page as follows:
<div id='driverAttributesPane'>
...
</div>
Add components here if you want them to appear below the
drive attributes panel
<div id='setAttributesTablePane'></div>
Add components here if you want them to appear below the attributes panel
4. Create a new builder class for the step, overriding the getView() method to specify the view jsp for the step.
The suggested Name for the builder class for this step is
<object type> DefineItemAttributesWizStepBuilder.java
The suggested name for view JSP for this step is:
defineItemAttributesWizStep.jsp
or
defineItemAttributesWizStep For<object type>.jsp (if there is more than one in the directory)
If the object is RevisionControlled one example of additional information to include is a Keep checked out checkbox, include the following jsp in the view jsp to display it: /netmarkets/jsp/components/keepCheckedOutCheckbox.jspf
See
Default view JSP for the Set Attributes Step for WTPart and
Create Wizard Using Keep Checked Out Checkbox for examples.
How to remove components from the step
1. Create a new main jsp file for the step
2. Copy the contents of the file <Windchill>/netmarkets/jsp/object/defineItemWizStep.jsp into the new file.
3. One component that one may want to remove is the read-only property panel. To do this delete the following line from the file:
<%@ include file="/netmarkets/jsp/components/
defineItemReadOnlyPropertyPanel.jspf"%>
How to modify the contents of the read-only property panel in the step
1. Create a new main jsp file for the step.
2. Copy the contents of the file <Windchill>/netmarkets/jsp/object/defineItemWizStep.jsp into the new main jsp file.
3. Delete the following line and replace it with your custom describePropertyPanel tag that includes the attributes you want to display:
<%@ include file="/netmarkets/jsp/components/
defineItemReadOnlyPropertyPanel.jspf"%>
Be sure to set the following attributes on your describePropertyPanel tag:
Attribute | Value |
var | “defineItemStepContextPanelDescriptor” |
id | “defineItemStepContextPanelDescriptor” |
scope | “request” |
mode | “VIEW” |
Alternatively, you could include a new jspf file that contains your describePropertyPanel tag instead of placing it in-line.
See JSP for the Defining the Define Item Panel for WTPartfor an example.
How to create a step with no driver attributes
For this you do not need to create a new wizard step JSP.
Create an entry in a type-based service properties xconf file pointing to the jsp file defineItemAttributesPanelEmpty, as follows:
<Resource context="default" name="com.ptc.netmarkets.util.misc.FilePathFactory">
<Option requestor="<object type to be created>"
resource=”/netmarkets/jsp/object/defineItemAttributesPanelEmpty.jsp”
selector="defineItemAttributesPanel"/>
</Resource>
How to create a step with additional driver attributes
For this you do not need to create a new wizard step JSP, just a new sub-JSP file for the driver attributes, as follows.
1. Create a new JSP file containing describePropertyPanel, getModel, and renderPropertyPanel tags for your driver attributes. (Note this must be a .jsp file and not a .jspf file.) Use the file <Windchill>/codebase/netmarkets/jsp/object/defineItemAttributesPanel.jsp as an example and list the attributes you want to display in the describePropertyPanel tag. Because the output of this jsp is parsed and inserted dynamically inserted into the page, it must not contain any display text or HTML besides the three tags listed above.
2. Create an entry in a type-based service properties xconf file pointing to your new jsp file as follows:
<Resource context="default"
name="com.ptc.netmarkets.util.misc.FilePathFactory">
<Option requestor="<object type to be created>"
resource=”<path to your jsp page ”>
selector="defineItemAttributesPanel"/>
</Resource>
editAttributesWizStep
This step is common to almost all edit wizards and is where the user edits most of the object’s attributes. It generally contains a read-only context property panel and an attribute input panel.
By default there are no read only attributes. The desired attributes vary by object type. An MVC builder is used to configure the set of read only attributes to be displayed foa given type when it is desired. Some typical attributes displayed in the read only are are:
• the object type
• the container name (If the object is WTContained)
• the organization id (If the new object is OrganizationOwned and the preference Display -> Expose Organization is set to true)
You will need to decide what, if any, information needs to be displayed in this panel for your object type.
The attribute input panel typically contains input fields for all the editable soft and hard attributes for the object type, it does not contain input fields for part classification attributes. These are entered on a following step. The set of attributes displayed in this panel is controlled by the Type and Attribute Management utility.
Solution
Add the editAttributesWizStep to your new wizard and configure the step.
When to use this step
VRThis step is intended for use for editing objects. For Creating objects see defineItemAttributesWizStep.
Solution Elements
Action
<action name="editAttributesWizStep" id="editAttributesWizStep"
preloadWizardPage="false"
required="true" afterVK="editAttributes" resourceBundle=
"com.ptc.core.ui.componentRB">
<component name="editAttributesWizStep" typeBased="true"
windowType="wizard_step"/>
</action>
Action file: <Windchill>/codebase/config/actions/actions.xml
Note that the editAttributesWizStep action specifies the page as non-preloaded in case in is not the first step in the wizard and is dependent on an earlier step. However, if it is the first step, the framework will preload it regardless of how it is specified on the action.
JSP
View JSP Page: <Windchill>/codebase/netmarkets/jsp/object/propertyAttributesWizStep.jsp
Validator
The EditAttributesStepValidator is available to validate the data entered in this step. This class will validate whether or not all the input attributes in the edit attributes step have valid values by checking constraints. The "required" attribute validation will be done on the client with javascript.
Other Java Classes
These additional java classes are also involved in the creation of this step and available for advanced customization.
• DefaultEditAttributesWizStepBuilder : MVC Builder for the Set Attributes step which includes an empty read only attributes area and the editable attributes panel. Extend this class to define a non empty set of read only attributes.
• TypedAttributesPanelBuilder : MVC Builder for the attributes panel.
Procedure — Configure the Step
Add the Action to Your Wizard Tag
To add this step to your wizard you can use: <jca:wizardStep action="editAttributesWizStep" type="object"/>
Add the initalizeItem Tag
Like the defineItemAttributesWizStep, editAttributesWizStep requires an initializeItem tag. Instead of setting the operation attribute of this tag to ${createBean.create}, you should set it to ${createBean.edit}. The following tag attributes are not applicable to edit wizards: objectHandle, baseTypeName.
Layout the Attributes
The attributes displayed on this step are controlled in the Type and Attribute Management utility. For details on laying out the attributes on this step see
Attribute Panels.
Customization — How to Modify the Conents of the Read-Only Property Panel in the Step
To modify the read only attribute panel to have it contain some attribute, write an EditAttributesWizStepBuilder. The new builder should extend from DefaultEditAttributesWizStepBuilder and implement the buildReadOnlyAttributePanelConfig method. In this method, create an AttributePanelConfig containing the desired attributes. Use the TypeBased annotation to specify the type the builder applies to. An Example builder can be found in the Basic Edit Wizard example in
Building Wizards to Edit a Single Object.
A basic builder might look like the following:
@TypeBased(value = "FakeLiterature")
public class LiteratureEditDetailsWizStepBuilder extends
DefaultEditAttributesWizStepBuilder {
@Override
protected AttributePanelConfig buildReadOnlyAttributePanelConfig
(ComponentParams params) throws WTException {
ComponentConfigFactory factory = getComponentConfigFactory();
AttributePanelConfig attrPanel = factory.newAttributePanelConfig();
attrPanel.addComponent(getContainerAttributeConfig(params));
attrPanel.addComponent(factory.newAttributeConfig(DescriptorConstants.
ColumnIdentifiers.TYPE));
return attrPanel;
}
}
SetContextWizStep
This step typically has only one input field, which is a picker for the owning container of the object being created. The selected container will be used to select the appropriate OIRs for other attributes.
In many cases, the container is determined from the launch context of the wizard and this step is not needed. For example, if the wizard is launched from the folders page of a product, the container is assumed to be that product.
Solution
Add the SetContextWizStep to your new wizard and configure the step.
When to use this step
This step is for WTContained objects only. This step contains a context (container) picker and should be included in a create wizard for a WTContained object if the container cannot be determined from the launch context and/or you want to allow the user to choose a container.
Solution Elements
Action
<action name="setContextWizStep" id="setContextWizStep" preloadWizardPage="true"
required="true"
afterVK="setContextWizStep">
<command windowType="wizard_step"/>
</action>
Action file: <Windchill>/codebase/config/actions/actions.xml
JSP
View jsp page: <Windchill>/codebase/WEB-INF/jsp/netmarkets/object/setContextWizStep.jsp
Validator
The ContextWizardStepValidator is available to validate the data in the set context wizard step. The ContextWizardStepValidator just validates that the form data contains a valid container object reference.
This validator also determines if the step should be displayed in the wizard. If the context has been determined from the launch point the step will be skipped even though it is included in the wizard.
Procedure — Configure the Step
Add the Action to Your Wizard Tag
To add this step to your wizard you can use: <jca:wizardStep action="setContextWizStep" type="object"/>
When you are using this step it is recommended that this be the first step in your wizard.
Customizations — Creating a Custom Set Context Step JSP Page
If a custom wizard has a Set Context step, the out-of-the-box step jsp listed above will usually suffice. The only time it might be necessary to develop a custom step jsp is if there is a need to capture additional attribute values before the display attributes are presented on the Define Object step.
For example, assume that:
• The wizard launch point has no folder context
• There are not any OIRs that set a default folder location for new objects
• There are defined access control policies denying users create permission for certain object subtypes. These policies are based on the administrative domain associated with the folder in which the new object is located.
In this case, the object container will have no effect on folder selection and you may want the user to select a folder location so the list of types available to him/her can be accurately determined. In this case you may want to put a folder input field on a step prior to the Define Object step. You could either add this input field to the Set Context step or add additional step to the wizard to capture folder location either before or after the Set Context step. (Either way, you will also need your own JSP for the Define Object step so you set the administrative domain parameter on the type picker based on the user’s folder selection in the Set Context step.)
If a custom Set Context jsp is needed and it needs to have a container picker, it is recommended that the out-of-the-box jsp is included in it rather than copying the contents of the out-of-the-box jsp. This will ensure the custom page will continue to behave correctly even if the context picker is modified in a future release.
setClassificationAttributesWizStep
Solution
Add the setClassificationAttributesWizStep to your new wizard and configure the step.
When to use this step
This step only applies to WTParts and subtypes thereof when PartsLink is installed. It is a dynamic step that only appears if the part is classified. It allows the user to modify the classification attributes of the part. It displays the classification of the part in view mode at the top and then includes a table of input fields for classification attributes. This step can be used for both creating and editing objects.
Note that the Set Classification Attributes step is marked as hidden. It is dynamically inserted into the
wizard if the user clicks the “Choose Classifications” radio button on the Set Attributes step. It is dynamically removed if the user clicks the “Do Not Classify” radio button to unclassify the part.
Solution Elements
Action
<action name="setClassificationAttributesWizStep"
id="setClassificationAttributesWizStep"
hidden="true" required="true" preloadWizardPage="false">
<command windowType="wizard_step"/>
</action>
Action file: <Windchill>/codebase/config/actions/PartManagement-actions.xml
JSP
View JSP Page: <Windchill>/codebase/netmarkets/jsp/part/setClassificationAttributesWizStep.jsp
Validator
The Set Classification Attributes step uses the same validator as the Set Attributes step.
Procedure — Configure the Step
To add this step to your wizard you can use:
<jca:wizardStep action=" setClassificationAttributesWizStep" type="part"/>
Add the Action to Your Wizard Step
Customizations
Using the Step in an Edit Wizard
When building an edit wizard that contains the Set Classification Attributes step you will need to dynamically load that step if the part being edited is classified. The js function “loadClassificationStep()” in <Windchill>/codebase/netmarkets/javascript/part/PartHelper.js is available to do that. In most cases this should be called indirectly by calling the “onloadEditPartWizard()” function when the wizard loads your main wizard jsp, as follows:
<script language="JavaScript" src="netmarkets/javascript/part/PartHelper.js">
</script>
... full jsp contents, the following javascript
should be the last thing in the file...
<script language="Javascript">
PTC.onReady(onloadEditPartWizard);
</script>
The onloadEditPartWizard() function calls loadClassificationStep() and also does some additional configuration for wizards launched from a workspace. You can use it regardless of whether your wizard can be launched from a workspace.
attachments_step
This step is typically included when creating or editing objects that are ContentHolders. It allows the user to attach documents, links, and other content to the new object.
See
Attachments for information on the elements that must be included to incorporate this step.
No validator is provided or needed for the attachments step.
setAccessControlWizStep
This step is typically included when you want to allow the user to make modifications to the access permissions for the object.
See
Component Access Control for information on the elements that must be included to incorporate this step.
Sample Code
Default view JSP for the Set Attributes Step
This jsp is the MVC view for the “defineItemAttributesWizStep” action for objecttype=object in <Windchill>/codebase/config/actions/actions.xml. The MVC builder for the Set Attributes Step for any object is DefineItemAttributesWizStepBuilder. The MVC view for the builder is defined in WEB_INF/jsp/object/ defineItemAttributesWizStep.jsp
The next section Default view JSP for the Set Attributes Step for WTPart illustrates having own view jsp for object type WTPart as WTPart need to include a customized type picker and ReadOnlyPropertyPanel.
<%@ taglib uri="http://www.ptc.com/windchill/taglib/jcaMvc" prefix="mvc"%>
<%@ include file="/netmarkets/jsp/components/beginWizard.jspf"%>
<%@ include file="/netmarkets/jsp/components/createEditUIText.jspf"%>
<%@ include file="/netmarkets/jsp/components/includeWizBean.jspf"%Ok. W>
//The driver attribute panel that defines the top section that includes the read
only property panel for context, type picker and driver attributes
<div id='driverAttributesPane'>
<%@ include
file="/netmarkets/jsp/components/defineItemReadOnlyPropertyPanel.jspf"%>
<jca:configureTypePicker/>
<%@ include file="/netmarkets/jsp/components/defineItem.jspf"%>
</div>
//Include Attribute Panel defining the non driver attributes
<mvc:attributesTableWizComponent/>
<%@ include file="/netmarkets/jsp/util/end.jspf"%>
Default view JSP for the Set Attributes Step for WTPart
WTPart need to include a customized type picker, ReadOnlyPropertyPanel, and custom information related to the CreateCadDocStep option. Hence we need to define a builder for WTPart(PartDefineItemAttributesWizStepBuilder) to set the view for the Set Attributes step (WEB_INF/jsp/part/ defineItemAttributesWizStep.jsp).
The only difference from the Generic one is that the jsps to render the driver attributes is different.
<%@ taglib uri="http://www.ptc.com/windchill/taglib/jcaMvc" prefix="mvc"%>
<%@ taglib uri="http://www.ptc.com/windchill/taglib/mvc" prefix="mvc1"%>
<%@ include file="/netmarkets/jsp/components/beginWizard.jspf"%>
<%@ include file="/netmarkets/jsp/components/createEditUIText.jspf"%>
<%@ include file="/netmarkets/jsp/components/includeWizBean.jspf"%>
<%@ taglib uri="http://www.ptc.com/windchill/taglib/wrappers" prefix="wrap"%>
<%@ page import="com.ptc.windchill.enterprise.part.partResource" %>
<fmt:setBundle basename="com.ptc.windchill.enterprise.part.partResource"/>
<fmt:message var="createCADDocument" key="<%= partResource.CREATE_CAD_DOC_
FROM_NEW_PART_LABEL %>" />
<div id='${createBean.encodedCurrentObjectHandle}driverAttributesPane'>
<%@ include file="/netmarkets/jsp/part/defineItem.jspf"%>
</div>
<mvc:attributesTableWizComponent/>
<c:if test='${param.showNewCADDocStep == "true"}'>
<wrap:checkBox name="createCADDocForPart" id="createCADDocForPart"
label="${createCADDocument}" renderLabel="true"
renderLabelOnRight="true" checked="false"
onclick="toggleCreateCADDocStep('part.defineItemAttributesWizStepForCADDoc!~
objectHandle~caddocHandle~!');" />
</c:if>
<br>
<c:if test='${param.invokedfrom != "workspace"}'>
<%@ include
file="/netmarkets/jsp/components/keepCheckedOutCheckbox.jspf"%>
</c:if>
<input id="selectedClfNodes" type="hidden" name="selectedClfNodes" >
<input id="selectedClfNodesDisplayName" type="hidden"
name="selectedClfNodesDisplayName" >
<%@ include file="/netmarkets/jsp/util/end.jspf"%>
JSP for the Defining the Define Item Panel for WTPart
Filename: <Windchill>/codebase/ netmarkets/jsp/part/defineItem.jspf
This example illustrates how to override the read-only context panel and to reconfigure the type picker.
<%@ page import="com.ptc.windchill.enterprise.part.PartConstants" %>
<%@ page import="com.ptc.core.ui.componentRB" %>
<%@ taglib uri="http://www.ptc.com/windchill/taglib/components"
prefix="jca"%>
<%@ taglib uri="http://www.ptc.com/windchill/taglib/picker" prefix="p"%>
<%@ taglib uri="http://www.ptc.com/windchill/taglib/partcomponents"
prefix="partcomp"%>
<%@ taglib uri="http://java.sun.com/jsp/jstl/core" prefix="c"%>
<%@ taglib uri="http://www.ptc.com/windchill/taglib/fmt" prefix="fmt"%>
<jca:describePropertyPanel var="defineItemStepContextPanelDescriptor"
id="defineItemStepContextPanelDescriptor"
scope="request" mode="VIEW" type="wt.part.WTPart">
<jca:describeProperty id="containerName"
label="${createBean.containerLabel}"/>
</jca:describePropertyPanel>
<%-- Get the part types to filter from type picker selection list --%>
<partcomp:PartCreateHelper var="partTypesToFilter"
method="getPartTypesToFilter"/>
<c:choose>
<c:when test='${param.invokedfrom == "tabular_input"}' >
<!-- If New Part client is invoked from Edit Structure, association
constraints need to be enforced. (Please see the Javadoc for
DefaultAssociationConstraintIT for more details). The list of
creatable types needs to be filtered out to inlcude only the
types allowed by association constrains. This is achieved by
finding the list of valid (allowable) types using the
getSeedPartTypes below and then setting the type picker's
'type' parameter to 'ROOT_TYPES' -->
<!-- Get the seed part types. Usually, it is wt.part.WTPart but
it can be a bunch of types if association contraints
are in place -->
<partcomp:PartCreateHelper var="seedPartTypes" method="getSeedPartTypes"/>
<jca:configureTypePicker>
<%--
Type Picker picks up the default from Preferences.
It does not have be set here.
--%>
<c:forEach var="item" items="${seedPartTypes}">
<p:pickerParam name="seedType" value="${item}"/>
</c:forEach>
<c:forEach var="item" items="${partTypesToFilter}">
<p:pickerParam name="filterType" value="${item}"/>
</c:forEach>
<p:pickerParam name="type" value="ROOT_TYPES"/>
</jca:configureTypePicker>
</c:when>
<c:when test='${param.invokedfrom == "config_link_table"}' >
<!-- The part types in the type picker must come from the
association constraints on the configurable link. -->
<clui:getRoleBTypesForNewAction var="roleBObjectTypes"
roleBBaseType="wt.part.WTPart"/>
<jca:configureTypePicker>
<c:forEach var="item" items="${roleBObjectTypes}">
<p:pickerParam name="seedType" value="${item}"/>
</c:forEach>
<c:forEach var="item" items="${partTypesToFilter}">
<p:pickerParam name="filterType" value="${item}"/>
</c:forEach>
<p:pickerParam name="type" value="ROOT_TYPES"/>
</jca:configureTypePicker>
</c:when>
<c:otherwise>
<jca:configureTypePicker>
<%--
Type Picker picks up the default from Preferences.
It does not have be set here.
--%>
<c:forEach var="item" items="${partTypesToFilter}">
<p:pickerParam name="filterType" value="${item}"/>
</c:forEach>
</jca:configureTypePicker>
</c:otherwise>
</c:choose>
<%@ include file="/netmarkets/jsp/components/defineItem.jspf"%>
Additional Resources
Related Customization Documentation
Related Package/Class Javadoc
• com.ptc.core.components.tags.components..InitializeItemTag
• com.ptc.core.components.tags.components.ConfigureTypePickerTag
• Common Components Tag Lib Javadoc