Configuring the Indexing Dashboard
This topic is intended for the Windchill System Administrator.
 |
If you have previously indexed vault content using Windchill AI Assistant Plugin version 2026.0.0.21 or earlier, update the plugin and reindex the existing content to ensure compatibility with future plugin versions. For more information, see Reindexing.
|
The Indexing Dashboard is the central control panel for managing indexing in Windchill AI Assistant. Use the dashboard to configure what content is indexed, schedule indexing jobs, and monitor indexing status and progress.
Before you configure indexing, make sure that the Windchill AI Assistant Plugin is connected to the required Azure services. For more information, see Configuring the Windchill AI Assistant Plugin.
Accessing the Indexing Dashboard
Follow these steps to access the indexing dashboard:
1. Open the Windchill AI Assistant tab.
2. Click  , and then select Indexing Dashboard.
, and then select Indexing Dashboard.Follow these steps to configure the indexing dashboard:
Step | Task |
|---|---|
1 | |
2 | |
3 | |
4 | |
5 | |
6 |
Step 1: Specify the Indexing User
The indexing user controls which Windchill content is eligible for indexing. The system indexes only content that the indexing user can access and that matches the selected containers and entity types.
For best results, use a dedicated indexing user with access limited to the relevant products, libraries, or projects. For information about creating an indexing user, see Creating an Indexing User.
Follow these steps to configure the indexing user:
1. In the > section, click  .
.
.2. Enter the user name for the indexing user.
3. Click  to save your changes.
to save your changes.To discard your changes, click  . To remove an existing indexing user, click
  .
.
. To remove an existing indexing user, click .Step 2: Select Containers for Indexing
The Containers section defines the Windchill containers that are included in the indexing scope. Only content in the selected containers is eligible for indexing. Containers listed under Available Containers are excluded from the indexing scope.
The dashboard displays containers in the following lists:
List | Description |
|---|---|
Containers | Containers currently selected for indexing. |
Available Containers | Containers that are available to add to the indexing scope. |
Follow these steps to select containers:
1. In the Containers section, click .
.2. Add or remove containers as needed:
◦ Select Add  next to a container to move it from Available Containers to Containers.
next to a container to move it from Available Containers to Containers.◦ Select Add all to add all available containers.
to add all available containers.◦ Select Remove  next to a container to remove it from the indexing scope.
next to a container to remove it from the indexing scope.◦ Select Remove all to remove all selected containers from the indexing scope.
to remove all selected containers from the indexing scope.3. Click to save your changes.
to save your changes.To discard your changes, click .
.| | Removing a container from the indexing scope permanently deletes the associated indexed chunks from the index after synchronization runs. The AI Assistant cannot answer questions about documents in that container after the content is removed from the index. Reindexing the removed content later can be time-consuming and may incur additional costs. |
 | Indexing may incur usage-based costs depending on the number and size of indexed documents. To manage costs and processing time, start with a small number of smaller containers. Indexing large containers can take several days or weeks. |
Step 3: Select Entity Types for Indexing
The Entity Types section defines the Windchill object types that are included in the indexing scope. Only selected entity types are eligible for indexing.
Follow these steps to select entity types:
1. In the Entity Types section, click .
.2. Select the entity types to include in the indexing scope.
3. Click to save your changes.
to save your changes.To discard your changes, click .
.The available entity types can include the following types, depending on your configuration:
• Document
• Dynamic Document
• Change Notice
• Problem Report
• Manufacturing Part
• CAD Document
• Change Request
• Change Task
• Part
• Vendor Part
| | If you clear an entity type, content of that type is removed from the index after synchronization runs. If you need the change to take effect before the next scheduled synchronization, start synchronization manually. |
Step 4: Configure the Index Synchronization Job
The Index Synchronization Job controls scheduled synchronization between Windchill and the Azure index. When enabled, the system synchronizes the Azure index weekly with the latest Windchill changes. Updated content is indexed and made available to the AI Assistant.
Follow these steps to configure the index synchronization job:
1. In the Index Synchronization Job section, click .
.2. Select the checkbox next to Index Synchronization Job to enable the index synchronization job.
3. In Configure Weekly Sync, select a day of the week.
4. In Time of Day, enter the time when synchronization should run. For example, 09:30 AM.
5. Click to save your changes.
to save your changes.To discard your changes, click .
.Step 5: Configure the Indexing Schedule
The Indexing Schedule section defines when indexing activity can run. When the schedule is enabled, indexing runs only during the specified time intervals. Use this configuration to schedule indexing during appropriate periods, such as off-peak hours.
| | Configuring the indexing schedule is required. You must enable the Indexing Schedule for indexing to run. If the schedule is not enabled, no content is indexed. The index synchronization job continues to add events to the indexing queue, but those events are not processed until an indexing schedule is enabled. |
Follow these steps to configure the indexing schedule:
1. In the Indexing Schedule section, click .
.2. Select the checkbox next to Indexing Schedule to enable the indexing schedule.
| | By default, selecting this checkbox applies a 24/7 schedule, enabling indexing to run at all times. Define time intervals only if you want to restrict indexing to specific periods. |
3. In Time Intervals, enter a start time and an end time. For example, 06:30 AM to 12:30 PM.
4. To add another time interval, select Add Interval.
5. Click to save your changes.
to save your changes.To discard your changes, click .
.If documents are added, modified, or removed outside the configured time intervals, indexing occurs during the next scheduled indexing window.
Example—If indexing is scheduled from 11:00 AM to 6:00 PM, documents added or modified after 6:00 PM are indexed during the next scheduled indexing window.
| | Indexing may incur usage-based costs depending on the number and size of indexed documents. |
Step 6: Synchronize the Index Manually (Optional)
Use the Synchronize index section to manually start synchronization of eligible Windchill content with the Azure index. Manual synchronization is useful after configuration changes, such as changing the indexing user, selecting different containers, or updating entity types.
Manual synchronization ensures that document changes are indexed and available to the AI Assistant without waiting for the next scheduled synchronization job.
The Synchronize index section displays the next scheduled synchronization and the most recent synchronization run. Expand Last synchronization run to view the job status and progress for the following synchronization steps:
• Cleaning staging storage
• Deleting removed content from index
• Adding queue entries
To synchronize the index manually:
1. Open the Indexing Dashboard.
2. In the Synchronize index section, click Start.
After you click Start, the system synchronizes eligible Windchill content with the Azure search index. The synchronization process creates queue entries for content that the indexing user can access and that matches the selected containers and entity types.
| | • After you select Start, the button is temporarily disabled while the system prepares the synchronization job. When the synchronization job is prepared, the Start button becomes available again. However, this does not indicate that all content has been fully indexed. At this point, the required indexing events have been created and added to the indexing queue, and indexing continues to run in the background. • If you skip manual synchronization, only documents that are added or modified after indexing is enabled are indexed until the next scheduled synchronization runs. |
Reviewing the Health Center
The Health Center displays the health status of the services and configuration required for indexing. Use this section to verify that the indexing configuration is ready before you start using the Windchill AI Assistant.
The Health Center displays health indicators for the following services and configuration:
• Indexing User
• Windchill Subscriptions
• Azure AI Search
• Azure OpenAI
• Azure Storage
• PTC SaaS Platform
When all required services and configuration are healthy, the dashboard displays the following message: All services are healthy.
If a service or configuration setting requires attention, review the message displayed in the Health Center and take the recommended action.
Monitoring Indexer Status
The Indexer Status section displays the current status and progress of the indexing process.
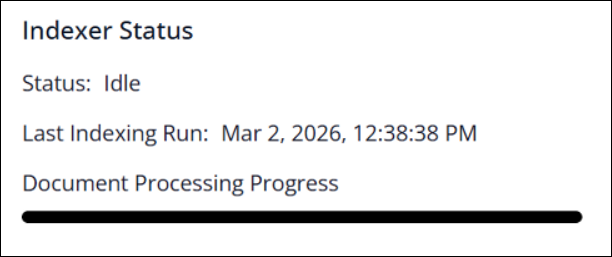
The following table describes the available fields:
Field | Description |
|---|---|
Status | Displays the current status of the indexing process. |
Last Indexing Run | Displays the date and time of the most recent indexing run. |
Document Processing Progress | Displays a progress bar indicating how much of the queued content has been processed. |
Use this section to monitor indexing activity after manual synchronization starts or after scheduled indexing begins.
Viewing Indexing Queue Details
Indexing is incremental and event‑driven. Windchill uses a queue-based mechanism to process indexing events. As an administrator, you can inspect the details of this queue and identify indexing failures.
To review indexing queue details, open the WindchillAIAssistant_QUEUE queue by using the Queue Management utility in Windchill. For more information about locating and opening queues, see Working with the Queue Management Utility.
The queue displays one document per row as an event.
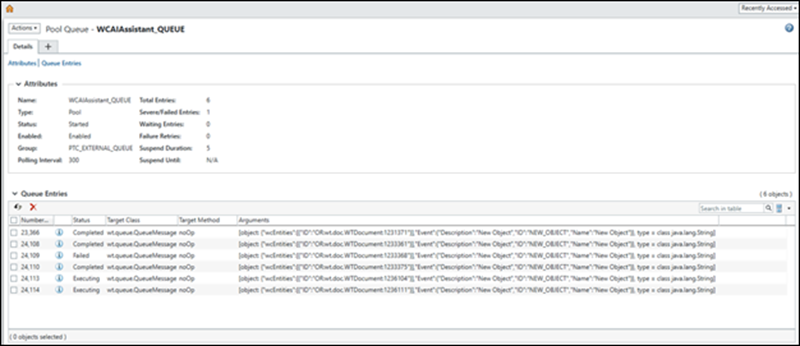
The following table describes the available status values:
Status | Description |
|---|---|
Ready | The document has been queued for processing. |
Executing | The document is being indexed. |
Completed | Document indexing completed successfully. The content can be queried by using chat or the summarization action. |
Failed | Document indexing failed. Review the event details, indexing limits, and troubleshooting information. For more information, see Indexing Limits, and Troubleshooting for On-prem Environment. |
Completed entries are automatically removed from the queue after a defined period. Failed entries remain in the queue so that administrators can review and investigate them. Event details may include messages from the indexing service that help identify the cause of the failure.
Important Considerations
Review the following considerations before and after configuring indexing:
• The Windchill AI Assistant uses knowledge from indexed documents. Allow indexing to complete before submitting product-related queries.
• The plugin indexes content that is accessible to the indexing user and that matches the selected containers and entity types.
• Removing containers or entity types from the indexing scope removes the associated content from the index after synchronization runs.
• Granting the indexing user access to additional containers and running indexing may increase Azure usage-based costs.
• For limitations related to the number of documents that can be indexed, see Document Indexing Specifications and Known Issues for On-prem Environment.
• If indexing fails, review Document Indexing Specifications topic. Indexing an unsupported type can result in a failed indexing event.