Configuring the Windchill AI Assistant Plugin
This topic is intended for the Windchill System Administrator.
You can configure the Windchill AI Assistant plugin in one of the following ways:
• Configuring the Plugin Using the Configuration File (Recommended)—Import the .json file generated by the deployment helper script. All fields are populated automatically, minimizing manual entry and avoiding copy-and-paste errors.
• Configuring the Plugin Manually— Enter each configuration value manually.
Configuring the Plugin Using the Configuration File (Recommended)
Follow these steps to configure the Windchill AI Assistant plugin using the plugin configuration file generated by the deployment helper script:
1. Go to > > .
2. Right-click the Windchill AI Assistant plugin, and then select Configure Plugin.

The Windchill AI Assistant Configuration window opens.
3. In the Infrastructure as Code script section, click Download to download the Infrastructure‑as‑Code (IaC) script.

4. Create the required Azure resources using the downloaded IaC script. For more information, see Creating Azure Resources for On-prem Environment.
5. Run the deployment helper script (deploy-wcaia.py) to generate the plugin configuration file. For more information, see Generating the Plugin Configuration File.
6. Import the plugin configuration .json file . For more information, see Importing a Configuration.
7. Verify that the configuration values in the following sections are correctly populated:
◦ Azure OpenAI
◦ Azure Storage
◦ Azure AI Search
◦ PTC SaaS Platform
8. In the PTC SaaS Platform section, select I accept the usage criteria of the PTC-hosted eSupport index to enable PTC-hosted support content. For more information, see Opting In to the PTC‑Hosted eSupport Index.
9. In the Create index resources section, click Create index resources to create the Azure AI Search index resources for the Windchill AI Assistant.
 | The plugin creates the required index, indexer, skillset, and data source in your Azure subscription. The Azure AI Search indicator in the Health Center remains unhealthy until this step completes. After the resources are created, the indicator turns healthy and document indexing can begin. |
10. In the Health Center dashboard, verify that all services are healthy. For more information, see Reviewing the Health Center.
11. Close the Windchill AI Assistant Configuration window.
The plugin is now configured and ready to use.
Configuring the Plugin Manually
Follow these steps to configure the Windchill AI Assistant plugin manually:
1. Navigate to > > .
2. Right-click the Windchill AI Assistant plugin, and then select Configure Plugin.
The Windchill AI Assistant Configuration window opens.
3. In the Infrastructure as Code script section, click Download to download the Infrastructure‑as‑Code (IaC) script.
4. Create the required Azure resources using the IaC script. For more information, see Creating Azure Resources for On-prem Environment.
5. Run the deployment helper script (deploy-wcaia.py) to generate the plugin configuration file. For more information, see Generating the Plugin Configuration File.
6. Configure the Azure services by entering the values from the plugin configuration file:
a. In the Azure OpenAI section, click  , and specify the following details:
, and specify the following details: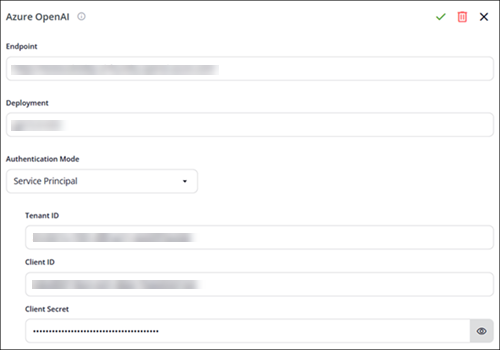
i. Endpoint—Enter the Azure OpenAI endpoint.
ii. Deployment—Enter the model deployment name.
iii. Authentication Mode—Select one of the following, and then provide the required values:
▪ Service Principal—Enter the Tenant ID, Client ID, and Client Secret.
▪ Key—Enter the API Key for the Azure OpenAI resource.
iv. To save your changes, click  .
.
.To discard your changes, click  . To remove an existing configuration, click
  .
.
. To remove an existing configuration, click .b. In the Azure Storage section, click and specify the following details:
and specify the following details: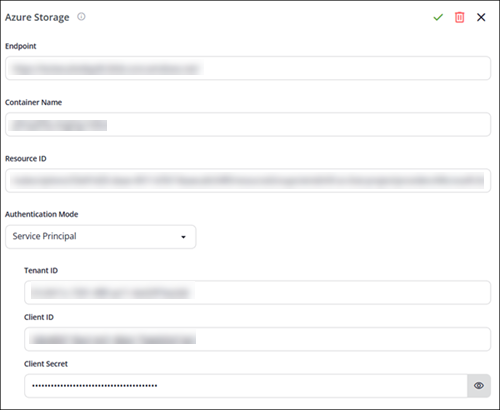
i. Endpoint—Enter the Azure storage endpoint in one of the following formats:
▪ The full endpoint URL, for example https://<account-name>.blob.core.windows.net
▪ The storage account name only, for example wcaiardplmdevstorage
ii. Resource ID—Enter the resource ID.
iii. Container Name—Enter the storage container name.
iv. Authentication Mode—Select one of the following, and then provide the required values:
▪ Service Principal—Enter the Tenant ID, Client ID, and Client Secret.
▪ Key—Enter the Account Key for the storage account.
v. To save your changes, click .
.To discard your changes, click . To remove an existing configuration, click .
. To remove an existing configuration, click .c. In the Azure AI Search section, click and specify the following details:
and specify the following details: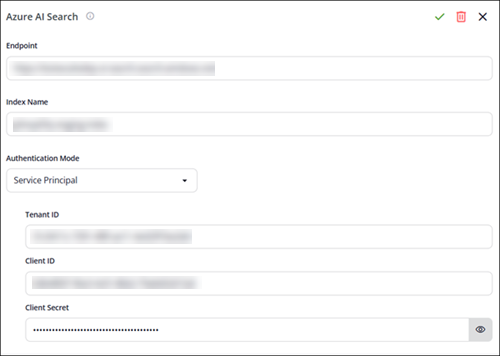
i. Endpoint—Enter the Azure AI Search endpoint.
ii. Index Name—Enter the index name.
iii. Authentication Mode—Select one of the following, and then provide the required values:
▪ Service Principal—Enter the Tenant ID, Client ID, and Client Secret.
▪ Key—Enter the API Key for the Azure AI Search resource.
iv. To save your changes, click .
.To discard your changes, click . To remove an existing configuration, click .
. To remove an existing configuration, click .| | The plugin validates each field when you save a section. If a value is missing or has an invalid format, for example, an endpoint that is not a valid URL, an unreachable service, or an incorrect identifier, the plugin displays an error message and blocks the save action. Correct the highlighted value, and then save again. You cannot exit edit mode without either entering a valid value or discarding your changes. |
7. In the PTC SaaS Platform section, click .
.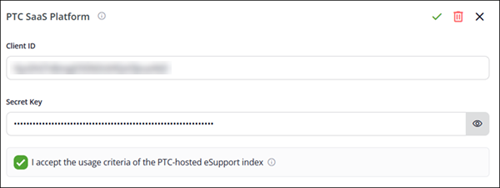
a. Enter the following details:
▪ Client ID—Enter the client ID.
▪ Secret Key—Enter the secret key.
b. Select I accept the usage criteria of the PTC-hosted eSupport index to enable access to PTC-hosted support content. For more information, see Opting In to the PTC‑Hosted eSupport Index.
c. Click to save changes.
to save changes.To discard your changes click , or to remove the existing configuration click .
, or to remove the existing configuration click .8. In Create index resources section, click Create index resources to create the Azure AI Search index resources for the Windchill AI Assistant.
| | The plugin creates the required index, indexer, skillset, and data source in your Azure subscription. The Azure AI Search indicator in the Health Center remains in the unhealthy state until this step completes. After the resources are created, the indicator turns healthy and document indexing can begin. |
9. In the Health Center dashboard, verify that all services are healthy. For more information, see Reviewing the Health Center.
10. Close the Windchill AI Assistant Configuration window.
The plugin is now configured and ready to use.
Opting In to the PTC‑Hosted eSupport Index
The I accept the usage criteria of the PTC-hosted eSupport index check box is cleared by default. When selected, it allows the Windchill AI Assistant to connect to a PTC-managed service and respond to your queries using content from the PTC Help Center and Technical Support knowledge base.
The availability of source modes depends on the state of this check box:
• When selected, both All Sources and Help/Support Only modes are available.
• When cleared, only Windchill Data mode is available, and the assistant uses only locally deployed agents.
| | When this option is selected, some data is processed outside your local environment by secure Azure services hosted in the PTC Azure tenant. Review your organization's data-handling policies before selecting this option. |
Reviewing the Health Center
The Health Center displays the live status of the following services:
• Azure AI Search
• Azure OpenAI
• Azure Storage
• PTC SaaS Platform
Review the indicators in the Health Center section:
• A green indicator means the service is reachable and configured correctly.
• A red indicator means the service requires attention. The Detected problems list shows the issue and the recommended action.
When all required services are healthy, the Health Center displays All services are healthy.
If any indicator remains unhealthy, follow the guidance in the Detected problems list and see Troubleshooting for On-prem Environment.
Exporting and Importing a Configuration
After the plugin is configured, you can export the configuration and reimport it later. This is useful during a rehost or when applying a configuration to another environment.
Exporting a Configuration
Follow these steps to export a configuration:
1. At the top of the Windchill AI Assistant Configuration window, click Export configuration.
2. Save the generated .json file to a secure location.
| | The exported file does not include the client secrets and account keys. You are prompted to re‑enter the missing secrets during import. |
Importing a Configuration
Follow these steps to import a configuration:
1. At the top of the Windchill AI Assistant Configuration window, click Import configuration.
2. In the file browser, select the .json configuration file that you want to import, and then click Open.
3. In the Complete imported credentials dialog box, enter the missing Client ID (if not pre-populated) and Secret Key for each imported credential pair.
4. Click Continue import.
A Configuration imported successfully message appears, and the values are applied to the corresponding sections.
To cancel the import at any time without applying changes, select Cancel.
Plugin Certificate Rotation
This topic describes the strategy for managing self-signed certificates used by Windchill plugins. AI plugins rely on self-signed certificates for secure communication. It covers certificate creation, validation, rotation, and integration with Windchill and Apache components to ensure secure communication. The Rotate Certificate action is used to manage these self-signed certificates.
To start the certificate rotation process, click > on the Windchill Plugins page. When you perform the action, the following rotation process takes place:
1. A new certificate is generated with the same names:
◦ certificate.crt (public key)
◦ privateKey.pem (private key)
2. The old certificates are renamed as:
◦ certificate_rotated.crt
◦ privateKey_old.pem
3. The new public key is added to the Apache certificate file.
| | Retain the previous certificates in both the plugin folder and the Apache certificate file. After the certificate rotation, restart the Apache and Windchill services. |

Using the Rotate Certification Action
The Rotate Certificate action is available only on the Windchill Plugins page, as the plugin certificate rotation applies exclusively to the Windchill on-prem environment.
In cluster environments of Windchill on-prem, running this action on any node rotates the certificate across all nodes.
If one of the nodes is down and certificates are rotated from another node, the allClientCerts.crt file must be copied manually from the currently active node to the node that was previously down, before restarting any nodes.
For example, if Node 1 is up and Node 2 is down, and certificates are rotated from Node 1, manually copy the allClientCerts.crt file from Node 1 to Node 2 before starting Node 2. Once the file is copied, then start Node 2.
| | After performing the Rotate Certificate action, copy the allClientCerts.crt file from the local Apache folder to the remote Apache folder for a split‑web server. This step must be completed after configuring the Windchill AI Assistant plugin on the above deployment scenario. |
Managing Self-Signed Certificates
The following points outline key considerations for managing self-signed certificates and maintaining functionality after a rotation:
• The Apache and Windchill services must be manually restarted after the certificate rotation.
• Self-signed certificates have a validity period of 6 months.
• Retain old certificates in both the plugin folder and the Apache certificate file.
• Certificate rotation cannot occur unless at least one hour has passed since the previous rotation.
• If a certificate rotation fails for any plugin, the MethodServer log shows the corresponding plugin ID.
• Failure to restart Apache and Windchill after rotation may result in plugins using outdated certificates.
Configuring the Plugin in Windchill Deployment Scenarios
This topic is intended for the Windchill System Administrator.
This section provides detailed instructions for configuring the Windchill AI Assistant plugin in the Windchill deployment scenarios, such as web server setups, and reverse proxy configurations.
Split‑Web Server Configuration
Follow these steps to configure the AI Assistant plugin on Windchill with split-web server configuration:
1. Ensure SSL is configured on remote Apache and Windchill.
2. Install the required plugins from the > page.
3. Restart remote Apache (in case of Windows only).
4. Navigate to a local Apache folder:
HTTPServer_HOME\conf\sslvhostconf.d
5. Copy these files:
◦ allClientCerts.crt
◦ pluginClients.conf
6. Paste these files into remote Apache at:
HTTPServer_HOME\conf\sslvhostconf.d
| | After performing the Rotate Certificate action, replace the allClientCerts.crt file on the remote Apache server, and then restart both the remote Apache service and the Windchill server. For more information on certificate rotation process, see the “Plugin Certificate Rotation” section of this topic. |
7. Edit the pluginClients file to update the path for allClientCerts.crt.
8. Copy WindchillAIAssistant-proxy.conf from plugin install directory and paste into HTTPServer_HOME\conf\conf.d on remote Apache.
9. Open the WindchillAIAssistant-proxy.conf file and replace balancemember localhost with windchill host name and save it.
<Proxy balancer://WindchillAIAssistant_lb/>
BalancerMember http://localhost:9090/Windchill/WCPlugins/wcaiassistant route=WindchillAIAssistant1
ProxySet stickysession=WindchillAIAssistant_sticky
</Proxy>
BalancerMember http://localhost:9090/Windchill/WCPlugins/wcaiassistant route=WindchillAIAssistant1
ProxySet stickysession=WindchillAIAssistant_sticky
</Proxy>
10. Restart split-web server or remote Apache.
11. Navigate to the > page and configure the plugin. Ensure that the configuration is completed successfully.
Reverse Proxy Configuration
Follow these steps to configure the AI Assistant plugin on Windchill with reverse proxy configuration:
1. Ensure SSL is configured on all relevant Apache servers and Windchill.
| | To ensure proper communication, add the reverse proxy IP address and its associated public DNS hostname to the hosts file on the Windchill node: • On Linux /etc/hosts or • On Windows C:\Windows\System32\drivers\etc\hosts |
2. Install the required plugins from the > page.
3. Restart Apache (Windows only, Linux not required).
4. Open the 20-mod_ssl.conf file from local Apache located at: %APACHE_HOME%/conf/conf.d and open httpd.conf file located at %APACHE_HOME%/conf.
5. Search for the string: RewriteCond %{HTTP_HOST}. If this string is found, proceed to steps 5a and 5b. If it is not found, omit steps 5a through 5c and proceed directly to step 6:
a. Add the hostname of the reverse proxy system in this condition:
RewriteCond %{HTTP_HOST} !^(<reverse_proxy_hostname>|<local_Apache>):<port>$ [NC]
For example:
▪ Old: RewriteCond %{HTTP_HOST} !^XYZ.localapache.example.com:22444$ [NC]
▪ New: RewriteCond %{HTTP_HOST} !^(XYZ.proxy.example.com|ABC.localapache.example.com):22444$ [NC]
| | Make sure the local Apache and reverse proxy Apache are configured to use the same port. |
b. Save the 20-mod_ssl.conf and httpd.conf files.
c. Restart local Apache.
6. Navigate to the > page and configure the plugin. Ensure that the configuration is completed successfully.