Create an App Integration for ThingWorx in Okta
SAML
1. Sign in to the Okta Admin Console.
|
|
You must be an administrator.
|
2. Navigate to > . Then, click Create App Integration.

3. On the Create a new application integration window, select SAML 2.0 as the Sign-in method, and then click Next:

4. On the General Settings tab on the Create SAML Integration page, enter the following information and then click Next.
◦ App name—give your app a name (for example, ThingworxSAML)
◦ App logo—(optional) add a logo for your app
◦ App visibility—Select whether or not you want to display the application icon to users
5. On the Configure SAML tab, enter and select the following information:
◦ Single Sign On URL—enter http://<ThingWorx FQDN>:<port>/Thingworx/saml/SSO
|
|
Leave the Use this for Recipient URL and Destination URL checkbox selected.
|
◦ Audience URI (SP Entry ID)—enter ThingWorxSP
◦ Default RelayState—leave blank
◦ Name ID format—select Unspecified
◦ Application username—select Okta username
◦ Update application username on—select Create and update
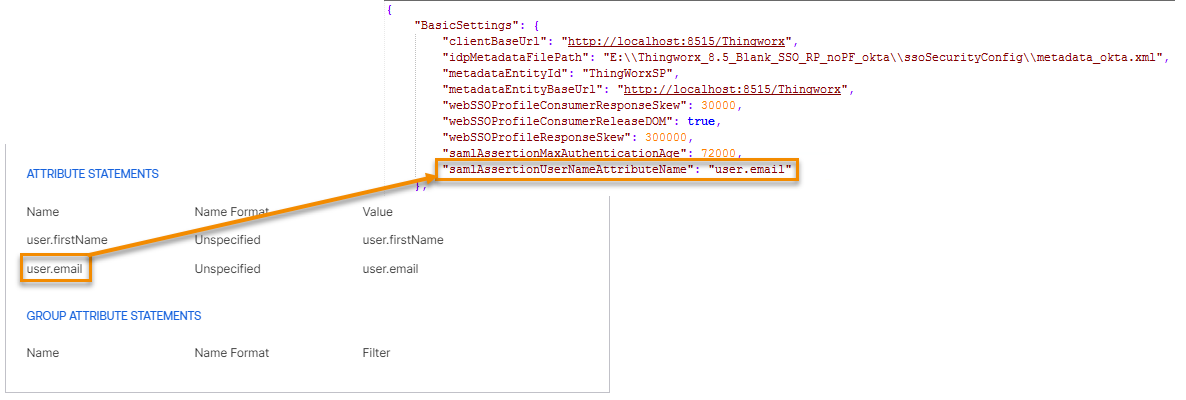
6. While still on the Configure SAML tab, scroll down to ATTRIBUTE STATEMENTS.
7. Enter user.firstName in the Name field, leave Unspecified for Name format, and select user.firstName for the Value. Click Add Another.
8. In the new set of attribute statement fields, enter user.email– in the Name field, leave Unspecified for Name format, and select user.email for the Value.

9. Under Group Attribute Statements (optional), enter role in the Name field, leave Unspecified for Name format, and enter gr for Starts with.
10. Click Next. On the Feedback tab, click Finish.
11. Your app integration is created, and you are taken to the Sign On tab of the new application.
12. On the Sign On tab, click Copy under the Metadata URL, and paste it into a new browser tab. When the contents of the file are displayed, right-click on the page and select Save As or Save Page As depending on the browser you are using. If using Chrome or Edge, the file will be downloaded as an XML file.
|
|
Simply copying and pasting the output can create formatting issues, so be sure to use Save As.
|

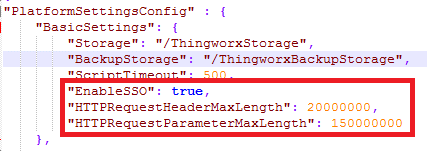
13. Navigate to the ThingworxPlatform folder on your system, and open the platform-settings.json file, make sure that the following is specified as shown below.
14. In the same ThingworxPlatform folder on your system, open the ssoSecurityConfig folder, and then open the sso-settings.json file. Ensure the following configurations are made under BasicSettings:
|
|
For more information about the ssoSecurityConfig folder and sso-settings.json file, see Create the ssoSecurityConfig Directory and Configure the sso-settings.json File in the ThingWorx Help Center.
|
◦ idpMetadataFilePath—Specify the path to the metadata_okta.xml file that you copied in Step 11..

◦ metadataEntityId—Enter the value of the Audience Restriction field (as shown in step 4) from your SAML Settings section on the General tab of the application in Okta.

◦ samlAssertionUserNameAttributeName—Enter user.email name from the attribute statement you created (in step 8).
15. While still in the sso-settings.json file, ensure that the enabled parameter under ApplicationKeySettings is set to true.

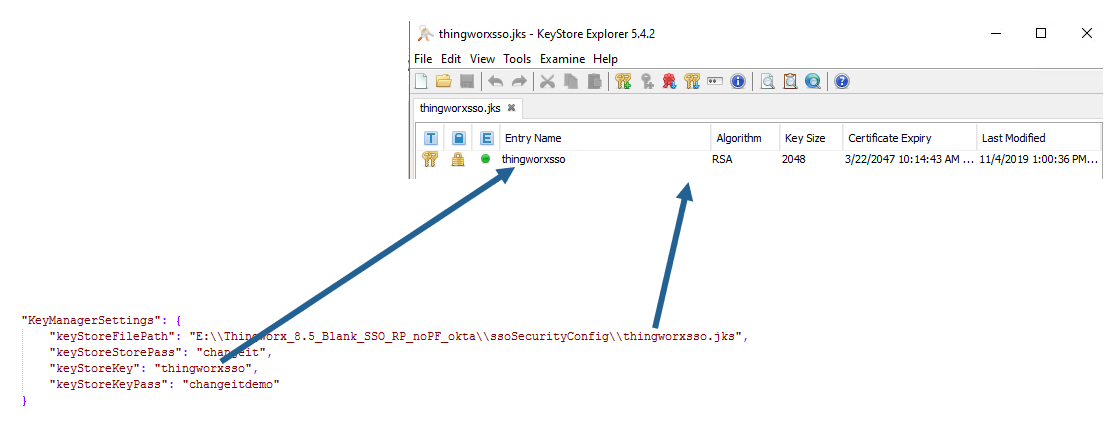
16. Next in the sso-settings.json file, scroll to KeyManagerSettings, and make sure the following are specified:
17. Save and then close the sso-settings.json file.
18. Restart ThingWorx.
19. Verify that the Okta authentication has been configured properly by using the appropriate credentials to sign in to ThingWorx Composer as the Administrator.
20. After successful sign in, navigate to the Configuration tab of the ThingworxSSOAuthenticator, enter role in Groups for the group attribute you created in step 9.

|
|
If the sign in attempt fails with 403 App Not Assigned error, assign the users to the ThingWorx application in Okta and try signing in again.
|
OAuth 2.0
1. Sign in to the Okta Admin Console.
2. Navigate to > .
3. On the Create App Integration window, select OIDC – OpenID Connect. Once you select this option, the Application type section appears. Select Web Application, and click Next.

4. Under General Settings, enter the following information and then click Save.
◦ App name—give your app a name (for example, ThingworxResourceProvider)
◦ Logo—(optional) add a logo for your app
◦ Proof of possession—select whether or not you want to require Demonstrating Proof of Possession (DPoP) header in token requests
◦ Grant type—by default, the Authorization Code checkbox is selected under Client acting on behalf of a user
◦ Sign-in redirect URIs—enter your sign in redirect URI. For example, http://localhost:8515/Thingworx/oauth2_authorization_code_redirect
◦ Assignments—select Skip group assignments for now

5. Next, navigate to > . On the Authorization Servers tab, click default.

6. On the Scopes tab, click Add Scope. Name the scope THINGWORX, and click Create.

7. Ensure that ThingWorx has been configured as a Resource Server before continuing. For more information, see Configure ThingWorx as a Resource Server in the ThingWorx Help Center.
8. Navigate to the ThingworxPlatform folder on your system, and open the resourceServerSettings.json file. Specify the following values:
|
Attribute
|
Value
|
|---|---|
|
userAuthenticationConverterUserNameAttribute
|
sub
This value will be the name of the claim created on the default authorization server in Okta. This value cane be found by navigating to > > > > .
|
|
oathTokenEndPoint
|
This value will be the same as the value of token_endpoint in the Metadata URL. To find this value, open the Okta Admin Console and navigate to > > > > . Click on the Metadata URI and find the token_endpoint value. It should look similar to the following:
https://<unique_server_name>.okta.com/oauth2/default/v1/token
|
|
checkTokenEndpointUrl
|
This value will be the same as the value of introspection_endpoint in the Metadata URL. To find this value, open the Okta Admin Console and navigate to > > > > . Click on the Metadata URI and find the introspection_endpoint value. It should look similar to the following:
https://<unique_server_name>.okta.com/oauth2/default/v1/introspect
|
|
clientId
|
This will be the same value as the Client ID field for the ThingworxResourceProvider application in Okta.
To find this value, open the Okta Admin Console and navigate to > in the left navigation pane. Click on the ThingworxResourceProvider application. On the General tab, find Client ID field under Client Credentials.
|
|
clientSecret
|
This will be the same value as the Client secret field for the ThingworxResourceProvider application in Okta.
To find this value, open the Okta Admin Console and click on Applications in the left navigation panel. Click on the ThingworxResourceProvider application. On the General tab, find the CLIENT SECRETS section under Client Credentials .
|
9. Obtain an OAuth access token using Postman. For more information, see Obtain OAuth Access Token for ThingWorx Administrator Using Postman.
