Step Check Components in Vuforia Editor
There following user interfaces in Vuforia Editor play an important role in the Step Check workflow.
|
User Interface Area
|
Role in the Step Check Workflow
|
What it Looks Like
|
|---|---|---|
|
Step cards
|
Step cards are where you will first enable Step Check for a step in a procedure by selecting Pass/Fail with Step Check as the feedback type for the step.
You can also do the following from a step card:
• Access the Step Check Dashboard
• View what mode Step Check is set to
• Rename a Step Check
• Delete a Step Check
• Select a shared step check
• Unlink a Step Check area
|
  |
|
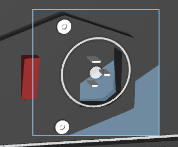
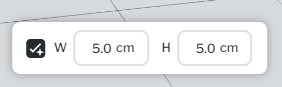
Step Check area on 3D canvas toolbar
|
The hide/show Step Check area button on the 3D canvas toolbar allows you to change the size of the Step Check area if needed. You can expand the area by dragging the edges or editing the widget and height.
  |
 |
|
Step Check Dashboard
|
The Step Check Dashboard displays training images that have been collected for the step. They are marked as pass or fail during training, but can be edited by a user that has edit permission on the procedure. Baseline images for both the pass and fail state are displayed. You can use the following filters to display only certain images:
• Conflicts
• Review Needed
• Pass
• Fail
• Unsure
• Guided Training
• Continued Training
You can also set the Step Check mode, enable or disable collecting training data, and view the Step Check status of a step. For more information, see Step Check Tab.
You can access the Step Check Dashboard for a step from the step card by clicking the Step Check Dashboard button. The dashboard will then open to the left of the EDIT tab.
For more information, see Step Check Dashboard
|
 |
|
STEP CHECK tab
|
From the STEP CHECK tab you can:
• Review any outstanding images that were collected in Vuforia Vantage that were too ambiguous for the AI to mark as pass or fail
• Configure Step Check settings
• Start training
For more information, see Step Check Tab.
|
 |