Executing Work Instructions
General
The Work Instruction Execution display includes a header with information about the current work orders, navigation through steps, a left instructions pane, and a right interactive execution pane.
The content within the right execution pane will change based on the step type.
To complete the work instruction, follow the steps below in sequence.
Secondary Signoff
Secondary signoff can occur on any step within an assembly work instruction.
1. Navigate through a work order as normal.
2. A popup will display informing the operator that a Signoff is required and it will designate the type of user that must be the witness.
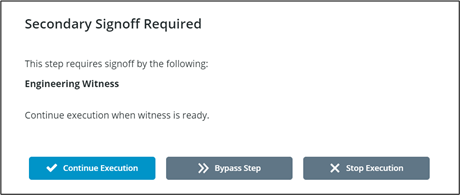
3. Click Continue Execution. A log in screen will display.
4. The Secondary Signoff witness must log in.
5. Once logged in, the witness must check Verify Secondary Signoff.
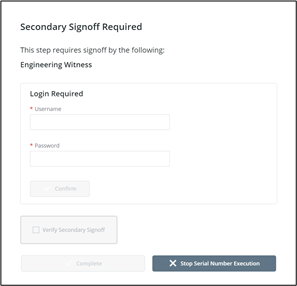
6. Click Complete.
7. Continue Work Order as normal.
Parallel execution serial numbers can not be run together if they have differing secondary signoff requirements. |
Header
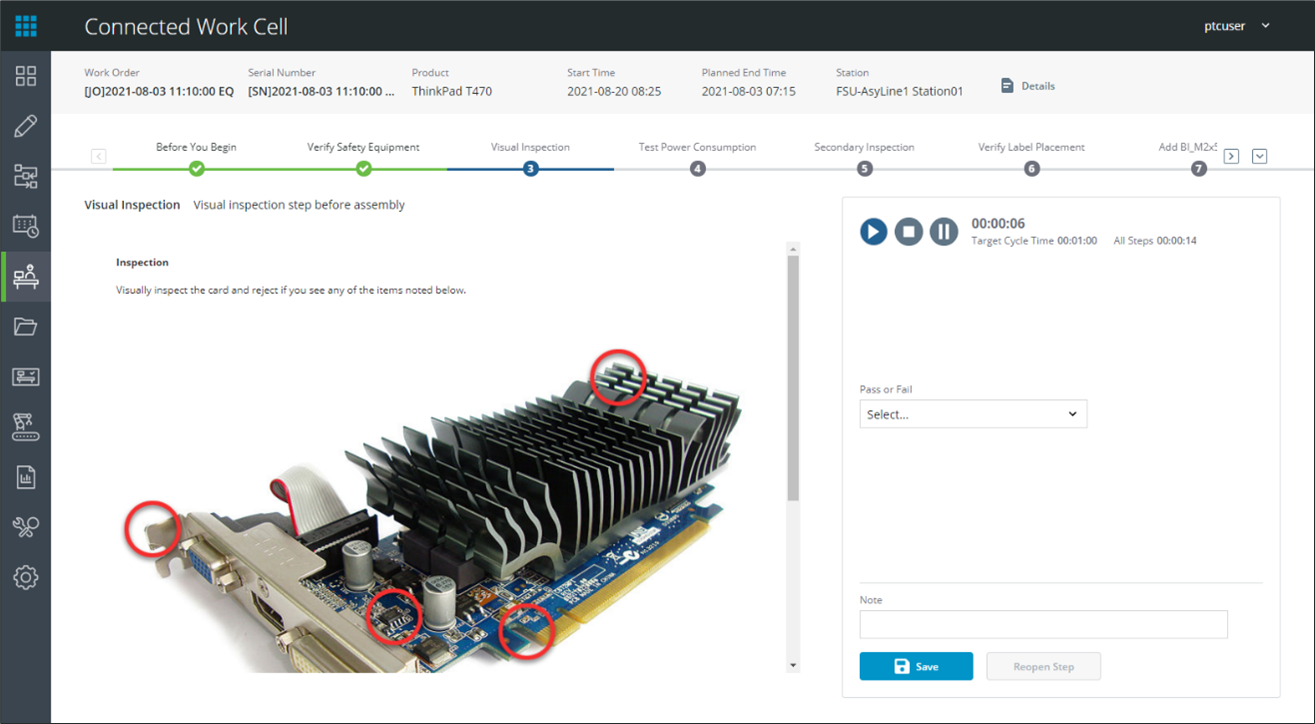

The header displays general information about the work order and serial numbers in progress.
Click Details to view information on the running work orders and serial numbers.
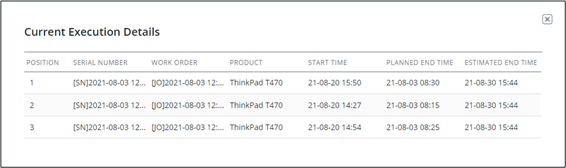
• The Details pop-up will also show estimated end time.
• In parallel execution mode, the pop-up will list all work orders and serial numbers by position.
Step Navigation

The navigation row shows all steps within the instruction. If there are more work instruction steps than fit on screen, you can click  or
or  to load more. You can also click
  to access a list of all steps in a dropdown.
or to load more. You can also click When work instructions initially load, the first step will be automatically selected.

Active steps appear with a dark blue circle. Completed operations and steps appear with a green circle. Inactive steps that are not complete appear gray.
Only the active step can be marked as Start/Stop/Hold/Complete. |
Instruction Pane
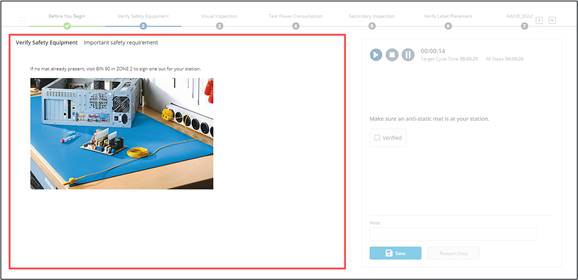
The instruction pane provides detailed information about the step, and may include rich content such as video, images, or PDF documents.
Execution Pane

The right execution pane includes:
• The work instruction timer and target time for the step
• The total time spent on the work instruction for all steps
• Start / Stop / Pause
controls
• Step-specific content defined in authoring
• A Note field
• Save/Complete, Bypass, and Reopen Step buttons
Serial number navigation, when in parallel execution mode. Click  or
or  to navigate to the previous or next serial number. You can also load a serial number’s execution from the dropdown.
or to navigate to the previous or next serial number. You can also load a serial number’s execution from the dropdown.Work Instruction Timer
Your time spent on each step is shown at the top of the execution pane. If the step is active, you will see the timer count up.
When the time spent exceeds the target time, the timer will appear in red with the  icon.
icon.
Start
A step is automatically started once the previous step is completed. The first step in a work instruction will start automatically when execution begins. The timer will run until the step is completed or work instruction is paused or stopped.
If a work instruction is paused, you can click  on the active step to continue. The work station’s downtime event will be closed.
If you stop or pause a step, you will need to provide a reason. (See Stop and Pause).
Stop
Click  on the active step to stop the work instruction for this serial number.
A reason must be provided in the Select a Reason for Stopping pop-up. These reasons must be preconfigured in the Reason Tree Configuration display.
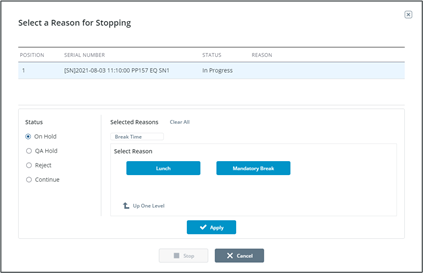
1. On Hold: The current serial number is assigned the configured Hold status. An open downtime event is created with the selected reason.
2. QA Hold: The current serial number is assigned the configured QA Hold status for further evaluation. An open downtime event is created with the selected reason.
3. Reject: The current serial number is assigned the configured Reject status. A waste event is created with the selected reason.
To stop execution when in non-parallel mode:
1. Select a status radio button from the left bottom pane.
2. Select a reason for stopping in the right bottom pane. Clicking a button for a reason will load any sub-reasons. The breadcrumb above will show the selected reason hierarchy.
3. Click Apply. The serial number information in the top section will update with the selected status and reason.
4. Click Stop.
In parallel execution mode, serial numbers can have different statuses and reasons for stopping.
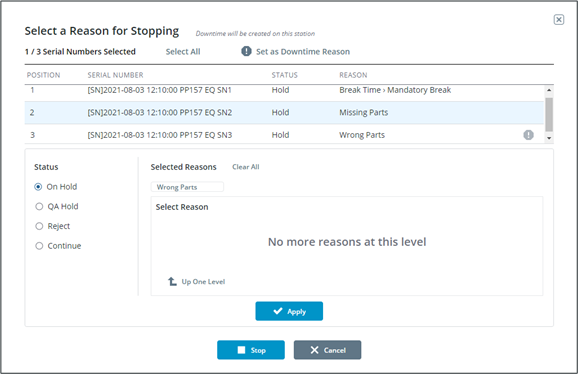
To stop parallel execution:
1. Select serial numbers in the top serial number list or click Select All.
2. Select a status radio button in the left bottom pane. To continue execution with the selected serial number, choose Continue. No reason is required when continuing a serial number’s execution.
1. Select a reason for stopping within the right bottom pane and click Apply. The serial number list in the top section will update with the chosen status and reason.
1. Assign statuses and reasons (if applicable) for all serial numbers.
2. If no serial numbers will continue, and one or more are set to Hold or QA Hold status, a downtime event will be created on the station. Select a serial number in the top list and click Set as Downtime Reason to use its reason for the downtime. The station’s downtime reason will be indicated by  in the serial number list.
3. Click Stop.
Pause
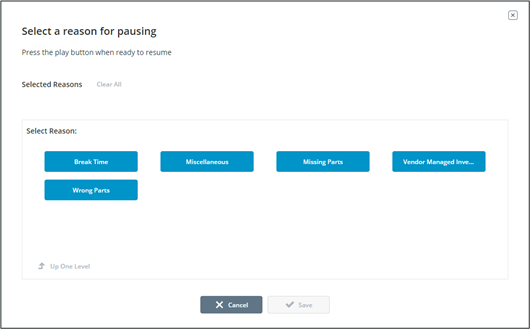
Click  on the active step to pause the work instruction for this serial number.
A reason must be provided in the Select a Reason for Pausing pop-up. These reasons must be preconfigured in the Reason Tree Configuration display.
When a work instruction is paused, an open downtime event is created with the selected reason.
Step Specific Content
The middle area of the execution pane will have content defined in authoring, based on the step type.
Steps configured as Auto step forward in authoring will complete automatically once the completion criteria are met. In these cases, you do not need to click Complete.
Click here for details on Step Specific Content
Step Bypass
Some steps may allow you to temporarily skip them. This is defined in authoring.
Click Bypass to bypass the step. You may need a supervisor to confirm by logging in.
Work instructions cannot be completed until all steps are complete. A prompt will display at the end of the instruction to revisit any bypassed steps.
Certification
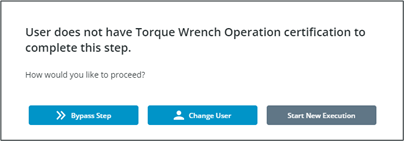
If the user does not have the required certification for a step, a pop-up will appear with possible actions:
• Bypass the step to temporarily skip it.
• Log out to allow another user to log in and complete the instruction.
• Stop execution and start a different work instruction.
Stop Reopening
You can reopen a step to apply corrections before finishing the work instruction.
Click Reopen Step to reopen the step.
If the reopened step is a calculation input, the user will see the Step Value Has Changed pop-up. Click Confirm to reopen the step and the calculation. Click Cancel to not reopen the step.
Work Instruction Completion
When all steps are completed, the system will progress to the next available serial number if auto advanced serial numbers are available. Otherwise, you will be returned to the Work Order/Serial Number Selection display to start the next serial number or select a new work order.
Raise Hand
At any time, you can click  in the application header to request assistance. This will launch the Raise Hand pop-up.
1. Select a Message Recipient from the dropdown.
2. Enter your message in the Message field.
3. Click Send.

Recipients must already be configured in the system, and the message notification functionality must be set up. ThingWorx users must have a configured email address and must be part of the Line Manager group. See CWC User Configuration for more information. |