Computer Vision
Azure Computer Vision provides developers with advanced algorithms that process images and return information. To analyze an image, you can either upload an image or specify an image URL. The processing algorithms can analyze the content of images in different ways, depending on various visual features. For example, Computer Vision can find all human faces in an image. For more information, see Azure Computer Vision.
Use the Computer Vision action to analyze an image, analyze an image by domain, describe an image, and detect and provide insights about visual features and characteristics of an image.
Ensure that your image meets the following requirements:
• JPEG, PNG, GIF, or BMP format.
• File size is less than 4 MB.
• Dimensions are between 50 x 50 pixels and 4200 x 4200 pixels.
• Size is no larger than 10 megapixels.
Complete the following steps to use the Computer Vision action in your workflow:
1. Drag the Computer Vision action under Azure to the canvas, place the pointer on the action, and then click  or double-click the action. The Computer Vision window opens.
or double-click the action. The Computer Vision window opens.2. Edit the Label, if needed. By default, the label name is the same as the action name.
3. To add an Azure connector type, refer to Supported Azure Connector Types.
If you previously added a connector type, select the appropriate Connector Type, and under Connector Name, select the connector.
4. Click TEST to validate the connector.
5. Click MAP CONNECTOR to execute the action using a connector that is different from the one that you are using to populate the input fields. In the Runtime Connector field, provide a valid Azure connector name. For more information about MAP CONNECTOR, see Using Map Connector.
If you selected Connector Type as None, the MAP CONNECTOR option is not available.
6. In the Resource Group list, select the appropriate resource group defined under your Azure subscription.
7. In the Computer Vision Account field, select the appropriate Computer Vision account.
8. In the Provide Image by list, select one of the following options, and do the following:
◦ Select URL and in the Image URL field, specify a publicly accessible image URL.
◦ Select Upload File and in the Image File Path field, map the output of a previous action to provide the path to an image.
9. In the Select Specific Service list, depending on the kind of image analysis that you want to perform, select one of the following Computer Vision services, and perform its respective task:
Service | Task |
|---|---|
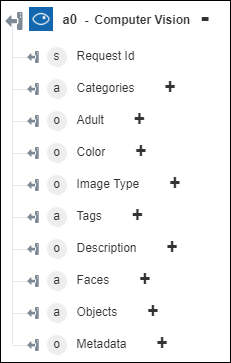
Analyze Image— Extracts a rich set of visual features from the image. | a. In the Visual Features list, select the features to use for image analysis: ◦ Categories—Categorizes image content according to the category taxonomy. ◦ Description—Describes the image content in a complete English sentence. ◦ Color—Determines whether the image is black and white or color, and for colored images, detects the dominant and accent colors. ◦ Tags—Tags the image with a detailed list of words related to the image content. ◦ Faces—Detects if faces are present in the image. ◦ Image Type—Detects if an image is a clip art or a line drawing. ◦ Adult—Detects if the image is pornographic in nature or if the image depicts sexually suggestive content. ◦ Objects—Detects various objects in the image. Click Add to add multiple visual features. Click  to delete any visual features that you added. to delete any visual features that you added.b. Under Details, click Add and then select one of the following domain-specific details that you want to include: ◦ Celebrities—Identifies celebrities detected in the image. ◦ Landmarks—Identifies notable landmarks in the image. Click Add to add multiple details. Click to delete details that you added. |
Analyze Image by Domain— Recognizes content from an image by applying a domain-specific model. | a. In the Model field, specify the domain-specific model that must be used to analyze the image. b. In the Language field, select the language in which you want to generate the output. By default, English is selected. |
Describe Image— Describes contents of the image in human-readable complete sentences. | a. In the Max Candidates field, enter the maximum number of candidate descriptions that the service must return. b. In the Language list, select the language in which you want to generate the output. By default, English is selected. |
Detect Objects— Performs object detection on the image. | No action required. |
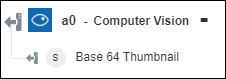
Generate Thumbnail— Generates a thumbnail image of the specified image. | a. In the Width field, specify the width of the thumbnail between 1 and 1024 pixels. It is recommended that you specify a value of at least 50. b. In the Height field, specify the height of the thumbnail between 1 and 1024 pixels. It is recommended that you specify a value of at least 50. c. In the Smart Cropping list, select true to enable smart cropping. Select false if you do not want to enable smart cropping. |
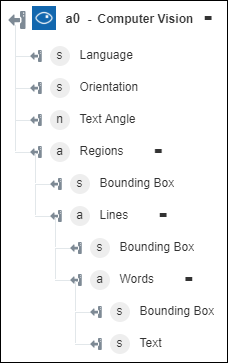
Extract printed text (OCR)— Detects text in an image and extracts the recognized characters into a machine-readable character stream. | a. In the Language list, select the language of the text in the image. By default, Unknown is selected. b. In the Detect Orientation list, select true to detect the text orientation in the image and correct it before further processing. Select false if you do not want the service to detect the text orientation in the image. |
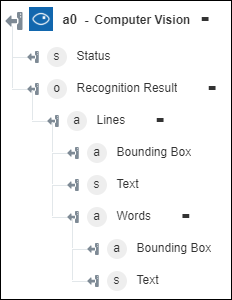
Extract Handwritten text— Extracts handwritten text from an image. | No action required. |
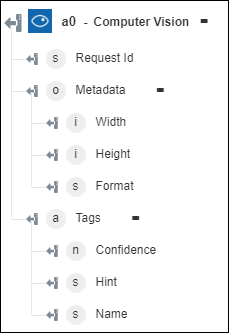
Tag Image— Generates a list of tags that are relevant to the content of the image. | In the Language list, select the language in which you want to generate the output. By default, English is selected. |
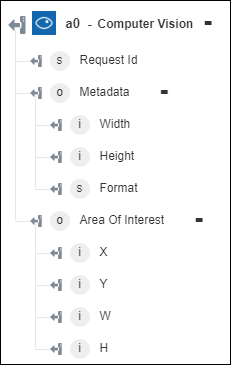
Get Area of Interest— Returns a bounding box around the most important area of the image. | No action required. |
10. Click Done.
Output schema
Each Computer Vision service has its own output schema.
◦ Analyze Image—Returns the selected visual features.
◦ Analyze Image by Domain—Returns the recognized content in the image.
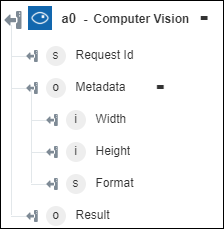
◦ Describe Image—Returns the description of the image.

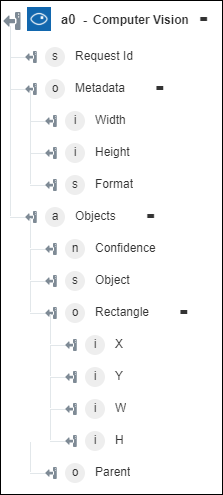
◦ Detect Objects—Returns the objects and their coordinates.
◦ Generate Thumbnail—Returns the thumbnail image.
◦ Extract printed text (OCR)—Returns the extracted text from the image.
◦ Extract Handwritten text—Returns the handwritten text from the image.
◦ Tag Image—Returns the detected tags for the image.
◦ Get Area of Interest—Returns the coordinates around the most important area of the image.