MSSQL Database Installation and Configuration
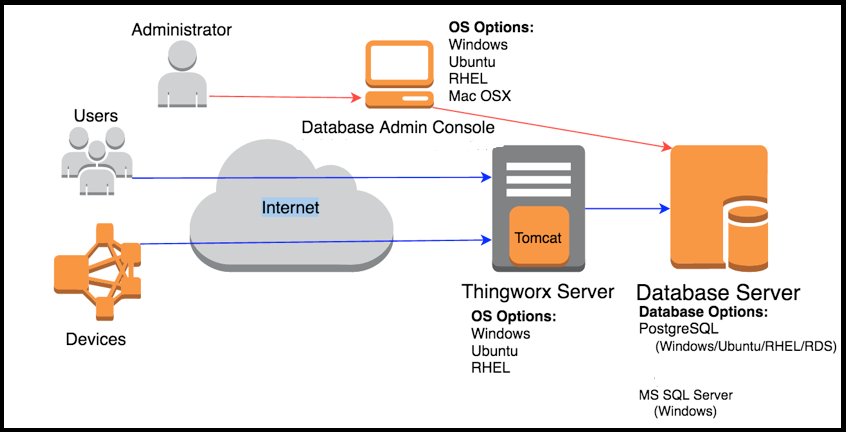
The architecture diagram below shows the options for ThingWorx Platform and database setup:
Installing MSSQL Server on the Database Server
The steps in the following procedure use MSSQL 2019. Other versions may be supported. Refer to the ThingWorx System Requirements document for the version of ThingWorx you are using. |
1. Obtain the licensed MSSQL Server installation from your software vendor for production deployments. Free editions for development and evaluation purposes can be found at the following locations:
◦ The free express edition of MSSQL Server 2014 can be found at http://www.microsoft.com/en-us/download/details.aspx?id=42299.
◦ The free SQLPro for MSSQL 2016 can be found at https://www.microsoft.com/en-us/p/sqlpro-for-mssql/9pd9fw7prdtv?activetab=pivot:overviewtab.
◦ MSSQL 2019 can be found at https://www.microsoft.com/en-us/sql-server/sql-server-downloads
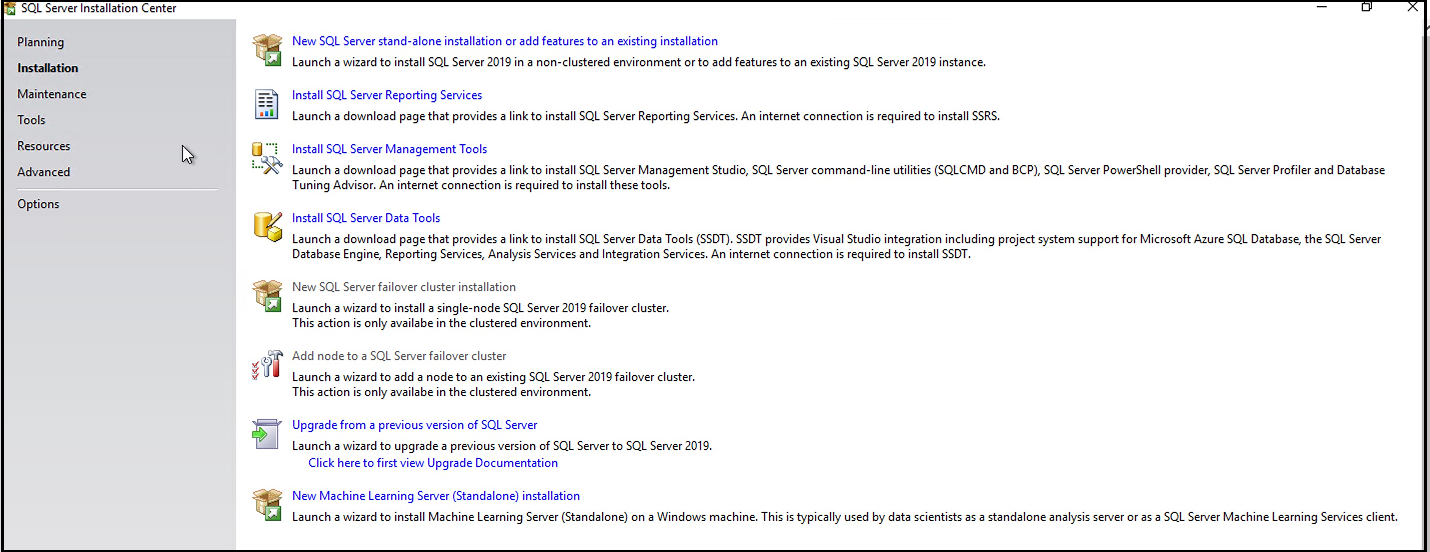
2. After obtaining the installation software, double click on the installable file. The SQL Server installation center window will open. Reference the SQL Server Failover Cluster Installation instructions at https://docs.microsoft.com/en-us/sql/sql-server/failover-clusters/install/sql-server-failover-cluster-installation?view=sql-server-2014&redirectedfrom=MSDN.
3. The following list of customizations are recommended while installing the MSSQL Server to be used with ThingWorx:
◦ Named instance – You can give any name for the instance or can keep it default. Make a note of it because this instance name will be used later to execute scripts on the database server.
◦ Mixed mode authentication – Mixed mode enables both Windows Authentication and SQL Server Authentication. Windows authentication is using the account with which you have logged into the machine. Windows authentication is more secure. If it does not work during DBSetup script execution due to any domain issue, you can use the Server Authentication account. Always use a very strong password for the Server Authentication account.
◦ Data directories – The best practice for choosing data directories is to keep data file directories, tempdb directories, log directories, and backup directories on separate physical hard disk drives, raided disk array, or a SAN.
◦ Connectivity – Enable TCP/IP Protocol in Sql Server Configuration Manager.
4. Select the Installation tab in the top-left corner of the SQL Server Installation Center.
5. Click New SQL Server stand-alone installation or add features to an existing installation.
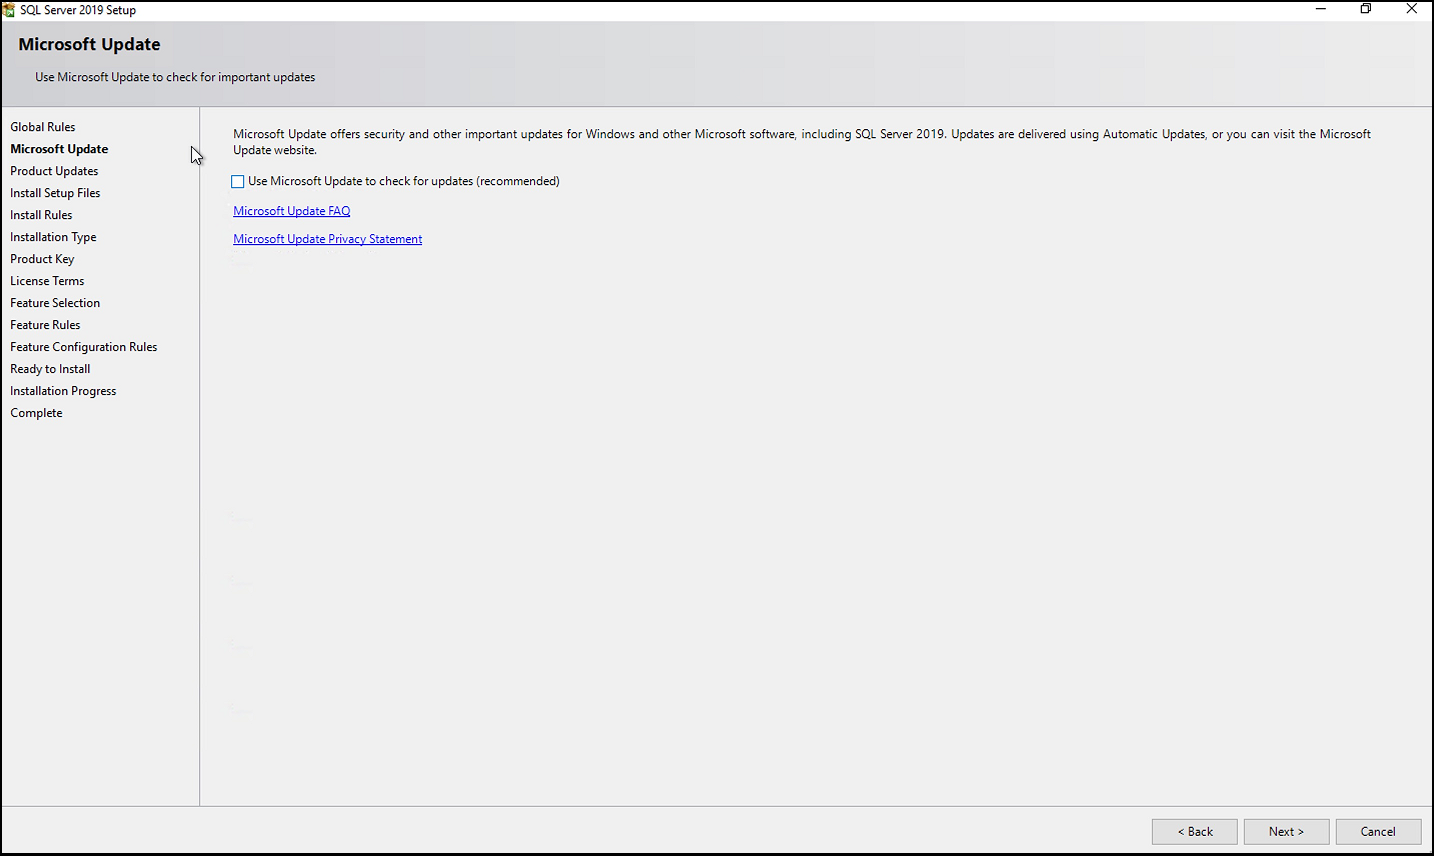
6. If necessary, click Use Microsoft Update to check for updates. Click Next to continue the setup.
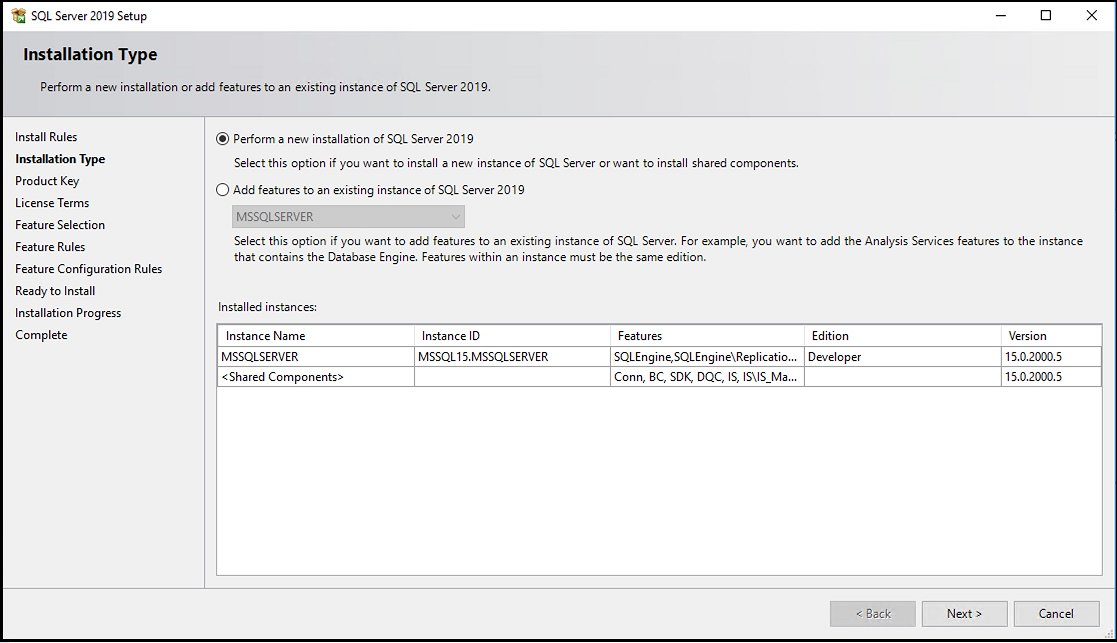
7. After SQL Server install updates run, the Installation Type screen appears. Click Perform a new installation of SQL Server 2019. Click Next.
8. Accept the license terms and click Next.

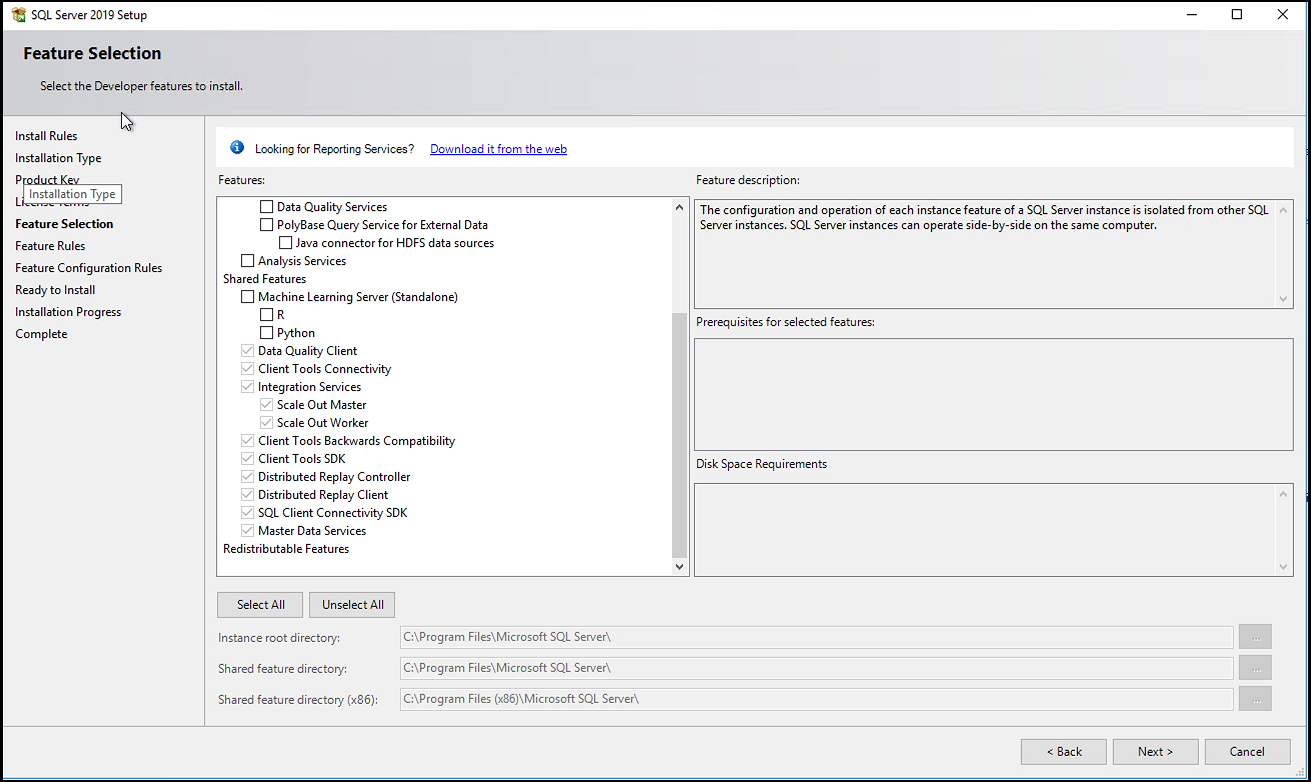
9. In the Feature Selection section, select the features according to your requirements or click Select All.
The features selected depend on your requirements. The image below is for example purposes only. |
10. If necessary, in the Instance root directory field, you can specify the path of the installation directory.
11. Click Next.
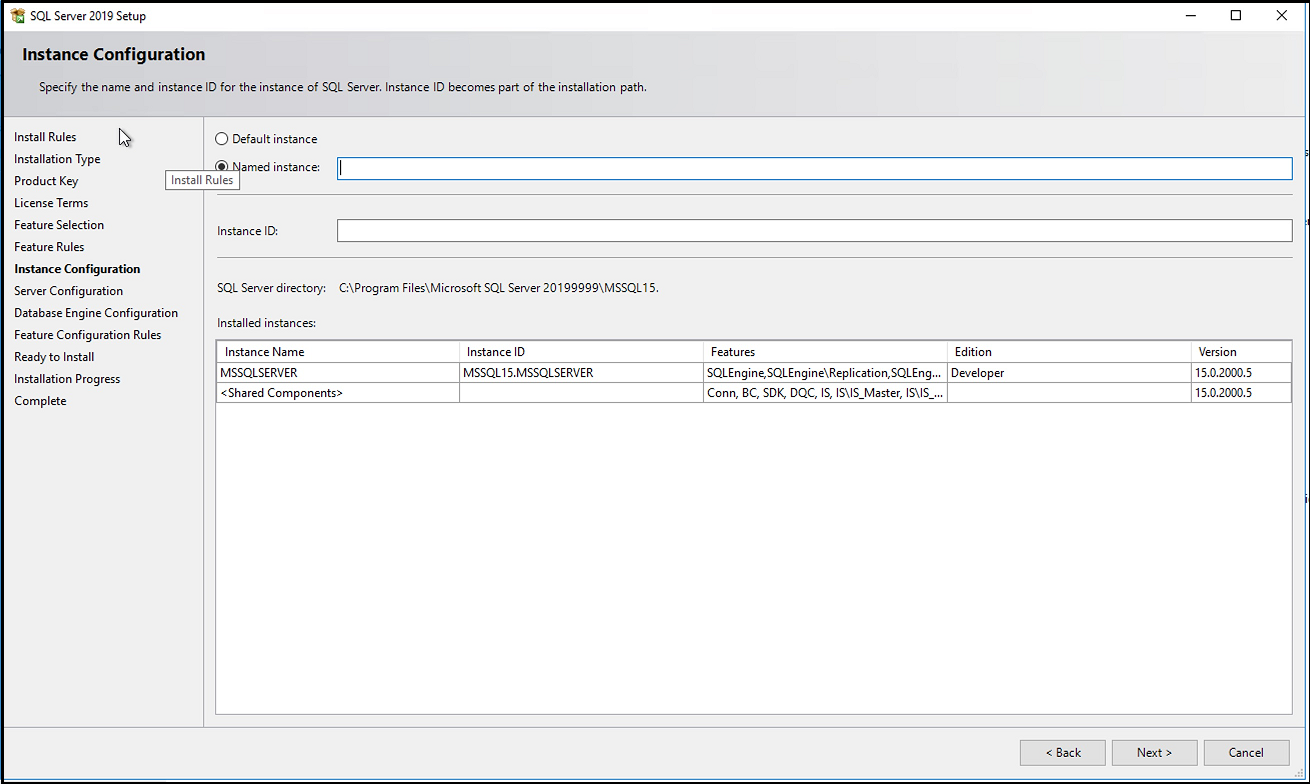
12. In the Instance Configuration section, specify the name of the SQL instance or retain the default. Click Next.
This SQL Instance name will be used later for running the batch scripts for database setup. Keep note of its name for later use. |
13. In the Database Engine Configuration section, click the Server Configuration tab.
14. Select Mixed Mode and provide a password for the “sa” account. If necessary, you can also add any other accounts (such as current Windows login account) in the SQL Server administrators group.
In the Data Directories tab, you can specify the directories and path for storing the data, log, temp, backup files according to your requirements and storage space availability if necessary. |
15. Click Next.

16. Installation starts. After completion, click Next.
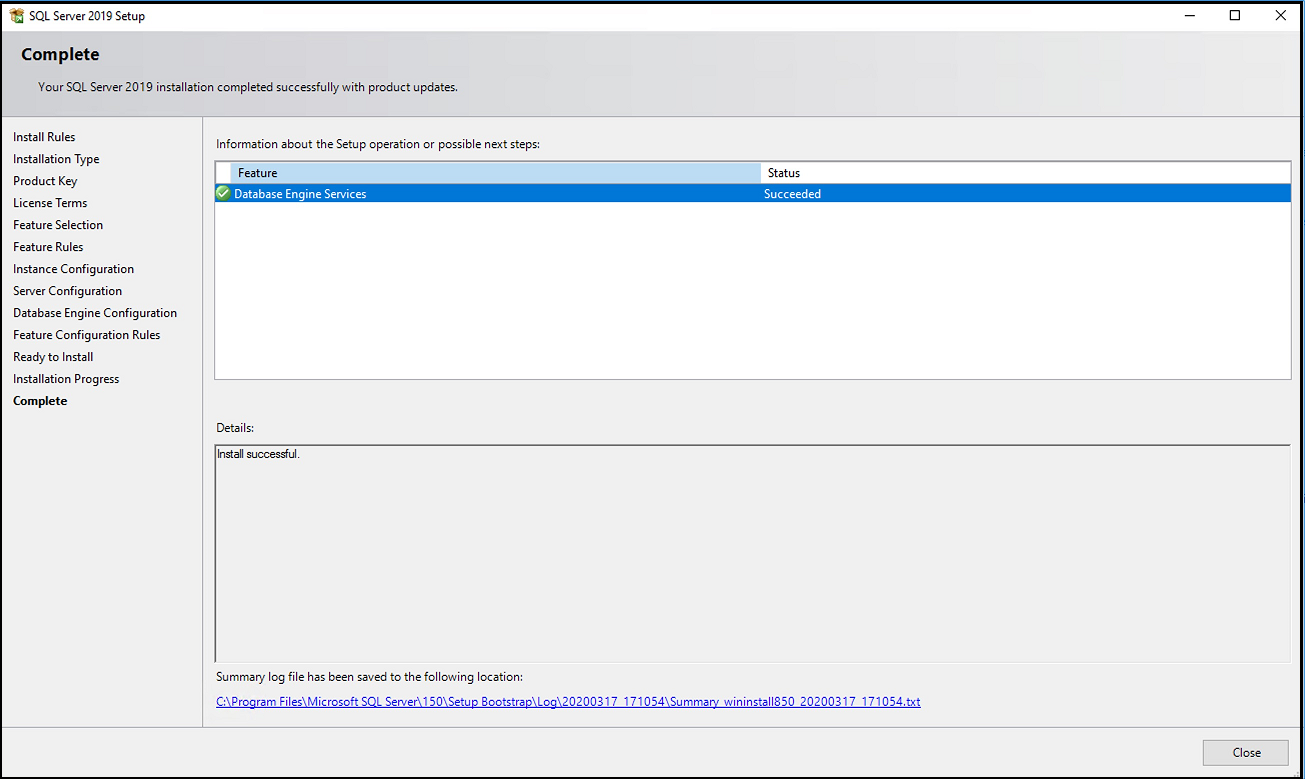
17. You can check the installation status of each feature in the Complete window. Click Close.
Installing SQL Server Management Studio (Database Admin Client) on Windows Machine
SQL Server Management Studio (SSMS) is an integrated environment for accessing, configuring, managing, administering, and developing all components of SQL Server. Installing SSMS is only required if the administrator does not have access to the database server machine or if you want to separate the client to connect to the database server. Skip this section if a separate client is not necessary. |
1. Select the Installation tab in the top-left corner of the SQL Server Installation Center.
2. Click New SQL Server stand-alone installation or add features to an existing installation.
3. Accept the license terms and click Next.
4. Select Management Tools – Basic and the sub item Management Tools - Complete.
The SQL Client Connectivity SDK will be installed by default, whether you checked it or not. |
5. Click Next.
6. The summary for all the installed features and status of installation for each one is shown. Click Close.
Connecting to the Client with the Database Server (Windows)
Skip this section if you have not installed SSMS. |
1. Open SSMS from the start menu.
2. Enter the following details:
◦ Server type: Database Engine
◦ Server name: FQDN or IP of the database server.
◦ Authentication: Any authentication mode (Windows authentication/SQL Server Authentication)
◦ Login: sa (in case of SQL Server Authentication)
◦ Password: Password of sa account
Configuring the MSSQL Server Port (Windows)
1. Open the Sql Server Configuration Manager.
2. Navigate to SQL Server Network Configuration > Protocols for <instance_name> > TCP/IP Properties > IP Addresses.
3. Set TCP Port to 1433 for all available IPs.
Port 1433 is the default. If a different port is used, use that for all available IPs. |
Installing the ODBC Driver for SQL Server (Linux)
This section is only required if the administrator does not have access to the database server machine or if there is a requirement to separate the client to connect to the database server. Skip this section if the ThingWorx database setup scripts need to be executed from a Linux machine. If the “Database Admin Console” is a Windows machine, as per the diagram above, then this section can be skipped. For more information, refer to the following for the installation of ODBC Driver for SQL Server on Linux:https://docs.microsoft.com/en-us/sql/connect/odbc/linux-mac/installing-the-microsoft-odbc-driver-for-sql-server?view=sql-server-2017. |
Connecting to the Database Server (Linux)
If you did not create a data source during the installation, you must create one. The SQL Server ODBC driver installation creates a sample data source named SQLSERVER_SAMPLE that you can use as a starting point.
1. As root, open /etc/odbc.ini in a text editor.
2. To locate the sample data source, search for [SQLSERVER_SAMPLE].
3. Change the following attribute values:
◦ Server: The host name (or IP address) of the machine where your SQL Server instance is running. To connect to a named instance, use the format machinename\instancename. To connect to a SQL Server Express instance, use the format machinename\SQLEXPRESS.
◦ Port: If the SQL Server instance is listening on the default port, leave this set to 1433. If your database administrator told you to specify a different port, replace 1433 with the new port number. Otherwise, delete 1433.
◦ Database: The name of database to connect.
◦ User: Your SQL Server login name. If you usually connect to SQL Server through your Windows account, use your Windows user name. If the SQL Server instance is running on a machine that is part of a Windows domain, use the format domain\username. Otherwise, type a valid SQL Server user name.
◦ Password: The password for the login name specified by User.
4. Use isql to test the new data source. In the example below, dsn_name is the name of your ODBC data source. If you created a data source during the SQL Server ODBC driver installation, specify that data source name. If you have just edited the sample SQL Server ODBC driver data source, type SQLSERVER_SAMPLE.
cd /usr/local/easysoft/unixODBC/bin
./isql -v dsn_name
./isql -v dsn_name
5. At the prompt, type a select statement or type help to display a list of tables. To exit, press RETURN in an empty prompt line.