TLS Support for ZooKeeper
TLS protection for communication with ZooKeeper is available starting with Analytics Server, release 9.1. TLS support for ZooKeeper protects its connections to both the Async Microservice and the Analytics Common Workers. TLS support is optional but is enabled by default.
If you plan to use TLS authentication for ZooKeeper, a signed TLS certificate must be in place before you deploy Analytics Server. Follow the links below to complete the necessary tasks:
• Generate a Self-signed Certificate – You can either follow the procedure below to generate a self-signed certificate or you can obtain a TLS certificate from any trusted Certificate Authority.
• Extract and Import the Certificate – Follow the steps to extract the certificate from its Keystore and import it into a Truststore.
Generate a Self-signed Certificate
1. Depending on your operating system, open a terminal window as the root user, or open the Windows PowerShell in Administrator mode.
2. Navigate to the JRE bin folder in your Java installation directory. The path to this installation can vary from one operating system version to another.
|
|
Linux Example: /opt/java/jdk1.8.0_161/jre/bin
Windows Example: C:\Program Files\Java\jdk1.8.0_161\jre\bin
|
3. Run the following command to create a certificate and a Keystore using the Java Keytool utility:
keytool -genkey -alias <zookeeper alias> -keyalg RSA -keystore <keystore name>.jks -keysize 2048 -ext san=dns:<localhost>,dns:<hostname>
|
|
Sample command:
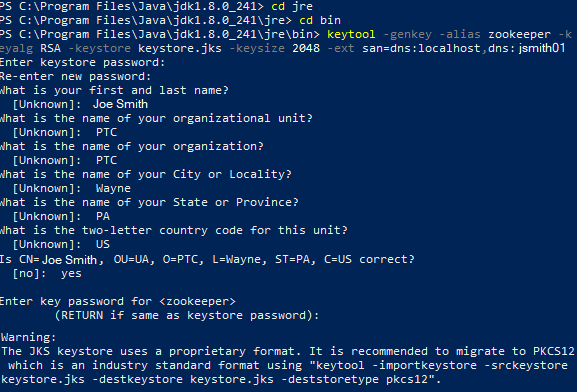
keytool -genkey -alias zookeeper -keyalg RSA -keystore keystore.jks -keysize 2048 -ext san=dns:localhost,dns:jsmith01
|
The system prompts you for answers to a series of questions.
4. The questions may vary depending on the version of your operating system, but provide the following important information:
◦ Enter a Keystore Password and re-enter it to confirm it.
◦ For the next questions, answer any name, organization, and location questions asked.
◦ Confirm that all of the entries are correct.
◦ To assign the same password to the Key that you entered for the Keystore, press the Return key.
When the command is executed, a Keystore file (JKS) is created. Inside the keystore, the self-signed certificate is generated. See the sample image below.
Figure 3. Sample:

Extract and Import the Certificate
1. Run the following command to export the certificate from the Keystore:
keytool -export -alias <zookeeper alias> -file <certificate name>.crt -keystore <keystore name>.jks
Sample command: keytool -export -alias zookeeper -file zookeeper.crt -keystore keystore.jks |
2. Run the following command to import the certificate to the Truststore:
keytool -import -trustcacerts -file <certificate name>.crt -alias <zookeeper alias> -keystore <keystore name>.jks
Sample command: keytool -import -trustcacerts -file zookeeper.crt -alias zookeeper-ca -keystore truststore.jks |
During Analytics Server Installation
During the Analytics Server installation, if you choose to install the Async Microservice, you will be asked if you want to enable TLS protection for your ZooKeeper connections. If you choose to enable TLS authentication for ZooKeeper, your signed certificate will be stored in a TLS Keystore. During the installation, you will be prompted to provide certain information from your authentication certificate. Be prepared to provide the following:
• Location of the Keystore file (JKS file)
• The password assigned to the Keystore
• Location of the Truststore file (JKS file)
• The password assigned to the Truststore
For more information about configuring ZooKeeper during Analytics Server installation, see one of the following procedures: